On July 18th, the geological survey ship Yashima entered Tokushima with orders to survey the outermost planet, Tokushima VI, which lay almost directly on a bearing for the primary and was two billion kilometres from the jump point. A week later she was joined by the gravitational survey ship Mishima which began surveying the locations near the Nagoya jump point. By August 20th Yashima had completed a survey of the gas giant, finding 370,000 tons of accessibility 1.0 Sorium, plus its twenty moons, three of which had minor mineral deposits. As there had been no sign of alien ships or further combat in Tokushima during the previous three months, she was ordered to proceed in-system to the fifth planet, a gas giant one point two billion kilometers from the star that had more than thirty moons. In addition, Fifteenth Swordsman Osagawa Teruko, the commander of Yashima, was authorised to attempt contact with the new alien race if Yashima encountered any of its ships. While this was a dangerous mission, venturing much closer to the site of the recent battle, the use of the twenty-year-old geological survey ship would not reveal any Rigellian capabilities to the new race and would not threaten them with a large force.
On September 8th Y230 contact was established with the new alien race, although in an unexpected location. The gravitational survey ship Kashima had recently entered Tokushima and was surveying around the edge of the system when she encountered a ship from the new alien race that was apparently on a similar mission. Kashima briefly engaged her active sensors to determine that the alien ship, designated as Adimarchus class, was 3900 tons. She followed the standing orders and hailed the alien ship. A hail was returned but the message was completely unintelligible. Work began immediately on translating the alien language. While it was gratifying that the aliens had not emulated the Mazoku and simply opened fire, there was concern amount senior Rigellian officers that the alien gravitational survey of Tokushima would soon locate the jump point to Nagoya. The question was whether to prevent that survey, allow the survey and prevent entry to Nagoya, or to allow access to the Empire. The latter course was the least aggressive and would improve the chances of a peaceful relationship but also ran the risk of leaving the Empire vulnerable should hostilities break out in the future.
By mid-September the Second Carrier Striking Force had returned to Rigel for an overhaul and was now ready to resume operations. A detached battlegroup of six ships from the First Striking Force, led by a Kongo class battlecruiser, was covering Takamatsu so the Second was available for a new mission. High Swordsman Takagi ordered Swordsman of Stars Terakado to investigate the five unexplored jump points in the Kobe system, which lay beyond the outermost of Osaka’s four jump points. The other three led to Rigel, Kawasaki and Kyoto. The jump points in the latter two systems had all been explored, which meant Kobe was the only system in the Osaka chain within two transits of Rigel that still had unexplored jump points. Kobe III was home to a small Rigellian colony so that would serve as a base for the Second Carrier Striking Force, allowing its crews to take shore leave, while detached squadrons explored the surrounding systems.
Meanwhile back in Tokushima, Yashima found Mazoku outposts on two adjacent moons orbiting Tokushima V. High Swordsman Takagi authorised the use of ground troops once the Third Carrier Striking Force was able to provide protection, which in effect would be the point at which the Tokushima – Nagoya jump gate was completed. Yashima continued her survey, moving on to the inner planets, and discovered a population of the new aliens on Tokushima III. The EM signature was only strength-55 but it was still surprising the aliens had established a colony so soon after their battle with the Mazoku. The planet itself was an excellent terraforming candidate with an atmosphere that was very close to breathable and a surface temperature of -38C. High Swordsman Takagi had been planning to send Rigellian colonists to the same planet in an attempt to lay claim to the system. That was still an option but now it was far more likely to provoke a reaction for the aliens. Another option was to establish a colony on another, less desirable world to at least dispute ownership of Tokushima.
On November 3rd the third Yamato class, Shinano, was launched from the Kazuyoshi Marine Shipyard. Three days later, High Swordsman Takagi ordered Swordsman of Stars Tanaka to take the Third Carrier Striking Force into Tokushima, perform a sweep of the inner system and cover subsequent salvage operations. The jump gate on the Tokushima side was only one week from completion so the Third would be able to leave the system once its mission was complete. Even with a speed of 7000 km/s the trip from the jump point to the inner system would take ten days. The Third Carrier Striking Force arrived in orbit of Tokushima I, a position that would allow the fleet’s Sakawa class destroyer to monitor the five inner planets, without seeing any sign of alien ships. Swordsman of Stars Tanaka gave the all-clear for the salvage ships and their accompanying freighters to enter Tokushima and begin work.
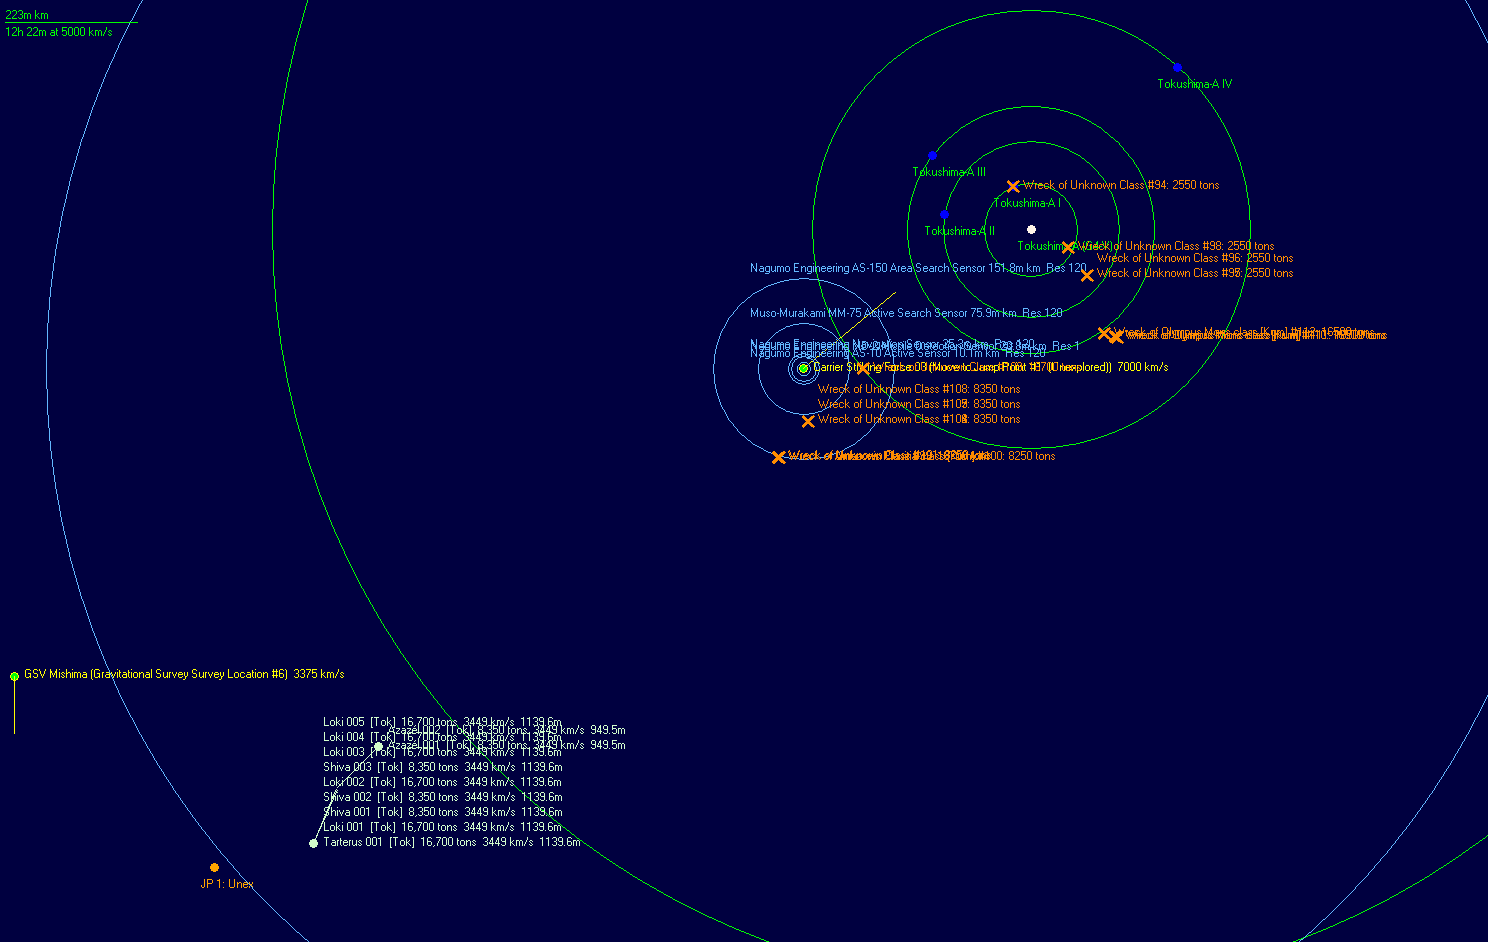
On November 17th, GSV Kashima detected a second Adimarchus carrying out a gravitational survey, once again in the outer ring of survey locations. A day later, her sister ship GSV Mishima detected a new jump point while surveying the inner ring of locations. The jump point was on the far side of the star from the Nagoya jump point. A line of alien wrecks stretching from the inner system was virtually pointing to the new jump point, which strongly suggested it was the alien point of entry. Tanaka decided to investigate. As the Third Carrier Striking Force moved toward the jump point, it detected a task group of eleven alien ships on a reciprocal heading that had apparently transited into Tokushima from the jump point. The alien force included five 16,700 ton Loki class ships, a single 16,700 ton Tarterus class, three 8350 tons Shiva class and two 8350 ton Azazel class. After a few minutes most of the alien fleet reversed direction and set a course for the outer system in the general direction of Kashima, which was still in contact with the alien survey ship. The two Azazel class destroyers continued moving toward the Third Carrier Striking Force. The alien ships appeared to have a maximum speed of 3449 km/s, which gave the Rigellian task group a huge speed advantage.
Meanwhile in Rigel, the Okumura Shipbuilding orbital shipyard launched Akishimo and Kiyoshimo, the first and only two units of a new destroyer class - the Kagero Mod 2. The Mod 2 had a hull of Laminate Composite Armour, two generations ahead of the Composite Armour used for the hulls of the original Kagero and the Mod 1. Because the new armour provided the same protection with lower mass, there was more internal capacity within the hull, allowing for the addition of a close-in weapons system. The Kagero series was very vulnerable to missile attack so the new CIWS would provide limited protection against smaller salvos. In addition the engineering deck and crew accommodation were both expanded to allow for longer missions, which would make the Kagero Mod 2 ideal for guarding jump points. The existing Kagero Mod 1 destroyers would not be upgraded to the Mod 2 due to the cost of replacing the outer hull with laminate composite. A new Mod 3 design was planned to take advantage of advances in laser technology.
Kagero Mod 2 class Destroyer    9,000 tons     281 Crew     2034.7 BP      TCS 180  TH 1260  EM 0
7000 km/s     Armour 5-38     Shields 0-0     Sensors 1/11/0/0     Damage Control Rating 7     PPV 44
Maint Life 4.02 Years     MSP 989    AFR 92%    IFR 1.3%    1YR 98    5YR 1472    Max Repair 210 MSP
Intended Deployment Time: 36 months    Flight Crew Berths 0
Hangar Deck Capacity 125 tons

Sakurai Drive Systems SDS-420 Fusion Drive (3)    Power 420    Fuel Use 45.19%    Signature 420    Exp 10%
Fuel Capacity 500,000 Litres    Range 22.1 billion km   (36 days at full power)

20cm C4 Ultraviolet Laser (6)    Range 256,000km     TS: 7000 km/s     Power 10-4     RM 4    ROF 15
25cm C4 Ultraviolet Spinal Laser (1)    Range 256,000km     TS: 7000 km/s     Power 16-4     RM 4    ROF 20
CIWS-250 (1x8)    Range 1000 km     TS: 25000 km/s     ROF 5       Base 50% To Hit
Katsumata Design Bureau KDB-128-7B Beam Fire Control (2)    Max Range: 256,000 km   TS: 7812 km/s
Tokamak Fusion Reactor (3)     Total Power Output 24    Armour 0    Exp 5%
Small Tokamak Fusion Reactor (1)     Total Power Output 4    Armour 0    Exp 5%

Muso-Murakami MM-75 Active Search Sensor (1)     GPS 7560     Range 75.9m km    Resolution 120
Muso-Murakami EM-11 Passive Sensor (1)     Sensitivity 11     Detect Sig Strength 1000:  11m km
As communication efforts with the alien race in Tokushima had so far failed to achieve any meaningful result, High Swordsman Takagi instructed Swordsman of Stars Tanaka to determine what lay beyond the system’s other jump point. Tanaka ordered a course around the two Azazel class destroyers, giving the alien ships a wide berth despite their efforts to intercept. The larger group of alien ships, comprising six cruisers and three destroyers, reversed course once again, trying to interpose between the Rigellian force and the jump point. Tanaka ordered a series of course changes, moving beyond the jump point in a wide arc before finally racing between the two alien task groups and reaching the jump point with the nearest alien ships more than eighty million kilometres away.
The destroyer leader Isuzu transited the jump point and emerged two point five billion kilometres from a yellow-white F7-V main sequence star, designated as Omuta, which had eight planets, five of which were terrestrial-sized. Remarkably, four of the terrestrial worlds had breathable nitrogen-oxygen atmospheres. Omuta II had gravity of 1.12G and a temperature of 64C, giving it a colony cost of 1.18. Omuta III was an ideal habitable world with gravity of 1.4G and a surface temperature of 23C. Omuta IV had a gravity of 1.74G, which was above the upper tolerance level for Rigellians, and a surface temperature of 5C while Omuta V had the lowest gravity and temperature at 0.92G and -20C respectively. Isuzu detected an EM signature on the ideal habitable world that was almost twice the strength of the signature from Rigel Prime, indicating a very large population. If, as seemed likely, Omuta III was the alien home world then their gravitational tolerance would be higher than the Rigellians, making Omuta IV habitable and giving them four habitable or near-habitable, worlds in the same system. If they exploited all four then their industrial potential would be considerable. Isuzu returned to Tokushima to rejoin the Third Carrier Striking Force, which immediately left the jump point and headed for the inner systems. The priority for Swordsman of Stars Tanaka was to provide cover for the forthcoming Rigellian salvage operation that would provide the Empire with invaluable information about the aliens technology.
On November 25th the Third Carrier Striking Force arrived at Tokushima I. The two Azazel class destroyers continued to pursue but the other ships moved back toward the Omuta jump point. Swordsman of Stars Tanaka viewed their withdrawal with some optimism. Despite the brief Rigellian visit to the alien home system, hostilities seemed unlikely if the main alien force was departing the area leaving only a couple of destroyers to monitor the Rigellians. Tanaka took his fleet to the area of the three Mazoku cruiser wrecks as they would be the first salvage targets. The Azazels followed and took up a position very close to the Rigellians. Tanaka decided not to take action against their presence as they posed only a minor threat to the Third Carrier Striking Force,
Two days later, the Azazel class destroyers suddenly opened fire from point blank range with some form of energy weapon. Noshiro, a Sakawa class scout destroyer, was struck by seven strength-16 impacts. The damage penetrated her armour, causing a strength-80 secondary power explosion that tore Noshiro apart. The sensor range of the Third Carrier Striking Force was suddenly cut from one and a quarter billion kilometers to just one hundred and fifty million. With one strike, the aliens had taken out the eyes of the fleet. Within five seconds of the attack all three Kongo class battlecruisers, all three Kagero class destroyers and the Nagara class destroyer leader Isuzu had opened fire. The two alien destroyers were struck by twenty strength-10 hits from 20cm lasers and four strength-16 impacts from spinal 25cm lasers. A few seconds later thirty-six Meteor II missiles arrived from the battlecruisers and obliterated both Azazels. Fortunately the experienced Rigellian crews had reacted very quickly to the alien treachery. However, the loss of Noshiro severely limited the flexibility of the Third Carrier Striking Force. In particular, the strikefighters on Hiryu were far less effective without the ability to strike targets at long range. Instead of monitoring the whole of the inner system, the task group could only react to threats within a hundred and fifty million kilometres. Despite this, Swordsman of Star Tanaka was determined to fulfil his mission and called for reinforcements, including another Sakawa.
Five Sakawas remained in service. Two were at Rigel Prime, one of which was undergoing overhaul, another was in orbit of Rigel-A II, covering the heart of the Rigel system. The fourth was with the Second Carrier Striking Force, operating in the systems around Kobe, and the fifth was part of the battlegroup covering Takamatsu. DSC Yubari was dispatched from Rigel Prime, along with the battleship Musashi, the battlecruiser Nagato and the Kagero Mod 1 Akatsuki. In Tokushima, Tanaka instructed the survey ships and inbound salvagers to continue as previously planned. Kyumei Boto lifeboats picked up the surviving crew of Noshiro and the survivors of the two alien destroyers. The aliens, seen for the first time by the Rigellian Empire, were hideous creatures - a combination of starfish and giant, bloated hairy spider – that triggered an instinctive revulsion among the Rigellians. Enough progress had been made in translation for interrogations to provide the name of their Empire, which translated roughly as the Arachnid Omnivoracity, but the prisoners offered little information beyond that.
On December 5th two Arachnid Hades class destroyers, a new type, were detected at the edge of the Third Carrier Striking Force’s reduced sensor range. A salvo of fifty-six Meteor IIs was launched from Yamato, Ise, Kotetsu and Tosa. Fifty minutes later both Hades were blown apart by a total of forty-one missile hits and a large secondary magazine explosion. A lifeboat was dispatched to pick up the survivors. Less than two minutes later, sensor emissions were detected from two Arachnid ships at a distance of three hundred million kilometres, well outside the Third’s active sensor range. One was a known Tarterus class while the second was the first of a new type, designated as Baalzebul class. As they moved within two hundred and twenty million kilometers the Arachnid ships moved onto slightly divergent courses, with the Baalzebul on a direct heading for the Third with the Tarterus set a course that would take it past the Rigellian task group at a range of perhaps fifty million kilometers. For the moment the Third Carrier Striking Force held position near the cruiser-sized Mazoku wrecks. Tanaka wished to determine the range of Arachnid missiles before considering abandoning his position. The first pair of salvage ships were en route to that position and were only three hundred million kilometers away in the direction of the Nagoya jump point. A third salvager was three hundred and fifty million kilometers behind the first two.
The Baalzebul halted at a distance of just over two hundred million kilometers, possibly to launch missiles. Swordsman of Stars Tanaka orders the Third Carrier Striking Force to close to within active sensor range of both enemy ships and launch a missile attack. As soon as the Third got underway, the Baalzebul began moving away at its best speed while the Tarterus continued on its existing course, taking it to the side of the approaching Rigellian fleet. Once the Tarterus was within one hundred and fifty million kilometers, it was confirmed as a single target. Tanaka decided to let it fall further within active sensor range before ordering a missile attack as he was concerned a course reversal by the Tarterus might allow it to escape the engagement range of the Meteor II. Twenty minutes after the Tarterus was picked up on active sensors, a wave of forty-two size-4 missiles travelling at 16,200 km/s was detected on a heading that suggested they were launched by the Baalzebul, still outside sensor range at one hundred and eighty-three million kilometers. Such a large salvo meant the Baalzebul was either very large indeed or multiple ships were launching. The latter seemed more likely. Three Matsukaze Mod 1 class destroyer escorts immediately began launching at the inbounds, targeting two Nova III AMMs on each Arachnid missile.
A second wave of forty-two missiles appeared 325,000 behind the first and was soon followed by a third. Swordsman of Stars Tanaka ordered a course reversal to increase engagement time. When the fourth wave appeared, he instructed the commanders of the Matsukazes to begin firing only one AMM at each inbound. With a total of only sixteen hundred and sixty-five anti-missiles in the magazines of the three destroyer escorts, Tanaka was concerned that defending against the volume of Arachnid anti-ship missile fire could quickly run through his available defensive ordnance. His caution was justified. Fifteen waves of missiles attacked the Third Striking Force, totalling sixty hundred and thirty ASMs. Even though the Matsukazes prevented any hostile missiles reaching the task group, they expended two-thirds of their own missiles even when only firing one vs one. The Third did not have the ordnance to withstand another similar attack so Swordsman of Stars Tanaka was determined to run down the Arachnid warships before they could escape through the Omuta jump point and reload.
The three Kongo class battlecruisers launched against the Tarterus when the range fell to one hundred and thirty-eight million kilometres. Four missiles were shot down. The other thirty-two Meteor IIs all struck their target, leaving the Tarterus dead in space. The apparent helplessness of the stricken vessel suggested it could be captured by a boarding attempt, that is if the Imperial Rigellian Navy possessed that capability. Tanaka passed on that observation to High Swordsman Takagi. For the moment Tanaka decided to ignore the crippled cruiser as it could be finished later by energy fire. His next target was the Baalzebul and whatever ships accompanied it. Within ten minutes of the attack against the Tarterus, a new threat appeared at the edge of sensor range. Five 16,700 ton Loki class cruisers and three 8350 ton Shiva class destroyers, all of which had been previously detected, were closing on the Third Carrier Striking Force. The active emissions from the Baalzebul were thirty million kilometers further out.
Swordsman of Stars Tanaka gave the order to open fire when the new Arachnid task group reached one hundred and thirty-three million kilometers. The battlecruisers Ise, Kotetsu and Tosa combined their fire against the Loki class cruisers, firing three salvos of thirty-six missiles at three different cruisers. The Yamato fired at the same time, targeting three salvos of twenty missiles at the Shiva class destroyers. After those first three salvos, Tanaka ordered a cessation of fire to judge the results even though two Loki class cruisers had not yet been targeted. 800,000 kilometers from the Arachnid force, twenty-eight strength-1 detonations were detected and a similar number of Rigellian missiles disappeared from tactical screens. The Arachnids had AMM-armed escorts in their task group. Seventeen more Meteor IIs were destroyed but eleven reached their targets, scoring seven hits on Shiva 001, two of which resulted in atmospheric streaming, and four hits on Loki 001. The second salvo fared slightly better with fifteen hits, nine of which were on Shiva 002 and six on Loki 002. Both ships suffered internal damage. The damage inflicted by the first two Rigellian missile waves obviously affected the defences of the Arachnid fleet as both damaged Shivas were lagging behind the main body at 1723 km/s. Only nine missiles were lost from the third wave, leaving forty-seven more to completely obliterate Loki 003 and Shiva 003.
Tanaka ordered two new salvos. The battlecruisers targeted an undamaged Loki with each salvo while the Yamato split her first salvo between the two remaining Shivas and sent her second against the lightly damaged Loki 001. While the missiles were midway to their target the Third Carrier Striking Force closed to within one hundred and fifty million kilometres of the Baalzebul and found there were in fact three Baalzebuls, presumably the source of the missile salvos. The missile waves had arrived in three salvos of fourteen missiles. There were five Lokis so they were unlikely to be the source and the Shivas were not large enough to launch fourteen missiles each. The new Rigellian missile waves arrived. Wave four destroyed Loki 004 but the missiles heading for the Shivas were struck by AMMs. Eleven reached their targets, enough to kill one Shiva and further damage the other. The fifth salvo also suffered losses to AMMs with only twenty-six missiles reaching their target. Loki 005 suffered seventeen hits from the battlecruisers while Loki 001 took nine hits from Yamato.
The battered Arachnid task group had been reduced to a single damaged Shiva, one lightly damaged Loki and two badly damaged Lokis. It still continued to fire AMMs though, refusing to go down quietly. After two further fifty-six missile salvos plus a third salvo of twenty-two missiles, only Loki 005 remained and she was barely moving. The treacherous Arachnids had suffered heavy losses but the Rigellians were burning through missiles very quickly. The battlecruisers had only ninety-six missiles between them while Yamato had a further one hundred and twenty. Hiryu and her fighters had not yet been involved in the battle so they still had full magazines. The Aratama Maru class ammunition transport Nachisan Maru was attached to the Third Carrier Striking Force and was carrying 300 older Meteor I anti-ship missiles. She unloaded those to the battlecruisers then headed for the jump point. Her sister ship Senko Maru left Rigel with a hundred Meteor IIs and a thousand Nova IIIs.
The battlecruiser Tosa fired a salvo of the older ASMs at Loki 005 and finally destroyed the last ship in the Arachnoid force. Now all that remained were the three Baalzebuls and the crippled Tarterus. Tanaka considered detaching a Kagero to pick off the Tarterus with energy fire but decided against it as he had no idea of the alien ship’s armament or whether it remained partially functional. Instead, one of the BCs launched a half salvo of Meteor Is and destroyed it. However, Tanaka did suspect the Baalzebuls were missile ships that were probably out of ordnance so he decided to use his fleet’s superior speed to run them down and destroy them with laser fire. While this course of action meant pulling the Third Carrier Striking Force out of the inner system and leaving the salvage ships unprotected, Swordsman of Stars Tanaka believed the only threat was the one in front of him. Tanaka was much more inclined to follow his instincts and take risks than Swordsman of Stars Terakado, senior officer of the Second Carrier Striking Force, who was more deliberate and cautious. On this occasion Tanaka was proven correct. The Third Carrier Striking Force ran down the three Arachnid cruisers and opened fire at 250,000 kilometers, continuing to close as laser fire began to strike the Baalzebuls. One by one the enemy cruisers were smashed to pieces without any sign of return fire and no further ordnance expenditure by the Rigellians. Noshiro had been well and truly avenged by the destruction of nine Arachnid cruisers and seven destroyers. Although tempted to carry out a raid into the enemy home system, Tanaka knew his fleet was low on both fuel and ammunition. The Third Carrier Striking Force headed back to the inner system, recovering life pods en route.
Interrogation of the Arachnid prisoners provided information on one of the Arachnid ship classes, the Malar class Jump Destroyer, giving some indication of their level of technology. Their drive technology was Magneto-plasma, one generation behind the latest Rigellian designs, yet the top speed was actually lower than ion-engined Rigellian designs, indicating an Arachnid design philosophy oriented toward additional internal space, presumably for weapons, at the expense of speed. The fire control and active sensor however were very long ranged compared to those on equivalent sized Rigellian designs, suggesting that Arachnid active sensor technology may be ahead of the Rigellians. The Arachnid anti-ship missile had a range to match the fire controls yet managed to squeeze a strength-12 warhead into a size-4 missile. Once again though this was at the expense of speed, which was low compared to the latest Rigellian missiles. Finally, the Malar had similar range to comparable Rigellian designs but a lower endurance in terms of maintenance and crew accommodation.
Arachnid Malar class Jump Destroyer    8,350 tons     205 Crew     1487.6 BP      TCS 167  TH 576  EM 0
3449 km/s    JR 3-100     Armour 5-36     Shields 0-0     Sensors 8/8/0/0     Damage Control Rating 2     PPV 28
Maint Life 1.29 Years     MSP 223    AFR 278%    IFR 3.9%    1YR 141    5YR 2110    Max Repair 288 MSP
Intended Deployment Time: 6 months    Spare Berths 1
Magazine 420

J8400(3-100) Military Jump Drive     Max Ship Size 8400 tons    Distance 100k km     Squadron Size 3
144 EP Magneto-plasma Drive (4)    Power 144    Fuel Use 63.7%    Signature 144    Exp 10%
Fuel Capacity 650,000 Litres    Range 22.0 billion km   (73 days at full power)

CIWS-200 (1x6)    Range 1000 km     TS: 20000 km/s     ROF 5       Base 50% To Hit
Size 4 Missile Launcher (7)    Missile Size 4    Rate of Fire 25
Missile Fire Control FC223-R94 (1)     Range 223.4m km    Resolution 94
Guildenstern Anti-ship Missile (105)  Speed: 16,200 km/s   Range: 268m km   WH: 12    Size: 4    TH: 54/32/16

Active Search Sensor MR223-R94 (1)     GPS 27072     Range 223.4m km    Resolution 94
Thermal Sensor TH1-8 (1)     Sensitivity 8     Detect Sig Strength 1000:  8m km
EM Detection Sensor EM1-8 (1)     Sensitivity 8     Detect Sig Strength 1000:  8m km
On December 30th welcome reinforcements arrived at Third Carrier Striking Force, including the battleship Musashi, the battlecruiser Nagato, the destroyer Akatsuki and the destroyer scout Yubari. Not far behind was the ammunition transport Senko Maru, which almost refilled the magazines of the Matsukazes and added 100 Meteor IIs to the magazines of the Yamato. The temporary vulnerability of the Third Carrier Striking Force had ended. It now possessed two battleships and four battlecruisers, its anti-missile defences were close to maximum strength and its sensor range was once again one and a quarter billion kilometres. Even so, an assault on Omuta was still some time away. Given it was seventeen billion kilometres from Rigel to the Tokushima – Omuta jump point, a forward base in Tokushima would be required, plus a stockpile of fuel and ordnance, before such an assault could begin. In the meantime though the Third took advantage of its restored sensor range by moving to within active sensor range of the Omuta jump point while still providing a sensor umbrella for the salvage operations.
The Second Carrier Striking Force completed its exploration of the new systems around Kobe in early January Y231. Five jump points were probed, leading to the following systems:
1) Shimonoseki. A yellow white F6-V primary orbited by six planets and over three hundred asteroids. Planet IV was colony cost 1.38 with a breathable atmosphere and a temperature of -37C. High Swordsman Takagi authorised the creation of a small settlement on the planet as soon as was practicable.
2) Kurashiki: A quaternary system in theory but for all intents and purposes a single star system as only the primary star was accessible. In any event, the other stars had only three planets between them. The primary had seven planets including a colony cost two world with a temperature of -6C and thin 0.06 atm atmosphere of nitrogen and oxygen
3) Okayama: A trinary system with an orange K5-V primary and two brown dwarves. Nine planets in total, none of which were of particular interest.
4) Matsue: A yellow G2-V primary with nine planets. Matsue-IV had a nitrogen-CO2-oxygen atmosphere of 0.69 atm with 0.03 atm of oxygen and surface temperature of -58C, giving it a colony cost of 2.34.
5) Himeji: A G9-IV sub-giant primary with ten planets, one of which had an atmosphere that was close to breathable but a surface temperature of 108C and therefore a colony cost of 3.17.
By the end of January all four carriers, Akagi, Kaga, Soryu and Hiryu, had full strikegroups of A6M3 Reisen strikefighters, totalling one hundred and forty-four A6M3 in all. Forty A6M2s were in service, split between the Himeji class planetary defence centres on Kumamoto II and the twelfth moon of Nagoya VII. One hundred A6Ms remained in service. Twenty formed the strikegroup of the Himeji PDC on Osaka IV while the rest were in storage on Rigel in a pair of specially designed Atsugi class PDCs.
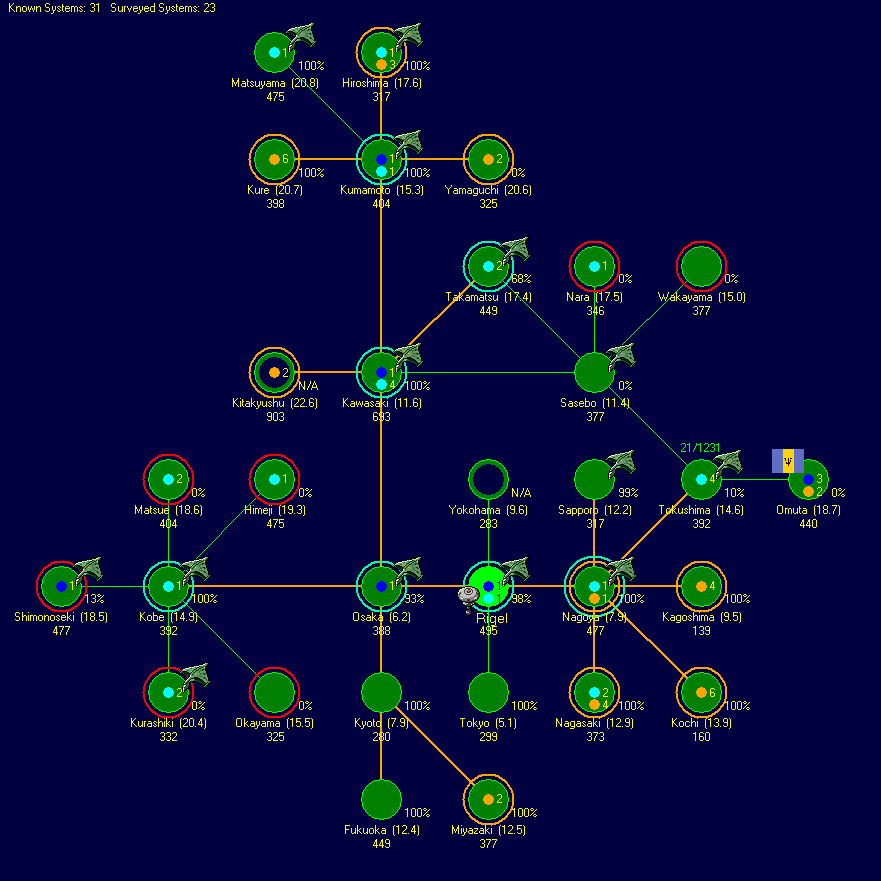
The survey of Tokushima was completed in early February. No jump points were found beyond those connecting to Nagoya and Omuta. Meanwhile, the Second Carrier Striking Force was exploring the jump points of Sasebo, a system adjacent to Kawasaki. Two of the four unexplored jump points led to the unremarkable systems of Wakayama and Nara. The other jump points both connected to known systems. Jump point two led to Takamatsu, once a Mazoku system but now home to a small Rigellian colony. Both Sasebo and Takamatsu were adjacent to Kawasaki, forming a triangle of systems. Jump point five made the strategic situation considerably more complicated as it led to Tokushima, revealing a dormant jump point in that system. The Second and Third Carrier Striking Forces were suddenly in adjacent systems instead of five transits apart. The new connection linked the Nagoya and Osaka chains and reinforced the need to maintain control of the Tokushima system, as it was not only two transits from Rigel but now also two transits from Kawasaki and only three from the vital Kumamoto and Osaka systems.
On March 28th simultaneous assaults by the Take-Ryodan
(PN: Warrior Brigade) and Ken-Ryodan
(PN: Sword Brigade) assault brigades captured the Mazoku outposts on the 20th and 21st moons of Tokushima V. A total of three deep space tracking stations were secured. A few days later, salvage operations in the system were completed. All the salvage ships and freighters withdrew to deliver minerals, information and intact ship components to Rigel Prime. The next task was to capture the small Arachnid population on Tokushima III and establish a Rigellian fleet base at the planet to support operations against Omuta.
An anomaly in the steady expansion of Rigellian space was an unexplored jump point in Nagoya. The system’s other five jump points had been probed over a decade earlier but one jump point had remained unexplored when a moratorium on expansion had been announced by Emperor Jimmu. Given the situation in Tokushima, any threat to Nagoya had to be identified. With the Striking Forces otherwise occupied, the gravitational survey vessel Mishima was given the task of investigating. She entered the jump point on April 12th and found herself in a dense nebula system, which was designated as Toyohashi. The system primary was a K2-V protostar with two terrestrial planets, each of which had two moons. Surprisingly, given the age of the star, the second planet was an ideal habitable world, with a surface temperature perfect for Rigellians. The gravity was high at 1.62G, but still within tolerance, and the atmosphere was very dense at 2.62 atm. Fortunately the low percentage of oxygen meant it was still well within the safe range for Rigellian physiology.
Due to the high dust density in the nebula, ships had to proceed slowly to avoid damage. This was especially true for ships with minimal armour such as Mishima. Her maximum safe speed in Toyohashi would be just 125 km/s, which meant it would take nine months to cover the three billion kilometers from the jump point to the two planets. Rigellian scientists believed that worlds in such a nebula system would be rich in minerals. However, before sending in an unarmed geological survey ship, the planets had to be checked. The Kagero Mod 1 destroyer Inazuma was dispatched from Rigel to investigate. Her armour meant she would be able to maintain a speed of 625 km/s, making the trip much more quickly than Mishima. An energy-armed warship was necessary because missiles would not function in a nebula.
Ground action moved to Tokushima III as Take-Ryodan and Ken-Ryodan were landed by a troop transport and immediately moved to assault the Arachnid colony on the planet. At least three defending Arachnid ground units were identified and they put up stiff resistance, inflicting casualties on the leading Rigellian units. Meanwhile in Kumamoto, after almost three years of work, the xenology team on Kumamoto II had finally completed its survey of the partially intact alien city, deciphering the alien language and identified more than eight hundred installations for possible recovery. The alien civilization was identified as the Kingdom of Viroconium. A few weeks earlier, Rigellian terraformers had added sufficient anti-greenhouse gas to the atmosphere of Kumamoto II to bring the temperature within Rigellian tolerance, making it an ideal habitable world. Since then, the terraformers had moved on to Kumamoto IV.
By the end of May, six weeks after combat operations had begun, the last Arachnid ground unit was destroyed on Tokushima III. The two Rigellian assault brigades captured a colony with no inhabitants, although there was sufficient infrastructure in place to support perhaps half a million colonists. Rigellian freighters and colony ships were waiting in orbit with additional infrastructure and 300,000 settlers. Tokushima III became the Empire’s latest colony. Two other freighters had collected the three deep space tracking stations captured on the moons of Tokushima V so those too became part of the new colony. The three Zosensho class maintenance vessels that had until recently been in orbit of Nagoya I were en route to Tokushima III as part of the plan to make the planet a fleet base. Two more Zosenshos, recently built at Rigel, were being towed to Tokushima by the two Ojima class tugs. Once all five were in place and sufficient minerals were available, Tokushima III would be able to maintain and overhaul vessels of up to 15,000 tons, which would include all ships of the Third Carrier Striking Force with the exception of Yamato, Musashi and Hiryu.
The destroyer Inazuma was two thirds of the way to the habitable planet in the Toyohashi nebula when she encountered an alien vessel from a previously unknown race. The alien ship, designated as Le Terrible class, was moving at 1250 km/s, which suggested it had armour of at least strength-10. Active sensors were seriously degraded by nebula systems but the alien was close enough to determine its size as 17,700 tons. News of the encounter was relayed to Mishima, which was stationed at the Nagoya jump point. The discovery of a new alien race in Toyohashi further complicated the strategic situation, with the adjacent Nagoya and Tokushima systems now threatened by the new race and the Arachnid Omnivoracity respectively. Given that Nagoya was the site of the Empire's largest and most vital mining colony, this was of serious concern. The Third Carrier Striking Force could not pull back to defend Nagoya because the Arachnids would be able to move through Tokushima to attack Kawasaki, Osaka and Kumamoto. The Second Carrier Striking Force had recently completed an overhaul so it was immediately dispatched to Nagoya, despite the long-held tradition that the Second only operated in the Osaka chain. That tradition would have to be disregarded in the face of this new threat. However, the Third Carrier Striking Force was also in need of overhaul and could no longer be pulled back and replaced by the Second. Instead it moved to Tokushima III for shore leave, leaving a Kagero Mod 1 class destroyer to picket the Omuta jump point. The establishing of the fleet base on Tokushima III assumed even greater importance than before. In Toyohashi, Inazuma reversed course and headed for the Nagoya jump point.
The Empire gained some new technological knowledge in July Y231 without requiring the use of the fifty-seven research facilities on Rigel Prime. A 25% increase in missile reload rate and a 33% increase in active sensor strength resulted from the disassembly of Mazoku and Arachnid ship components that had been recovered from wrecks in Tokushima. On Kumamoto II, the construction brigades involved the operation to recover alien installations found advanced technical data that boosted mining production by 20%.
After the dramatic events in Tokushima and Toyohashi, the Rigellian Empire entered a period of relative calm. Inazuma arrived in Nagoya on July 23rd Y231 with no sign of pursuit. During her journey back to the jump point, communication with the nebula-dwelling aliens had progressed to the point where some information could be exchanged. The aliens identified themselves as the Seiun Imperium. Several months later in Kumamoto, the Rigellian terraforming fleet completed its task of transforming Kumamoto IV into an ideal habitable world, making it the first Rigellian system with two habitable worlds, the other being Kumamoto II, home to the partially intact alien city. The terraforming fleet returned to Kawasaki to assist the terraforming installations on Kawasaki-A V.
On March 12th Y232, DD Akizuki, the first Kagero Mod 3 class destroyer, was launched from the Okumura Shipbuilding Yard in Rigel orbit. The Mod 3 was designed to take advantage of the development of two new lasers, the devastating 38cm C5 Ultraviolet Spinal Laser and 25cm C4 Ultraviolet Laser, but otherwise was almost identical to the Kagero Mod 2. The new 38cm spinal mount was capable of inflicting strength-38 hits at close range and would damage up to ten layers of armour. The 25cm fixed mount was as powerful as the spinal weapons on previous energy combatants and could inflict strength-16 hits at close range. As with the previous version, the Kagero Mod 3 was capable of extended operations such as guarding jump points for long periods.
Kagero Mod 3 class Destroyer    9,000 tons     280 Crew     2043.7 BP      TCS 180  TH 1260  EM 0
7000 km/s     Armour 5-38     Shields 0-0     Sensors 1/11/0/0     Damage Control Rating 7     PPV 44
Maint Life 3.9 Years     MSP 993    AFR 92%    IFR 1.3%    1YR 104    5YR 1554    Max Repair 210 MSP
Intended Deployment Time: 36 months    Flight Crew Berths 1
Hangar Deck Capacity 125 tons

Sakurai Drive Systems SDS-420 Fusion Drive (3)    Power 420    Fuel Use 45.19%    Signature 420    Exp 10%
Fuel Capacity 520,000 Litres    Range 23.0 billion km   (38 days at full power)

38cm C5 Ultraviolet Spinal Laser (1)    Range 256,000km     TS: 7000 km/s     Power 38-5     RM 4    ROF 40
25cm C4 Ultraviolet Laser (4)    Range 256,000km     TS: 7000 km/s     Power 16-4     RM 4    ROF 20
CIWS-250 (1x8)    Range 1000 km     TS: 25000 km/s     ROF 5       Base 50% To Hit
Katsumata Design Bureau KDB-128-7B Beam Fire Control (2)    Max Range: 256,000 km   TS: 7812 km/s
Tokamak Fusion Reactor (3)     Total Power Output 24    Armour 0    Exp 5%

Muso-Murakami MM-75 Active Search Sensor (1)     GPS 7560     Range 75.9m km    Resolution 120
Muso-Murakami EM-11 Passive Sensor (1)     Sensitivity 11     Detect Sig Strength 1000:  11m km
Six days later, the first unit of another new ship class was launched; the Takao class battlecruiser. The Takao was the first capital ship that relied on an entirely energy-based armament. Like the Kagero Mod 3, the Takao was armed with a 38cm spinal laser and a battery of 25cm lasers, although in this case that battery had nine mounts rather than four. In addition, the Takao had the same defensive armament as the Mikura class escort plus thicker armour than the Yamato class battleship. The combination of formidable defences and devastating close-range firepower was designed to enable the units of the Takao class to perform two different roles. Firstly, as jump point assault ships, incorporating the lessons learned from the assault on Takamatsu. Secondly, to run down and destroy enemy warships in deep space, relying on their defensive capabilities to withstand hostile missile attack. The latter was a new strategic concept devised by High Swordsman Takagi in order to reduce the Empire’s dependency on ordnance. That dependence had two significant impacts; increasing the strain on Gallicite supplies and requiring lengthy build up periods between offensives.
While the Gallicite Crisis was over, at least for the moment, the mineral was still in relatively short supply and all construction had to be planned to take account of the available flow from the Nagoya VII mining colony. Part of the issue was that missiles and fighters were particularly dependent on Gallicite so if the use of ordnance could be reduced, that would ease potential Gallicite shortages in other areas. Previous heavy use of ordnance, particularly in clearing the Mazoku from Kumamoto and the Arachnids from Tokushima, had caused delays in subsequent operations as the Empire’s supply of modern missiles had to be replenished. Due to the need to build up mining capacity to resolve the Gallicite Crisis, the production of both ordnance factories and fighters factories had been curtailed, which had exacerbated the problems caused by profligate ordnance use. The Takao and her sister ship Atago, which would be launched within a month, were potentially a solution to the economic issues caused by a missile-dependent fleet. Two further ships were planned.
Takao class Battlecruiser    24,000 tons     694 Crew     5082.2 BP      TCS 480  TH 3360  EM 0
7000 km/s     Armour 9-74     Shields 0-0     Sensors 1/11/0/0     Damage Control Rating 21     PPV 150.24
Maint Life 3.11 Years     MSP 2846    AFR 214%    IFR 3%    1YR 442    5YR 6626    Max Repair 420 MSP
Intended Deployment Time: 24 months    Flight Crew Berths 1
Hangar Deck Capacity 250 tons

Sakurai Drive Systems SDS-840 Fusion Drive (4)    Power 840    Fuel Use 33.89%    Signature 840    Exp 10%
Fuel Capacity 1,100,000 Litres    Range 24.3 billion km   (40 days at full power)

25cm C4 Ultraviolet Laser (9)    Range 256,000km     TS: 7000 km/s     Power 16-4     RM 4    ROF 20
38cm C4 Ultraviolet Spinal Laser (1)    Range 256,000km     TS: 7000 km/s     Power 38-4     RM 4    ROF 50
Twin Kagawa-Morita KM-5 Gauss Cannon Turret (4x8)    Range 30,000km     TS: 25000 km/s     Power 0-0     RM 3    ROF 5
Katsumata Design Bureau KDB-25M Beam Fire Control (2)    Max Range: 64,000 km   TS: 25000 km/s
Katsumata Design Bureau KDB-128-7B Beam Fire Control (2)    Max Range: 256,000 km   TS: 7812 km/s
Tokamak Fusion Reactor (5)     Total Power Output 40    Armour 0    Exp 5%

Nagumo Engineering PD-1 Missile Detection Sensor (1)     GPS 42     Range 4.6m km    MCR 503k km    Resolution 1
Nagumo Engineering AS-150 Area Search Sensor (1)     GPS 15120     Range 151.8m km    Resolution 120
Muso-Murakami EM-11 Passive Sensor (1)     Sensitivity 11     Detect Sig Strength 1000:  11m km
The mining colony on the twelfth moon of Nagoya VII had been established to combat the Gallicite Crisis. By mid-April Y232, six hundred automated mines were in operation. The site had been chosen because it also had accessible Duranium and Uridium. However, the deposits of Duranium were steadily being depleted and their accessibility was starting to fall, which meant that while Gallicite supplies were in no danger, the mining location might not be suitable in the longer term. Duranium was also a key mineral and if both Gallicite and Duranium could not be mined in the same location, the available mining capacity would have to be split between multiple sites. It was not an immediate problem as the moon still possessed a hundred thousand tons of Duranium and the accessibility was 0.79. However, a decision would have to be made in the next year or so with regard to the future location of the automated mines. Six existing Rigellian colonies, including the moon of Nagoya VII, and the Rigellian homeworld had either manned or automated mines in operation. In total the Empire operated 376 manned mines and 730 automated mines. Unfortunately, none of them met the criteria for substantial quantities of accessible Duranium and Gallicite.
Rigel Prime (300 Manned Mines)
Duranium 255,762 Acc: 0.9
Neutronium 47,089 Acc: 0.38
Corbomite 37,844 Acc: 0.3
Tritanium 4,503 Acc: 0.14
Sorium 953 Acc: 0.11
Corundium 18,851 Acc: 0.24
Nagoya-A VII - Moon 12 (600 Automated Mines)
Duranium 104,204 Acc: 0.79
Uridium 1,456,305 Acc: 1
Gallicite 855,708 Acc: 0.9
Osaka III (110 Automated Mines)
Duranium 45,268,520 Acc: 0.9
Neutronium 19,828,280 Acc: 0.1
Tritanium 9,676,425 Acc: 0.2
Corundium 22,053,230 Acc: 0.9
Gallicite 2,768 Acc: 0.1
Osaka-A IV (71 Manned Mines) – ideal habitable world
Duranium 66,349,180 Acc: 0.8
Corbomite 26,624,910 Acc: 0.1
Boronide 24,203,390 Acc: 0.4
Uridium 8,997,713 Acc: 0.3
Kawasaki-A IV - Moon 12 (20 Automated Mines)
Duranium 7,433 Acc: 1
Uridium 81,746 Acc: 1
Gallicite 49,049 Acc: 1
Kumamoto-A V - Moon 27 (28 Automated Mines)
Duranium 11,519,800 Acc: 0.5
Neutronium 2,433,483 Acc: 0.3
Corbomite 5,308,022 Acc: 1
Boronide 3,239,645 Acc: 0.9
Mercassium 626,948 Acc: 0.8
Sorium 5,198,006 Acc: 1
Corundium 4,460,386 Acc: 0.4
Gallicite 36,548 Acc: 0.8
Kumamoto-A IV (5 Manned Mines) – ideal habitable world
Duranium 5,229,374 Acc: 0.8
Neutronium 2,205,225 Acc: 0.1
Corbomite 4,460,543 Acc: 0.3
Tritanium 2,108,299 Acc: 0.9
Boronide 9,828,225 Acc: 0.1
Mercassium 7,868,020 Acc: 0.9
Sorium 1,185,920 Acc: 0.1
Uridium 278,779 Acc: 0.9
Corundium 527,075 Acc: 0.1
Gallicite 527,075 Acc: 0.1
On July 27th Y232 an Arachnid destroyer of a new type, designated as Behemoth class, transited into Tokushima from Omuta. The only Rigellian ship on the jump point was Akatsuki, a Kagero Mod 1 class destroyer performing picket duty. The Third Carrier Striking Force was at Tokushima III, where the ships of 15,000 tons or less were being overhauled a few at a time at the recently established fleet base. This was the first Arachnid warship to enter Tokushima in eighteen months so the crew of Akatsuki could be excused if they were slow to react. However, Swordsman of Worlds Kawagishi Masamitsu, commanding officer of Akatsuki, had drilled his crew hard in the two years since he was assigned to the ship. Within five seconds of the Arachnid destroyer appearing in Tokushima, Akatsuki opened fire and scored hits with her 25cm spinal laser and all six of her 20cm lasers. Although the Behemoth tried to run, Akatsuki’s engineering crew was equally fast to react and the Rigellian destroyer quickly ran down her foe. Another full volley smashed through the armour of the Behemoth, crippling its engines and damaging the active sensor. A third salvo was sufficient to destroy the Arachnid warship. Akatsuki was undamaged.
Meanwhile, the build up at Tokushima was continuing. All the ships of the Third Carrier Striking Force had replenished their magazines with modern missiles and a stockpile of older missiles had been established at Tokushima III. An assault on Omuta was in the planning stage, although could not be launched in the immediate future. Overhauls were in progress for several ships of the Third, although that was only possible at Tokushima III for the Kongo class battlecruisers and smaller ships. Larger ships would have to return to Rigel Prime. Reinforcements would also not be forthcoming for several months as the Second Carrier Striking Force was heading to Rigel for overhaul while the First Striking Force was understrength due to the detachment of two battlegroups; one to cover Nagoya in the absence of the Second Carrier Striking Force and a second to cover the Kumamoto system. As a reaction to the Arachnid incursion, a second Kagero Mod 1 destroyer, Kuroshio, was sent from the Third Carrier Striking Force to join Akatsuki at the Omuta jump point.
On August 11th, The Kido Butai was strengthened by the launch of Shokaku, the fifth Rigellian carrier. She was a new class of 72,000 tons, twice as large as the four Akagi class carriers with an intended strikegroup of seventy-two A6M3 Reisens. For the moment though she would have to operate original model A6M1s until new fighters could be built. Fighter production had been curtailed due to the fluctuating flow of Gallicite and Gallicite stockpiles had only just reached the point where new fighters could be considered. In addition to her huge hangar bay, the Shokaku was equipped with a pair of twin gauss cannon turrets for self-defence, more substantial armour than the Akagi class and the same AS-1250 System Search Array as the Sakawa class scout destroyer, which would enable Shokaku to locate targets for her strikegroup without assistance from her escorts. Zuikaku, the second of the class, was under construction but work on her had been paused to allow the construction of fighters for Shokaku. Each Shokaku class carrier required over five thousand tons of Gallicite and had a significant effect on the rate at which the supplies of the mineral were consumed.
Shokaku class Carrier    72,000 tons     1395 Crew     11666.8 BP      TCS 1440  TH 10080  EM 0
7000 km/s     Armour 4-154     Shields 0-0     Sensors 1/1/0/0     Damage Control Rating 56     PPV 33.12
Maint Life 2.04 Years     MSP 5671    AFR 740%    IFR 10.3%    1YR 1824    5YR 27359    Max Repair 1050 MSP
Intended Deployment Time: 12 months    Flight Crew Berths 2
Hangar Deck Capacity 24000 tons     Magazine 2300

Sakurai Drive Systems SDS-840 Fusion Drive (12)    Power 840    Fuel Use 33.89%    Signature 840    Exp 10%
Fuel Capacity 3,000,000 Litres    Range 22.1 billion km   (36 days at full power)

Twin Kagawa-Morita KM-5 Gauss Cannon Turret (2x8)    Range 30,000km     TS: 25000 km/s     Power 0-0     RM 3    ROF 5
Katsumata Design Bureau KDB-25M Beam Fire Control (1)    Max Range: 64,000 km   TS: 25000 km/s

ASM-5 Meteor II  (460)  Speed: 45,000 km/s   End: 54.1m    Range: 146.2m km   WH: 9    Size: 5    TH: 150/90/45

Nagumo Engineering AS-1250 System Search Array (1)     GPS 126000     Range 1,265.2m km    Resolution 120

Strike Group
72x A6M3 Reisen Fighter   Speed: 15267 km/s    Size: 6.55
1x Homuran Pinnace   Speed: 4285 km/s    Size: 4.9
Two months after the launch of Shokaku, the first pair of Tama class Scouts were completed. The Tama was the first Rigellian design with a cloaking device and was intended to carry out probes of unexplored jump points. The single engine included thermal reduction technology, which meant the Tama was similar to a 1000 ton fast attack craft in terms of both cross-section and thermal output. No active sensor was included in the design, as that would advertise the ship’s position. Instead, the Tama was equipped with Rigellian Empire’s most capable passive EM sensor in order to detect alien populations and the active emissions of alien ships. Their first mission was to investigate the unexplored jump points in Kagoshima, Kochi and Nagasaki, all of which were two jumps from Rigel via Nagoya. With the threat from the Arachnids in Omuta and the discovery of the nebula-dwelling Seiun Imperium in Toyohashi, High Swordsman Takagi wanted to ensure there were no other potential threats nearby.
Tama class Scout    5,000 tons     133 Crew     841.3125 BP      TCS 20  TH 157.5  EM 0
4500 km/s    JR 1-50     Armour 1-26     Shields 0-0     Sensors 1/110/0/0     Damage Control Rating 4     PPV 9
Maint Life 3.02 Years     MSP 421    AFR 50%    IFR 0.7%    1YR 69    5YR 1037    Max Repair 295.3125 MSP
Intended Deployment Time: 24 months    Spare Berths 0
Magazine 60

Mitsuharu Syndicate MJD-50 Military Jump Drive     Max Ship Size 5200 tons    Distance 50k km     Squadron Size 1
Sakurai Drive Systems SDS-450 Thermal Reduction Fusion Drive (1)  Power 450  Fuel Use 17.05%  Signature 157.5  Exp 7%
Fuel Capacity 100,000 Litres    Range 21.1 billion km   (54 days at full power)

TSH Dragon-5B Missile Launch System (12)    Missile Size 5    Hangar Reload 37.5 minutes    MF Reload 6.2 hours
Probe Fire Control (1)     Range 6.9m km    Resolution 100
Passive EM Probe (4)  Speed: 6,000 km/s   End: 4.4d    Range: 2263m km   WH: 0    Size: 5    TH: 20/12/6
Passive Thermal Probe (2)  Speed: 6,000 km/s   End: 5.4d    Range: 2785.2m km   WH: 0    Size: 5    TH: 20/12/6
Geosurvey Probe (6)  Speed: 6,000 km/s   End: 4.4d    Range: 2263m km   WH: 0    Size: 5    TH: 20/12/6

Muso-Murakami EM-110 Passive Sensor (1)     Sensitivity 110     Detect Sig Strength 1000:  110m km
Cloaking Device: Class cross-section reduced to 20% of normal
On November 9th substantial reinforcements arrived for the Third Carrier Striking Force at Tokushima III, including two carriers, two battleships, both Takao class battlecruisers, two destroyers, a scout destroyer and a destroyer escort. The carrier and battleship already with the Third both headed back to Rigel for overhaul as the maintenance facilities at Tokushima III could only handle ships of up to 15,000 tons. By this point, those ships of that size in the Third Carrier Striking Force had all completed their own overhauls. The force gathered at Tokushima III was now the most powerful Rigellian fleet ever assembled outside the Rigel system. The complete order of battle was as follows:
2x Akagi class Carrier:
Akagi, Hiryu2x Yamato class Battleship:
Musashi, Shinano2x Takao class Battlecruiser:
Atago, Takao4x Kongo class Battlecruiser:
Ise, Kotetsu, Nagato, Tosa1x Nagara Mod 1 class Destroyer Leader:
Isuzu4x Kagero Mod 1 class Destroyer:
Asagumo, Asashimo, Kasumi, Murakumo5x Matsukaze Mod 1 class Destroyer Escort:
Isokaze, Minekaze, Nadakaze, Tachikaze, Yakaze2x Mikura class Destroyer Escort:
Awaji, Miyake2x Sakawa Mod 1 class Scout Destroyer:
Yahagi, Yubari3x Aratama Maru class Ammunition Transport:
Myoko Maru, Nachi Maru, Senko Maru72x A6M3 Reisen Strikefighter
All ships in the Third Carrier Striking Force had full magazines of the latest missiles and were fully fuelled. Each of the three Aratama Marus carried three hundred Meteor II anti-ship missiles. An additional stockpile of ordnance on Tokushima III included a further one hundred and fifty Meteor IIs, nine hundred Meteor Is, nine hundred Nova III anti-missiles and fifteen hundred Nova II anti-missiles. Twelve million litres of fuel were also available on the planet. Everything was in place for an offensive against Omuta, with two exceptions. Unfortunately, no jump gate had been built on the Tokushima – Omuta jump point, which meant the capital ships could not transit into Omuta. That oversight was being corrected with the deployment of a Kochiku Suru class construction ship to the jump point. In addition, High Swordsman Takagi wanted to know the results of the mission of the Tama class scouts to ensure no new threat materialised just as the Rigellian Empire committed itself to a major offensive.
to be continued...

