This is the 1st of 5 posts today7th April 1985Amatsukaze, the first new survey cruiser to be constructed in thirteen years, is launched from the Saromi Systems shipyard in Earth orbit. Due to the size of known space and the many demands on the fifteen existing survey cruisers, additional ships are required. The Shimakaze II design is an evolution of the original Shimakaze class built between March 1971 and July 1972, five of which remain from the original class of six, with the engines, jump drive and sensors suite replaced by modern equivalents. The hangar bay has been reduced slightly in size and the B1N strike craft of the Shimakaze replaced with a second E2A scout, while the ordnance loadout has more buoys and fewer anti-ship missiles.
Shimakaze II class Survey Cruiser 18,000 tons 425 Crew 3,114.5 BP TCS 360 TH 1,680 EM 0
4666 km/s JR 3-50 Armour 1-61 Shields 0-0 HTK 107 Sensors 16/28/5/5 DCR 26-14 PPV 3.6
Maint Life 5.95 Years MSP 2,811 AFR 100% IFR 1.4% 1YR 136 5YR 2,035 Max Repair 294 MSP
Hangar Deck Capacity 1,050 tons Magazine 216 / 0
Kaigun-Taisa Control Rating 4 BRG AUX ENG SCI
Intended Deployment Time: 60 months Flight Crew Berths 21 Morale Check Required
Komatsu KMJ-180-B Jump Drive Max Ship Size 18000 tons Distance 50k km Squadron Size 3
Koga-Murakama KM-840-E Fusion Drive (2) Power 1680 Fuel Use 8.37% Signature 840 Explosion 7%
Fuel Capacity 2,508,000 Litres Range 299.7 billion km (743 days at full power)
Type 29 Reloadable Missile Launcher (1) Missile Size: 12 Rate of Fire 1390
Type 43 Go-44E Missile Fire Control (1) Range 34.8m km Resolution 120 ECCM-3
Zuiun-Ha Sensor Buoy (8) Speed: 0 km/s End: 0m Range: 0m km WH: 0 Size: 12 TH: 0/0/0
Shūsui-Ro Reconnaissance Drone (6) Speed: 8,000 km/s End: 9.7d Range: 6,683m km WH: 0 Size: 12
Rakurai II (4) Speed: 50,000 km/s End: 4.2m Range: 12.7m km WH: 20 Size: 12 TH: 220/132/66
Type 45 Go-11F Search Sensor (1) GPS 15120 Range 116.9m km Resolution 120
Type 33 Go-51C Passive Sensor (1) Sensitivity 16 Detect Sig Strength 1000: 31.6m km
Type 42 Go-61D Passive Sensor (1) Sensitivity 28 Detect Sig Strength 1000: 41.8m km
Gravitational Survey Sensors (5) 5 Survey Points Per Hour
Geological Survey Sensors (5) 5 Survey Points Per Hour
Electronic Warfare Jammers: Sensor 3
Strike Group
2x Aichi E2A Scout Speed: 8002 km/s Size: 5
2x Mitsubishi A3M2 'Hayabusa' Fighter Speed: 16000 km/s Size: 5.5
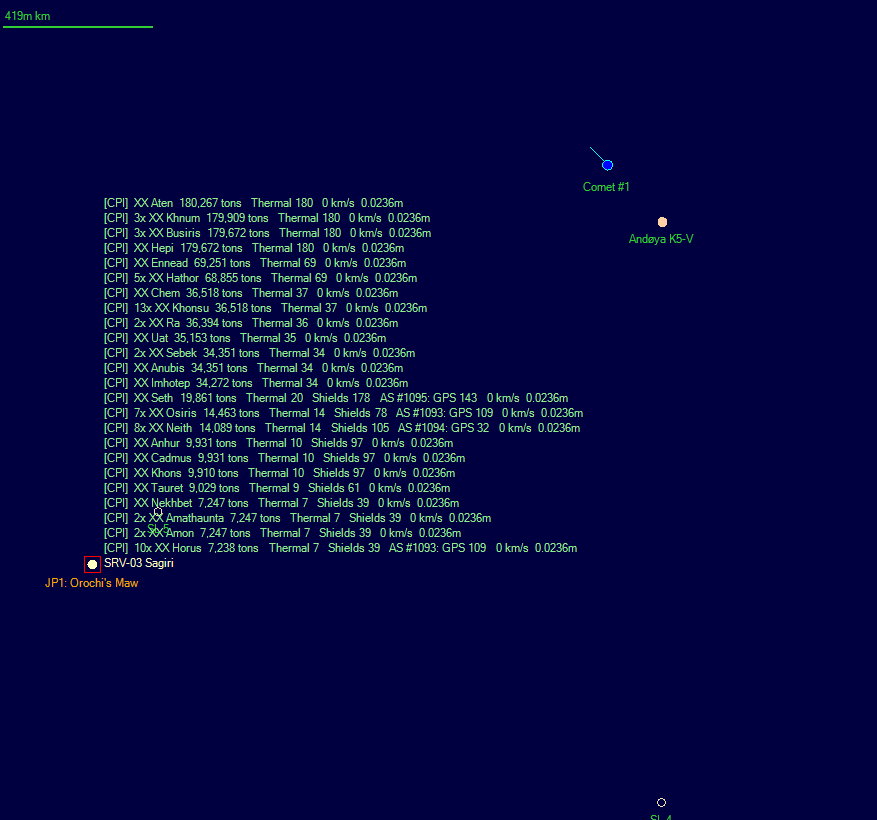
29th April 1985The survey cruiser Sagiri, one of ten ships of the 10,000-ton Asagiri II class, transits a recently discovered jump point in Orochi’s Maw. On arrival, the new system, comprising an orange K5-V star orbited by a lone comet, is of only incidental interest compared to the massive Capellan fleet stationed on the entry jump point. There are seventy ships of twenty-four different types, ranging in size from 7,238 tons to over 180,000 tons, half of which have active shields. Until now, only a limited number of small Capellan ships have been encountered.
The presence of such a large force partially explains the large number of Xiamen wrecks in Orochi’s Maw and the adjacent Faroe system. It also presents a significant threat to the new colony and naval base in Sapporo, which connects directly to Orochi’s Maw and also indirectly via Ascension. Increasing the defences of Sapporo moves up the list of many competing priorities for the Imperial Navy. From an exploration perspective, the new system, designated as Andoya, represents the best chance of locating the home world of the Capellan Imperium, so Sagiri abandons the survey of Orochi’s Maw and begins a survey of Andoya.
 25th May 1985
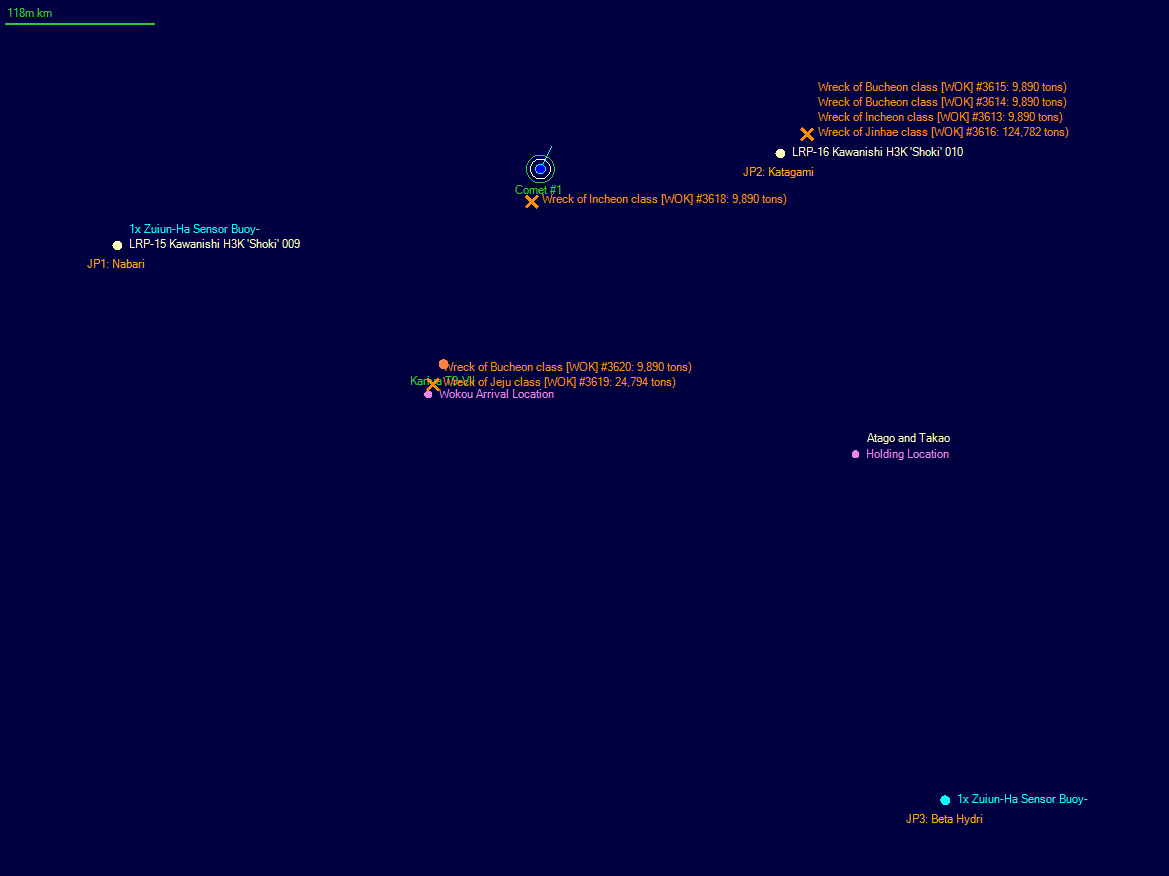
A third Bolas, escorted by a Scorpion-Tail, enters Kariya. An H3K long-range patrol craft on the jump point shadows the two ships as they move to the closest Wokou wrecks.
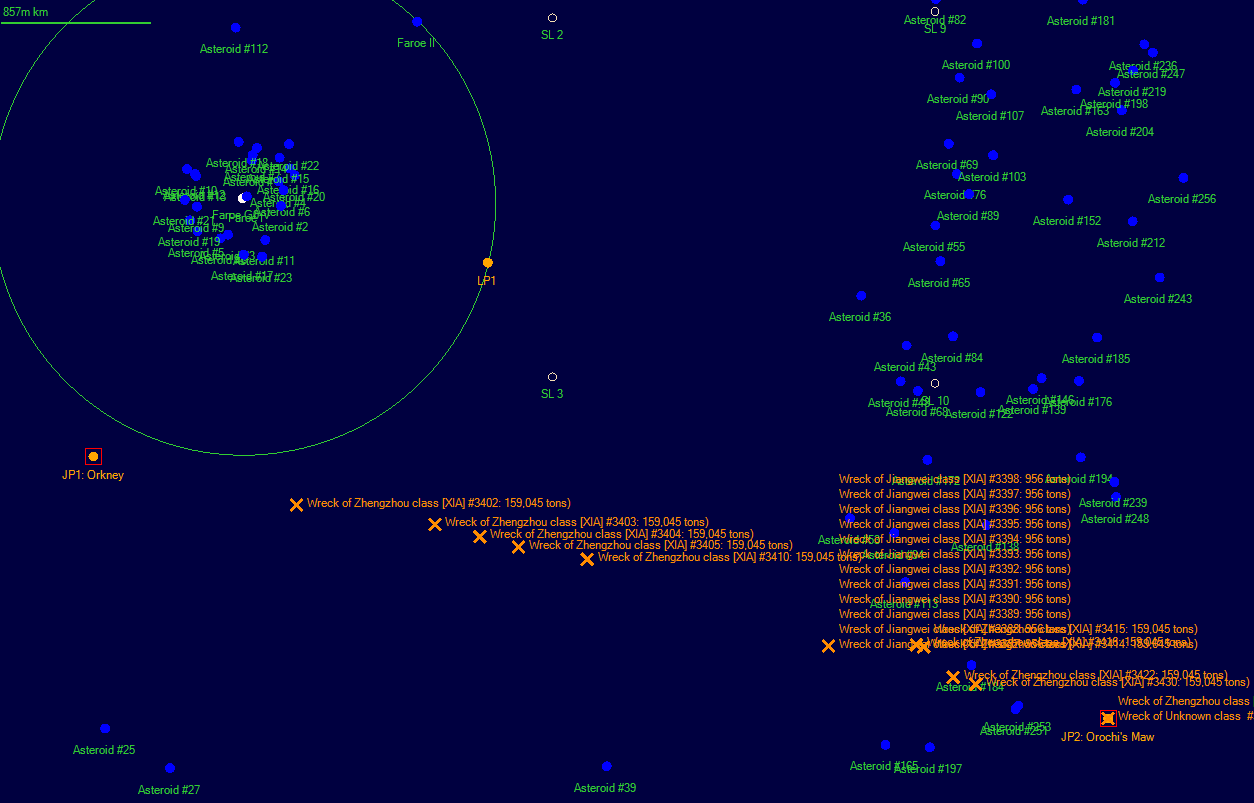
2nd June 1985Shirayuki, surveying in the Faroe system along the line of wrecks, finds a new stable jump point. She transits and enters Orkney, a system with a K-class primary and an unremarkable collection of planets, moons and asteroids. There are four unknown wrecks on the Faroe jump point. Despite the presence of Xiamen wrecks in Orochi’s Maw and Faroe, plus these new wrecks, there is still no sign of a link between the systems around Sapporo and the main area of Xiamen territory.
 10th June 1985
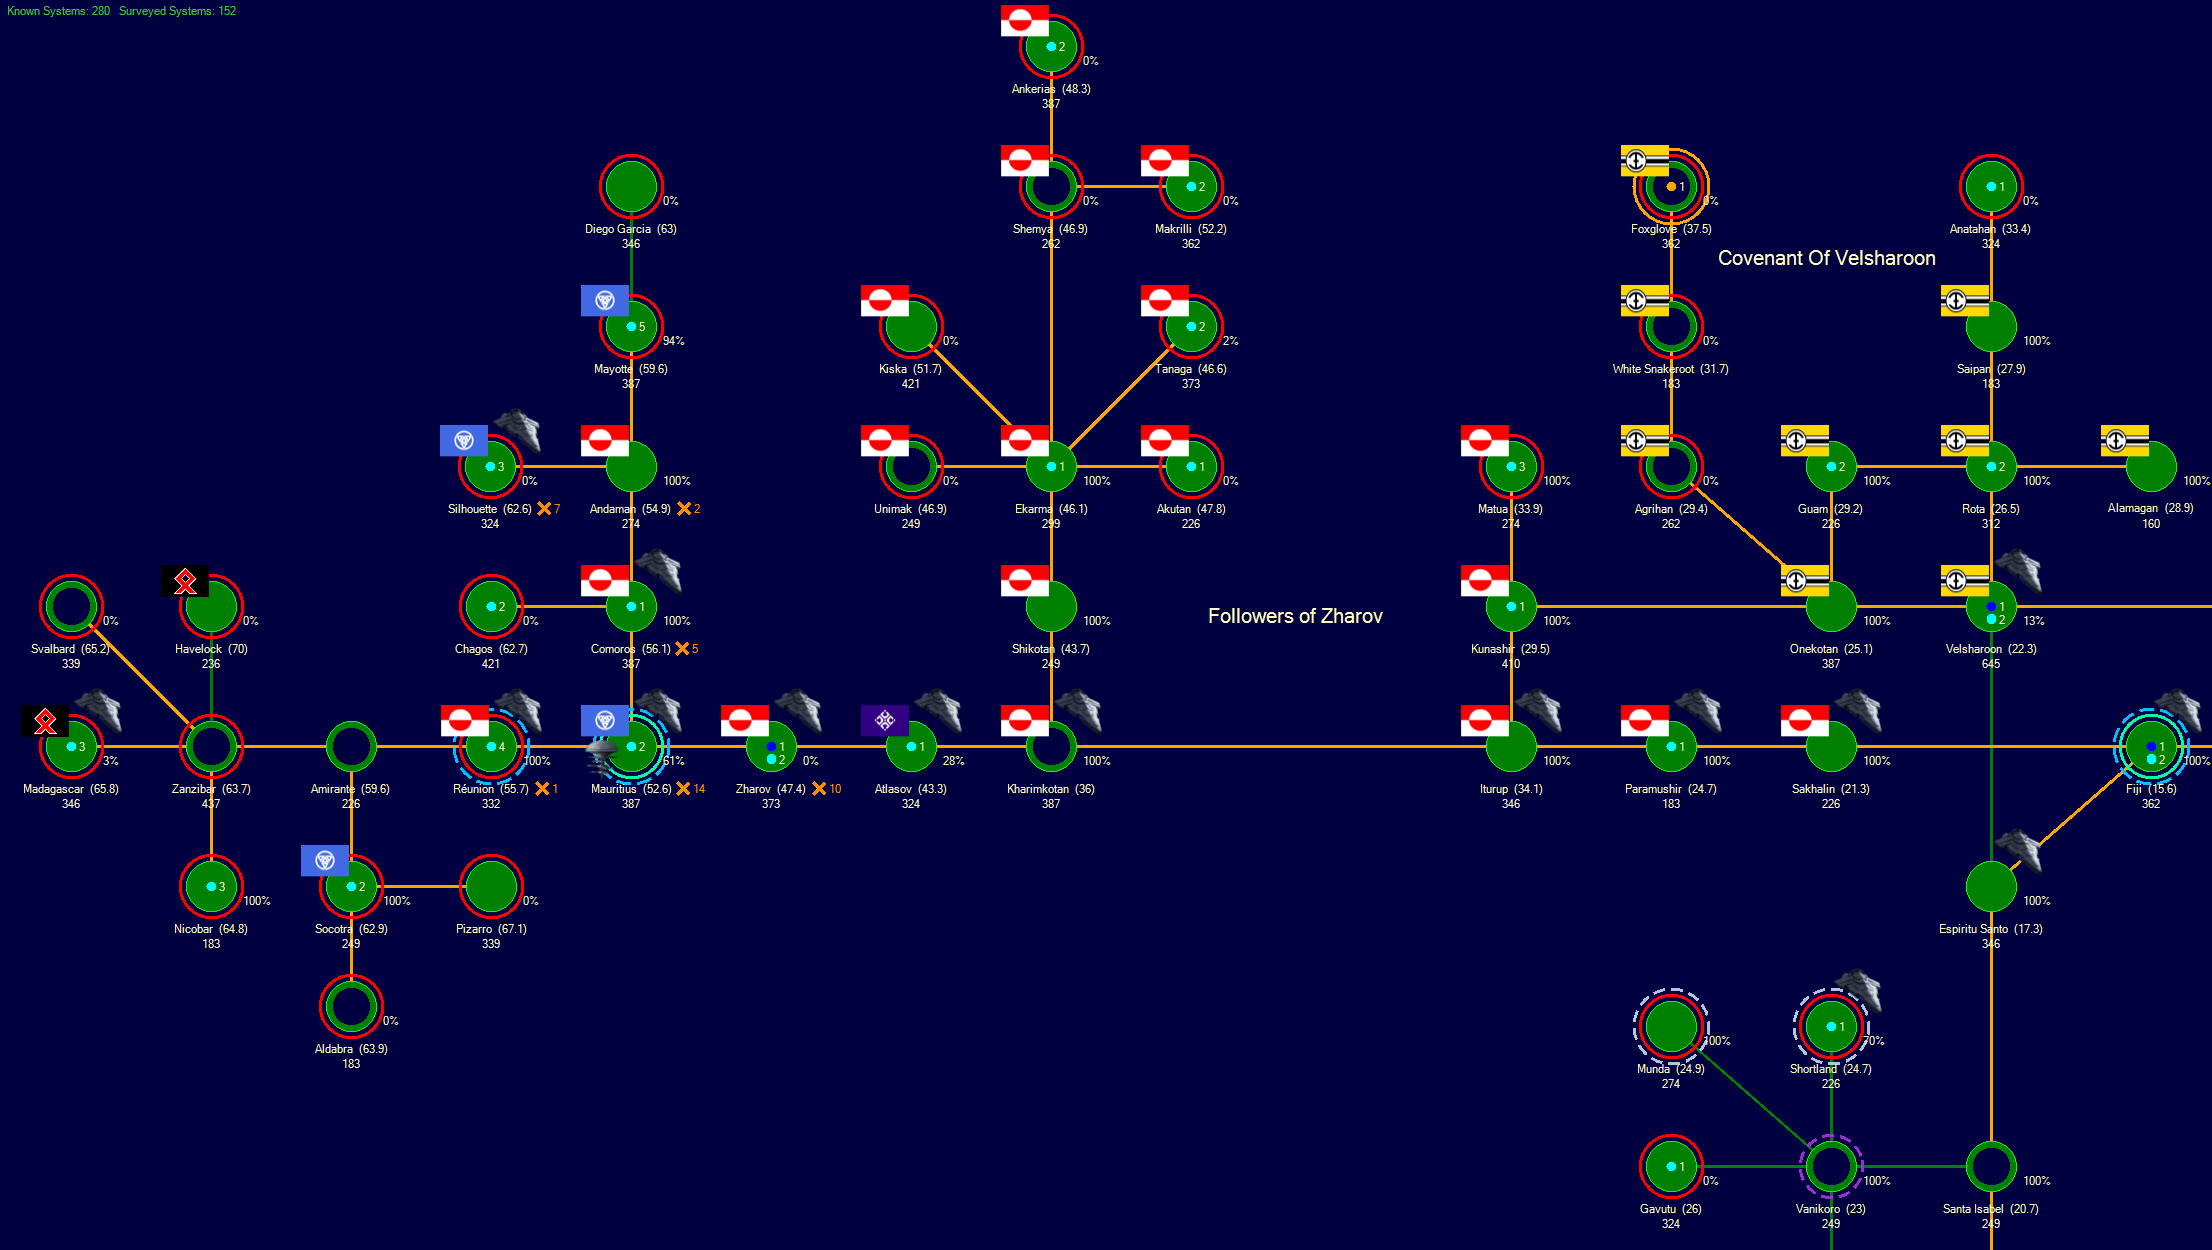
Most of the exploration around Mauritius, including the encounters with the Helgrim Protectorate, has taken placed beyond the Mauritius-Reunion jump point, where a total of ten systems have been discovered. Mauritius has a second outward jump point to Comoros, where a partial survey revealed a connection to the Andaman system. ELINT data from the Bloodclaw Dominion and the Followers of Zharov provided full gravitational survey data on both systems, revealing an additional jump point in Comoros and two outward jump points in Andaman, As a result, the survey cruiser Harukaze has been reassigned from Reunion, which still does not have a complete survey, to investigate the new jump points.
Due to the potential for hostile Bloodclaw warships, Harukaze sends her Aichi E2A scout through the jump point in Comoros. She discovers Chagos, an unremarkable binary with three planets, plus a scattering of moons and asteroids. There are four Bloodclaw ships stationed on the entry jump point, all of which are previously unseen types: two Clouded Leopards of 10,756 tons, a Highland Wildcat of 10,894 tons and a Margray of 23,830 tons. Given their size, they are likely to be military ships, but the scout does not come under fire.
The four ships jump into Comoros, so Harukaze launches both of her Mitsubishi A2M3 ‘Shinden’ fighters and her Nakajima B1N 'Ryūsei' with orders to attack the Highland Wildcat. All four Bloodclaw ships run, revealing that the Margray has commercial engines and a top speed of 2684 km/s, while the Clouded Leopards are military and have a speed of 7495 km/s. The Highland Wildcat briefly has a speed of 3979 km/s, until the B1N launches a pair of Rakurai-Ho anti-ship missiles, both of which detonate their strength-15 warheads on target, after which it drops to 1326 km/s. The best guess of Harukaze’s commander, Kaigun-Chusa Devayani Mohapatra, one of the rare non-Japanese female ship captains, is that the Clouded Leopards are probably scouts, given their speed, while the Highland Wildcat was an escort, likely missile-armed, for the Margray.
The fighters strafe the wounded Wildcat until it explodes, then close in on the Margray, which reverses course, attempting, but failing, to reach the jump point. With the slower ships destroyed, the fighters chase the faster Clouded Leopards. Twelve minutes later, the two Bloodclaw ships have been eliminated, although the fighters are both close to weapon failure. They return to Harukaze for resupply, while the survey cruiser deploys sensor buoys either side of the jump point, rescues the Bloodclaw survivors then heads for Andaman to explore its two outward jump points.
11th June 1985Atago and Takao return to Kariya. There have been no further transits from Mizuchi-Ro ships and the H3K has been able to maintain contact with the Bolas and Scorpion-Tail while the former is at work on the wrecks. When the cruisers move within thirty million kilometres of the two alien ships, they activate shields and sensors, which causes the Bolas to run, accompanied by the Scorpion-Tail. As yet, none of the wrecks have been salvaged by the Bolas.
The battle follows the same pattern as the previous two, with the Scorpion-Tail charging the cruisers as soon as it is attacked. Once again the alien escort reaches eight thousand kilometres from the Japanese warships before it is destroyed. Takao’s shields are reduced to twenty-three percent. The cruisers destroy the Bolas then pull back halfway to the Beta Hydri jump point. Rather than abandoning the system entirely as they did in early April, the cruisers will now remain far enough from the jump point to escape if needed, but close enough to attack targets detected by the H3Ks.
 18th June 1985
The six Engineer regiments at Mauritius Base, with the assistance of two construction factories retrieved from the captured Bloodclaw colony in Reunion, construct a refuelling station, which will allow replenishment ships to make a run from Earth to establish a fuel stockpile in Mauritius. As part of the plan to build up the base to allow an assault on the Bloodclaw home world, including the necessary replenishment ships, a new route has been scouted through the Zharov system that takes shipping on a circuitous path around the outer system to avoid getting too close to the Zharovian home world, before a quick dash through the Zharov – Mauritius jump point. As transports and colony ships are already en route through the six Zharovian systems that lie between Fiji and Mauritius, it is vital that they can pass through Zharov without triggering a war.
20th June 1985A Kawanishi H3K 'Shoki' patrol craft stationed on the Katagami – Kariya jump point detects the approach of a Bolas class salvage ship without the usual Scorpion-Tail escort. This is exactly the type of target the H3K was designed to intercept, so it moves away from the jump point and engages the approaching ship. The Bolas reverses course as the H3K fires continuously into its armour belt, with one shot every five seconds. The first armour penetration happens after twenty-nine minutes, with the Bolas immediately dropping to half speed. The second requires a further nine minutes. After that, the armour penetration happens more frequently, but it still requires fifty-three minutes and eleven weapon failures for the H3K to finally destroy the 20,000-ton salvage ship. Fortunately, due to its function as a long-range patrol craft, the H3K still retains sixty percent of its maintenance supplies, but this is not a sustainable tactic. All the ships of the Mizuchi-Ro appear to have extremely durable passive defences.
27th June 1985At the far side of known space, a Python class survey ship of the Mizuchi-Ha transits into Ube, adjacent to Sigma Tucanae and two jumps from the original Mizuchi-Ha contact system of Ryūgasaki. The Sigma Tucanae – Ube jump point is less than forty million kilometres from the Sigma Tucanae – Fomalhaut jump point, which is why an H3K 'Shoki' is picketing the former jump point in order to provide a potential warning about the latter. There is nothing of value in Ube, except its use as a tripwire warning. Nevertheless, the H3K takes the opportunity to attack and eliminate the unarmed 4000-ton Python, which proves much easier to destroy than the Mizuchi-Ro Bolas in Katagami.
As a result of the brief engagement, the Akagi III class carrier Soryu and the Nagara IV light cruisers Kashima and Kuma break orbit of Fomalhaut Naval Base en route to a picket position near the Fomalhaut – Sigma Tucanae jump point.
 1st July 1985
Two commercial-engined ships of the Capella Imperium, a new type designated as Ogdoad class, transit into Orochi’s Maw from Faroe. Two Hangzhou class ships of the People’s Republic of Xiama are already on the jump point and immediately open fire. The Imperial Navy salvage ship Kasuga Maru is also on the jump point, salvaging a Xiamen wreck but does not have active sensors engaged, so she while can detect ninety-six energy weapon impacts at strength-5, she cannot determine the weapons used by the Xiamen ships. By the time her sensors come online and classify the new Capellan ships as 120,000 tons, the two Xiamen warships have transited into Faroe. The People’s Republic must really be concerned about the Capella Imperium if their warships are running from commercial-engined ships.
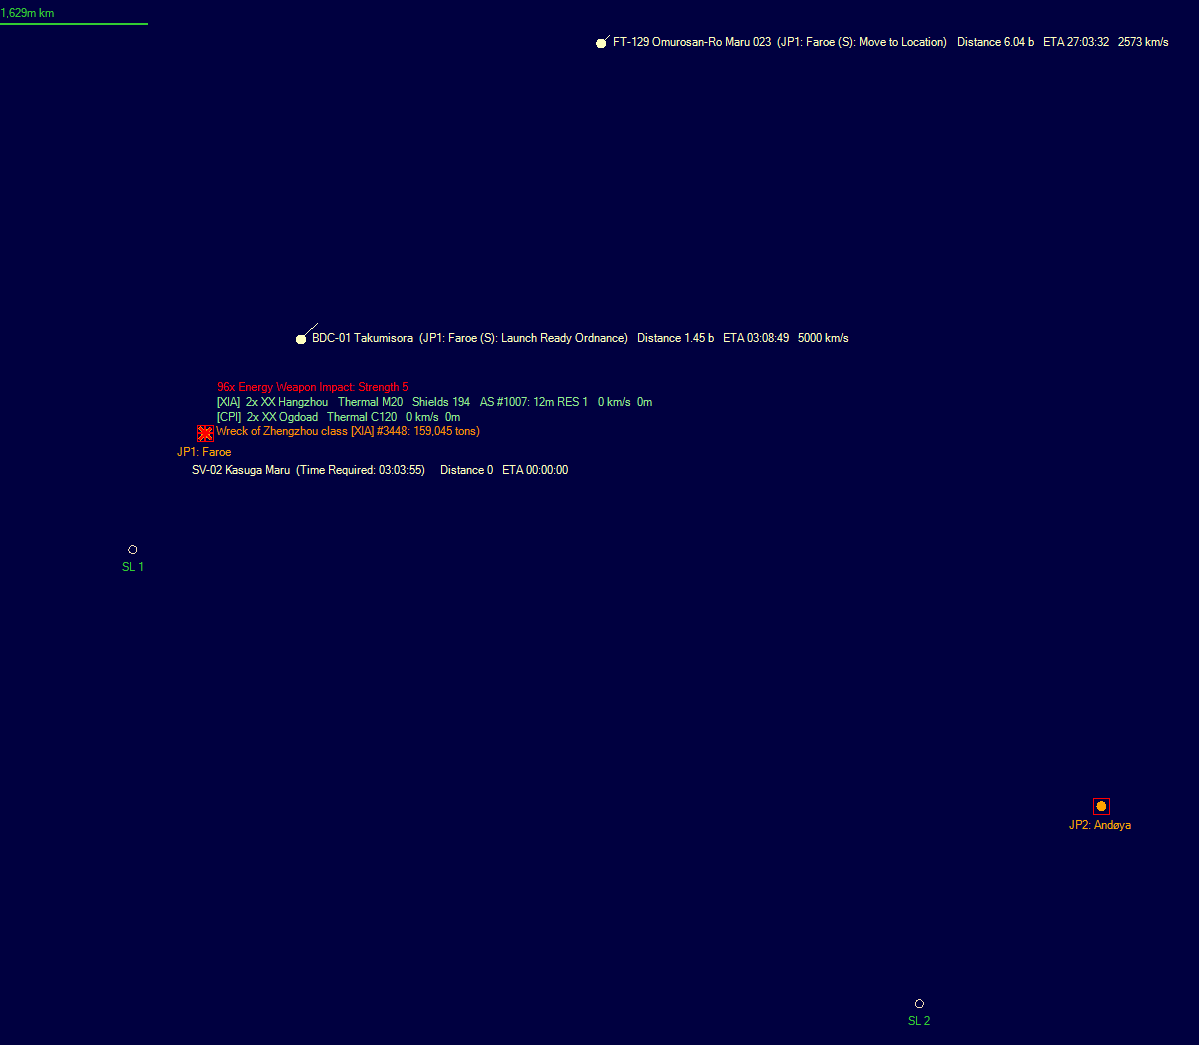
En route to the Faroe jump point is the buoy deployment ship Takumisora (Artisan's Sky). Takumisora and her sister ship Miyabikaze (Graceful Wind) were constructed in late 1984 to enable large-scale buoy deployment across multiple systems. Previously, this was handled on a small scale by the Kawanishi H2K 'Seiku' long range patrol craft, which has four fixed launchers, but the logistics became difficult as known space expanded and all but one of the original four H2Ks have been lost in action. Miyabikaze is currently returning from a mission to seed buoys throughout seventeen Xiamen systems that lie beyond the Eniwetok – Tulagi and Eniwetok – Bougainville jump points. Takumisora will focus on the systems around Sapporo.
Takumisora class Buoy Deployment Craft 4,000 tons 74 Crew 576.3 BP TCS 80 TH 400 EM 0
5000 km/s JR 3-50 Armour 1-22 Shields 0-0 HTK 27 Sensors 8/14/0/0 DCR 3-7 PPV 3.6
Maint Life 3.70 Years MSP 270 AFR 43% IFR 0.6% 1YR 31 5YR 461 Max Repair 200 MSP
Magazine 420 / 0
Kaigun-Chūsa Control Rating 1 BRG
Intended Deployment Time: 24 months Morale Check Required
Komatsu KMJ-40-B Jump Drive Max Ship Size 4000 tons Distance 50k km Squadron Size 3
Koga-Murakama KM-400 Fusion Drive (1) Power 400 Fuel Use 35.36% Signature 400 Explosion 10%
Fuel Capacity 673,000 Litres Range 85.7 billion km (198 days at full power)
Type 29 Reloadable Missile Launcher (1) Missile Size: 12 Rate of Fire 1390
Type 43 Go-44E Missile Fire Control (1) Range 34.8m km Resolution 120 ECCM-3
Zuiun-Ha Sensor Buoy (35) Speed: 0 km/s End: 0m Range: 0m km WH: 0 Size: 12 TH: 0/0/0
Type 42 Go-13E Navigation Sensor (1) GPS 3360 Range 55.1m km Resolution 120
Type 42 Go-63D Passive Sensor (1) Sensitivity 14 Detect Sig Strength 1000: 29.6m km
Type 33 Go-53C Passive Sensor (1) Sensitivity 8 Detect Sig Strength 1000: 22.4m km
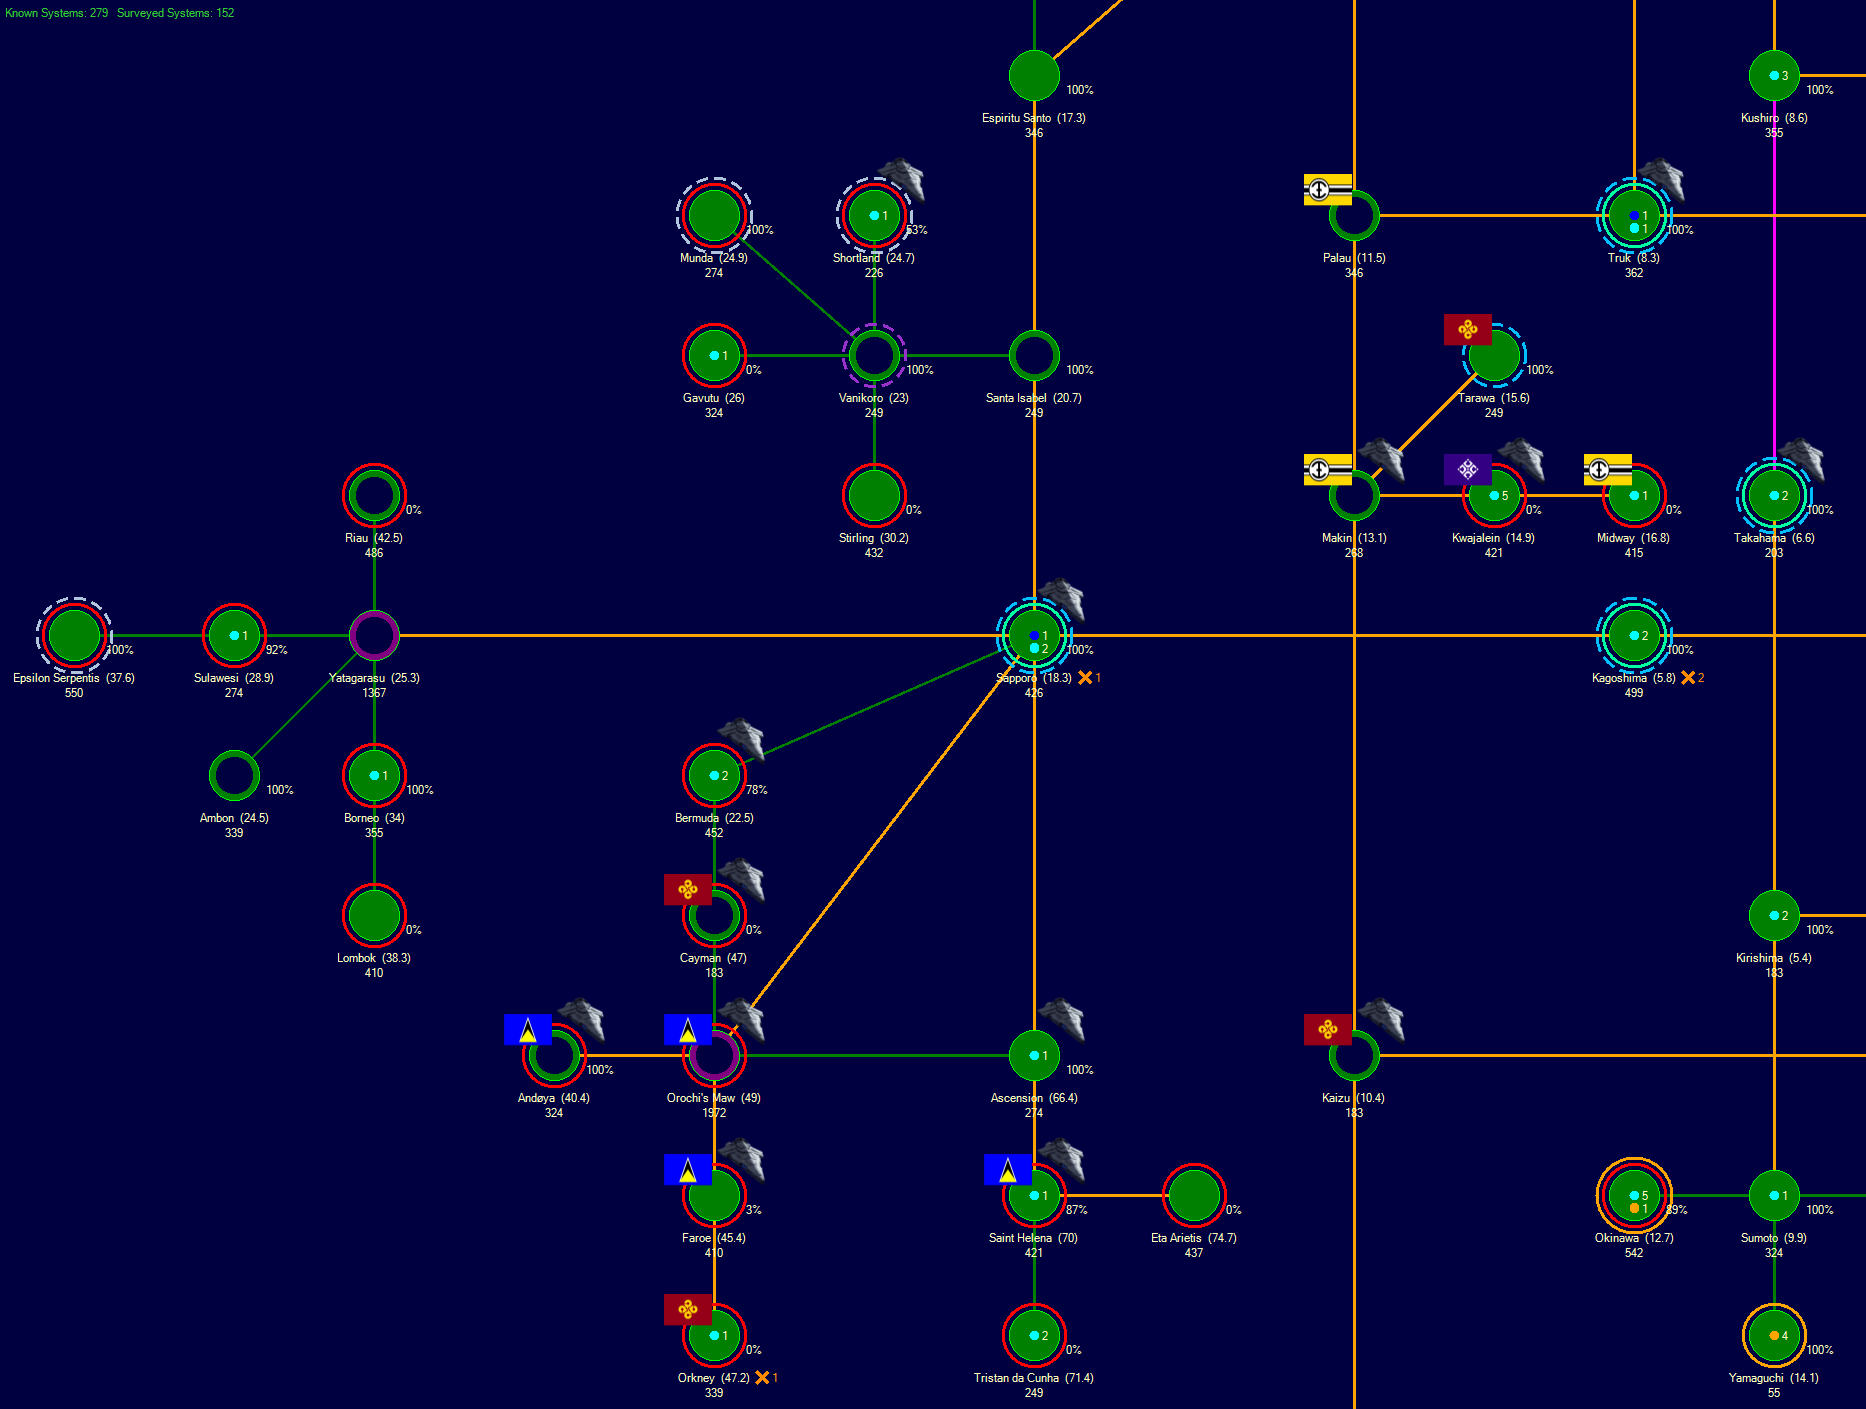
15th July 1985The light cruiser Arakawa is constructed in Earth orbit. This is the first new light cruiser to be built since 1971 and the first warship since 1980, when the battleships Katsuragi and Shinano joined the fleet. Arakawa is the first step in increasing the size of the Imperial Japanese Navy, allowing it to guard the growing number of Japanese colonies spread across known space while retaining the option of offensive operations.
6th August 1985The buoys recently deployed by Takumisora detect several skirmishes between the People’s Republic of Xiama and the Capella Imperium in the Faroe and Orkney systems.
31st August 1985The survey cruiser Harukaze transits one of the two unexplored jump points in Andaman and discovers Mayotte, a system with a G5-V primary, similar to Sol, orbited by a hot barren terrestrial world, an airless dwarf planet and a gas giant with fifteen moons. Given the relatively limited number of bodies, Harukaze begins a geological survey, during which she encounters a small Bloodclaw colony on the dwarf planet, including active emissions from surface-to-orbit weapons and a ground forces signature of 6000 tons. Fortunately, the colony is detected before Harukaze moves within weapon range. She gives the planet a wide berth for now, but it will be worthy of further investigation, most likely by an invasion force.
25th September 1985Protected by Atago and Takao, the new salvage ship Kochi Maru completes the recovery of all seven Wokou wrecks from Kariya, then retreats back to Sol, followed by the heavy cruisers. With all the wrecks cleared, there is no need to maintain a substantial presence, so the only Imperial Navy vessels remaining in the system are two H3K ‘Shoki’ patrol craft.
18th October 1985A research facility is delivered to Mauritius Base, although there is insufficient population to operate it, at least for the moment. A second facility has recently been delivered to Sapporo Base. In both cases, the lone research facility is to allow disassembly of salvaged components that have potential to aid research, rather than having to transport them all the way back to Earth, or a research colony. In the case of Mauritius, that transport could take around nine months with the most common freighters, although new faster freighters are under construction. The facilities have to be fully staffed to conduct the disassembly, but additional colonists are en route to Mauritius Base, using the recently mapped circuitous route through the Zharov system.
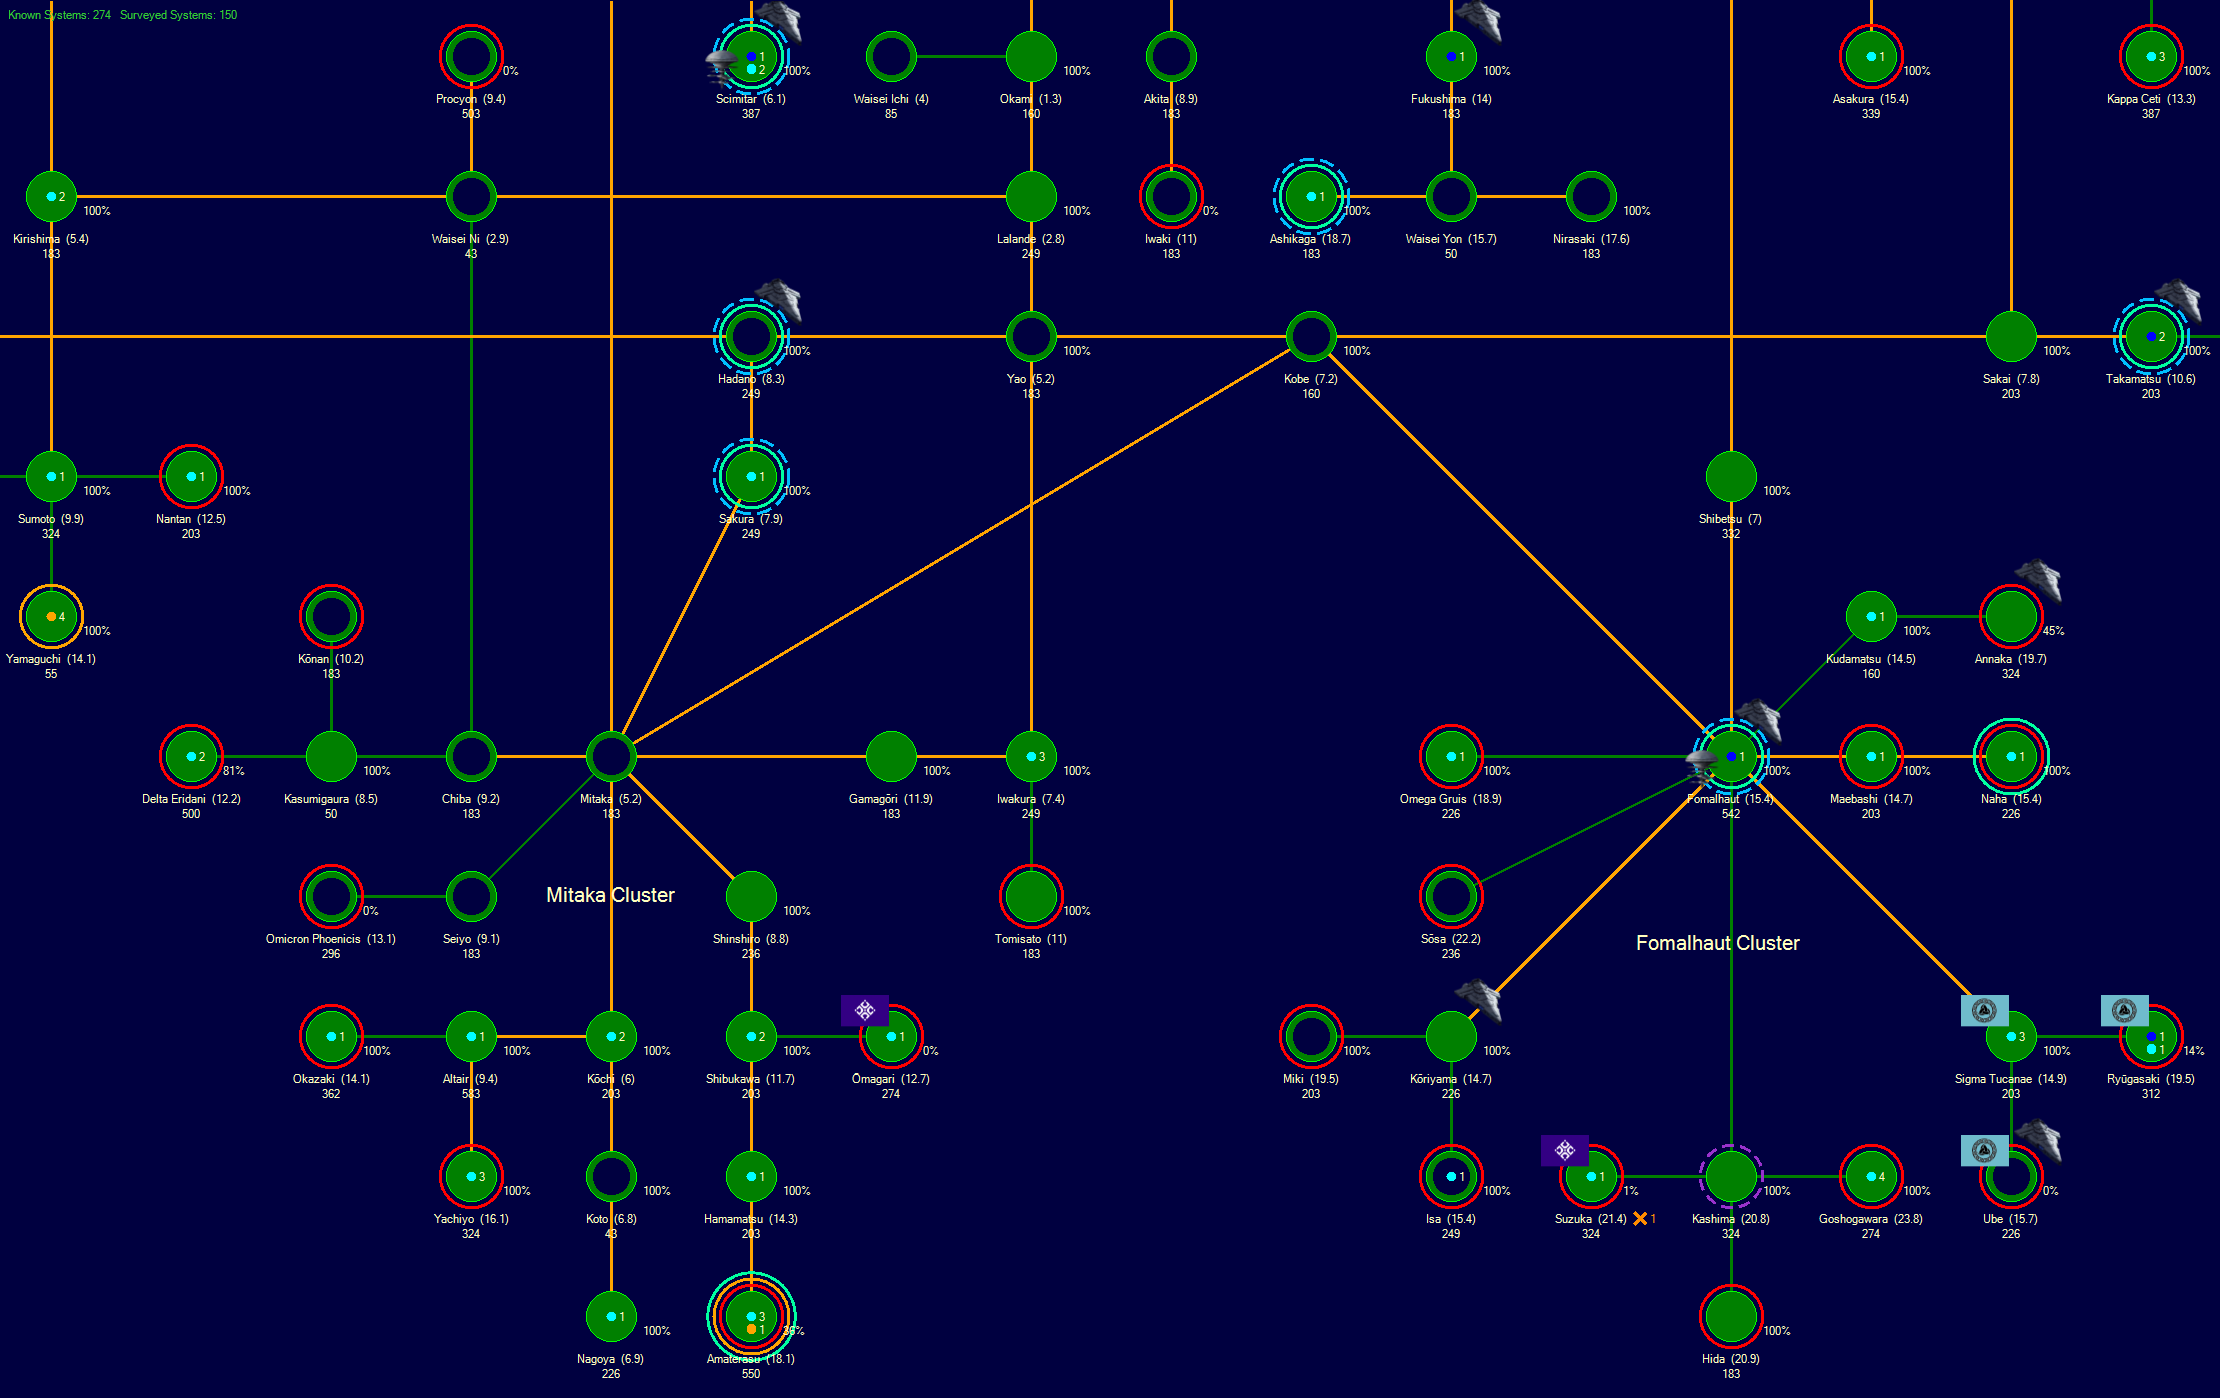
One hundred and eleven of the Empire of Japan’s research facilities are based on Earth. Thirty-two are located on Osaka-B I, which has an ancient construct with an eighty percent boost to Sensor research, with a further thirteen at Takahama II, which has a construct that adds forty percent to defence research. Ashikaga II, three jumps outward from Matsuyama, at the end of a dead-end chain, is home to eleven facilities and a propulsion construct, with a thirty percent boost. The second planet of the Naha system, two jumps out from Fomalhaut, has a ninety percent sensor construct and is home to two research facilities that were recovered from Zuijin ruins on the planet. No further facilities have been sent due to the threat of the Mizuchi-Ha attacking or cutting off Fomalhaut.
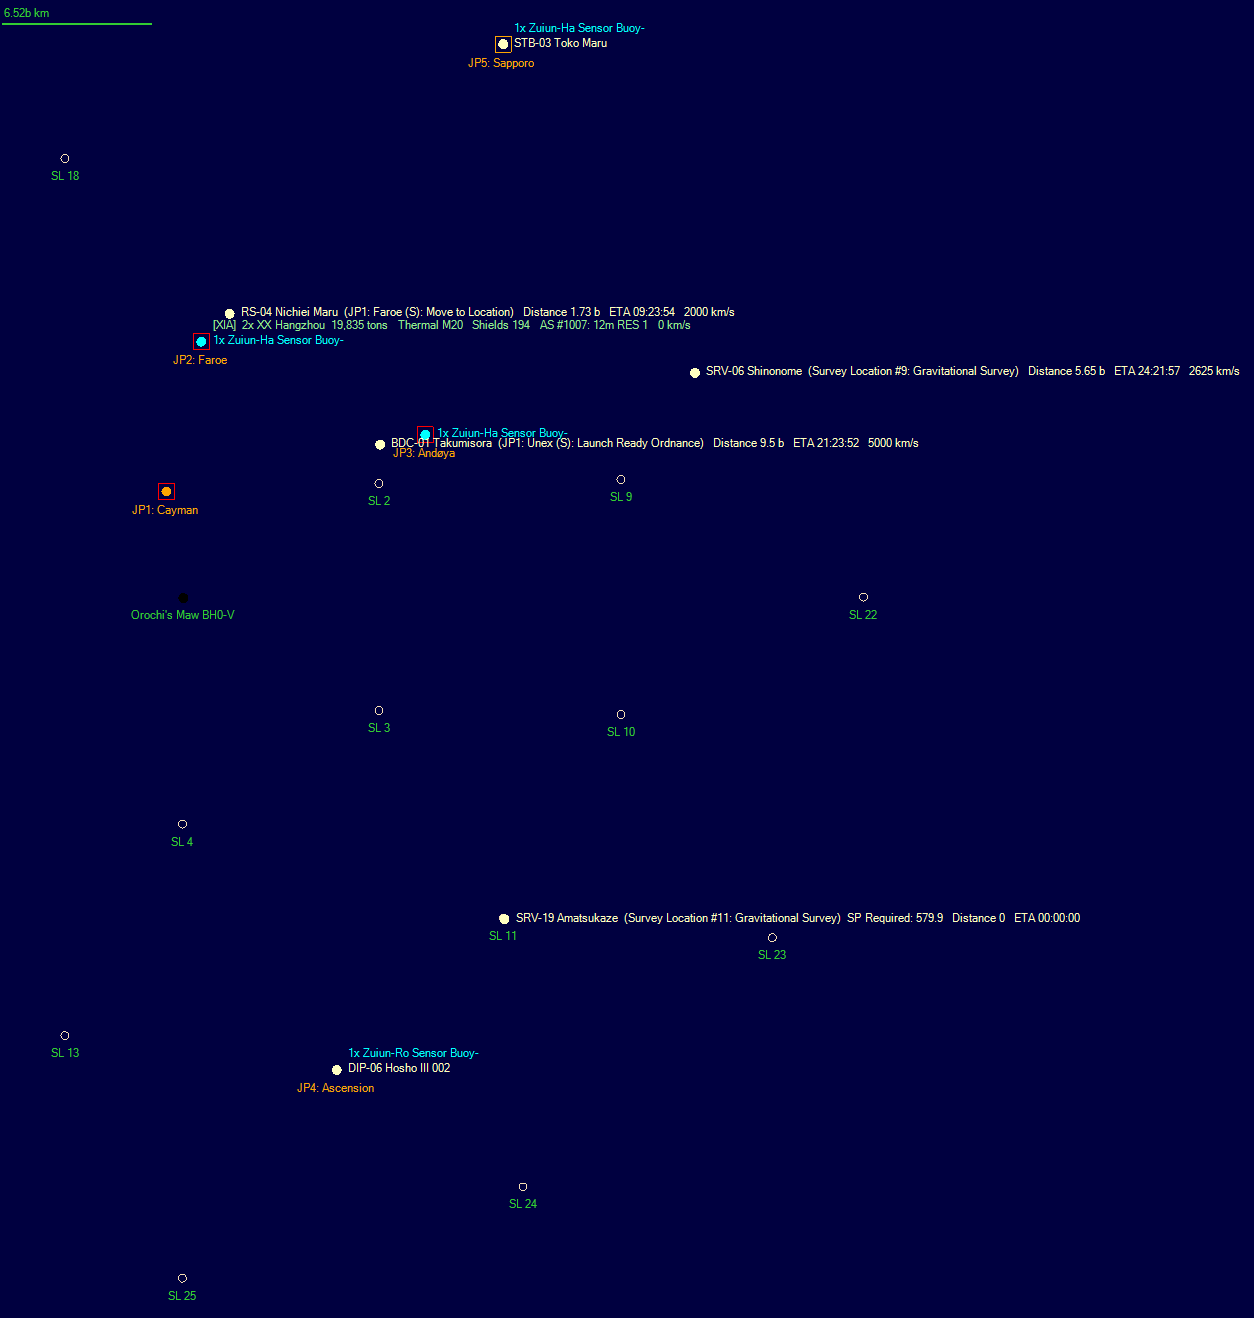
30th November 1985An newly discovered jump point in Bermuda, probed by the survey cruiser Murakumo, leads to a planetless system named Cayman. A day later, the survey cruiser Shirayuki transits an unexplored jump point near the centre of Orochi’s Maw and finds herself in the same system, with a substantial Xiamen fleet on her arrival jump point. Sapporo now connects to Orochi’s Maw via three routes; directly, via Ascension and via Bermuda and Cayman. Despite the ongoing survey efforts, the link to known Xiamen space has not been discovered.
 6th December 1985
Sensor buoys either side of the Mauritius – Comoros jump point have detected several Bloodclaw ships transiting the jump point over a period of several weeks, including ships with military engines. In Comoros itself, there are Zharovian warships on the Comoros – Andaman jump point, but the Dominion ships seems to be heading to the Chagos system. A sensor buoy on the Chagos – Comoros jump point has a current contact with three 11,646 ton Bay Cat class ships, with military engines, and a single 32,000-ton Iriomote class, which has commercial engines.
The light cruiser Nagara, which left orbit of Mauritius Base several days ago with orders to investigate, is seven hundred million kilometres from the Mauritius – Comoros jump point when she detects a Javan Leopard class freighter on a converging course. Closer to the jump point, the sensor buoy detects an approaching Tiger class ship of 19,954 tons. The Tiger has commercial engines but its function remains unknown. Nagara changes course to intercept the freighter, destroying it in a single volley, then pursues the Tiger, which has transited into Andaman and disappeared from sensors.
Nagara heads for the Chagos jump point, on the assumed route of the Tiger, and soon detects the fleeing ship. Sixteen hours after transit, she destroys the Tiger then continues outward to conduct her secondary mission; providing protection for Kimikawa Maru while she salvages the wrecks of the four Bloodclaw ships that were destroyed by Harukaze’s fighters near the Comoros - Chagos jump point.
12th December 1985Harukaze sends her E2A scout through the second unexplored jump point in Andaman, while she emplaces a sensor buoy on the Andaman side. Two Bloodclaw ships, a 59,344-ton Leopard Cat and a 16,236-ton Lynx class, both of which are new types, are stationed on the far side. As soon as the scout arrives, they transit into Andaman. Harukaze finds herself facing the two ships at point-blank range, so she launches both her fighters and follows the scout through the jump point. The new system, named Silhouette, comprises an orange K5-V star orbited by four planets and sixteen moons. One of the moons orbiting Silhouette III, a superjovian, has a nitrogen – CO2 atmosphere and an ice sheet covering half the surface. Two unknown wrecks are close to the orbit of the third planet with four wrecks of the Wokou Raiders in a group half a billion kilometres further out.
In Andaman, the two Bloodclaw ships move away from the jump point at 505 km/s with the fighters in pursuit and firing on the Lynx, which has military engines. For forty-five seconds, the fighters strafe the alien ship’s armour without penetrating, then they are instantly obliterated when it opens fire with seven twin gauss cannon turrets, presumably after recovering from jump shock. As the alien ships are only 25,000 km from the Andaman – Silhouette jump point, Harukaze dare not transit back into Andaman, so she begins a survey of Silhouette while calling for assistance. Nagara is already in Comoros, adjacent to Andaman, to provide cover for future salvage operations. While she waits for Kimikawa Maru, she diverts into Andaman to search for the Lynx.
 22nd December 1985
Nagara arrives at the Andaman – Silhouette jump point, after moving around to approach from the opposite direction to prevent any attempt to enter the latter system. There is no sign of the Lynx or Leopard Cat. Harukaze dispatches her scout to the Silhouette side to check if they have transited, but the jump point is deserted. As the jump point is secure, Harukaze launches a reconnaissance drone at Silhouette III to check for signs of life and starts heading back to the Andaman jump point.
The drone detects a very large Zuijin fleet orbiting the first moon of Silhouette III, comprising five orbital bases, nine 29,000-ton Vengeance class missile cruisers, four Ravager class escort cruisers and sixteen other vessels, totalling six hundred thousand tons. Fifteen Retribution class fuel harvesters and ten more Ravager escort cruisers are in orbit of Silhouette III itself. This is the second largest Zuijin force ever detected, which explains the wrecks in the system.
 24th December 1985
All six Taihō-series carriers have been refitted to the Taihō III class, which includes magnetic fusion drives and the latest sensor suite. The thirty-six Mitsubishi A3M ‘Hayabusa’ fighters in each Kōkūtai (strike group) have been replaced by thirty-six Mitsubishi A4M 'Ryūjin' (Dragon God) fighters, which have a top speed of 24,000 km/s, which should be sufficient to combat the swift Mizuchi attack craft, as well as providing an effective missile shield for the Kido Butai.
Taihō III class Carrier 54,000 tons 922 Crew 8,449.5 BP TCS 1,080 TH 8,640 EM 0
8000 km/s Armour 1-127 Shields 0-0 HTK 242 Sensors 8/14/0/0 DCR 26-4 PPV 0
Maint Life 1.43 Years MSP 5,042 AFR 897% IFR 12.5% 1YR 2,720 5YR 40,794 Max Repair 720 MSP
Hangar Deck Capacity 24,000 tons Magazine 867 / 0
Kaigun-Taisa Control Rating 3 BRG AUX PFC
Intended Deployment Time: 6 months Flight Crew Berths 480 Morale Check Required
Koga-Murakama KM-1440-B Fusion Drive (6) Power 8640 Fuel Use 32.20% Signature 1440 Explosion 12%
Fuel Capacity 2,619,000 Litres Range 27.1 billion km (39 days at full power)
Rakurai-Ho Anti-ship Missile (72) Speed: 40,000 km/s End: 4.4m Range: 10.6m km WH: 15 Size: 12
Type 45 Go-11F Search Sensor (1) GPS 15120 Range 116.9m km Resolution 120
Type 42 Go-21E Missile Detection (1) GPS 14 Range 7.9m km MCR 710.9k km Resolution 1
Type 42 Go-71E Fighter Detection (1) GPS 280 Range 24.1m km Resolution 10
Type 42 Go-63D Passive Sensor (1) Sensitivity 14 Detect Sig Strength 1000: 29.6m km
Type 33 Go-53C Passive Sensor (1) Sensitivity 8 Detect Sig Strength 1000: 22.4m km
Electronic Warfare Jammers: Sensor 3 Missile 4
Strike Group
36x Nakajima B2N 'Tenzan' Carrier Strike Speed: 12801 km/s Size: 7.5
36x Mitsubishi A4M 'Ryūjin' Fighter Speed: 24000 km/s Size: 5.5
2x Aichi E2A Scout Speed: 8002 km/s Size: 5
Mitsubishi A4M 'Ryūjin' class Fighter 275 tons 1 Crew 137.9 BP TCS 5 TH 132 EM 0
24000 km/s Armour 1-3 Shields 0-0 HTK 1 Sensors 0/0/0/0 DCR 0-0 PPV 1.65
Maint Life 1.59 Years MSP 25 AFR 55% IFR 0.8% 1YR 11 5YR 172 Max Repair 66 MSP
Kaigun-Shōsa Control Rating 1
Intended Deployment Time: 0.1 days Morale Check Required
Koga-Murakama KM-132-DB Fusion Drive (1) Power 132 Fuel Use 1661.74% Signature 132 Explosion 30%
Fuel Capacity 9,300 Litres Range 0.37 billion km (4 hours at full power)
MK III Cannon (1x2) Range 30,000km TS: 24,000 km/s Power 1.5-1.5 ROF 5
Type 43 Go-34F Cannon Fire Control (1) Max Range: 68,160 km TS: 24,000 km/s ECCM-3
R-1B Tokamak Fusion Reactor (1) Total Power Output 1.5 Exp 15%
Type 42 Go-24E Fighter Sensor (1) GPS 3 Range 3.5m km MCR 317.9k km Resolution 1
3rd January 1986The third buoy deployment ship, Yamabiko, has replaced the buoys around the Kariya system that were destroyed during the recent engagements with the Mizuchi-Ro. Preceded by a Kawanishi H3K, she moves into Katagami, first emplacing a buoy on the Katagami – Kariya jump point, before moving to the Nu Reticuli jump point. The H3K enters Nu Reticuli, where she finds the same 2591-ton Redback that was encountered in October 1983. As before, it runs at 9,264 km/s, faster than the H3K. Yamabiko enters the system and places a buoy, then moves on to the Katagami – Yashio jump point.
5th January 1986Nagara, heading back to Mayotte from the Silhouette jump point, encounters the Lynx and Leopard Cat ahead of her on a similar course. She closes in, avenges the two fighters by destroying the Lynx from well outside the range of its gauss cannon, before moving to point-blank range and firing on the Leopard Cat, which disintegrates due to a large secondary explosion. She picks up the survivors then continues on to Comoros.
13th January 1986The H3K scouting for Yamabiko transits into Moriguchi, the original contact system for the Mizuchi-Ro, and is instantly destroyed. Waiting on the jump point were eight Scorpion-Tail escorts, six 18,105-ton Huntsman class and thirty-six attack craft of various types. Yamabiko, en route to the same jump point, immediately reverses course and heads back to Kariya.
14th January 1986The Takao III-Ro class heavy cruisers Chōkai and Maya arrive at Mauritius Base as part of a gradual build-up with the ultimate aim of invading the Bloodclaw home world. The old battlecruiser Kirishima is already at the planet, along with the light cruiser Naka. The light cruisers Nagara and Yura are deployed in the adjacent system of Comoros, attempting to locate and destroy Bloodclaw shipping and protect subsequent salvage operations. Mauritius Base has now reached a population of five million and has thirty construction factories, plus a research facility. Freighters and colony ships continue to use the circuitous route through Zharov, which is avoiding any threats of hostile action from the Zharovians.
15th January 1986Kitsune, the first in a class of stealthy scouts, transits from Fomalhaut into Sigma Tucanae, which is the last point of contact with the Mizuchi-Ha and adjacent to the initial contact system of Ryugasaki. The Kitsune class has the first Japanese cloaking device, which reduces its signature from 3750 tons to just 750 tons, or about the size of a Mizuchi attack craft, while the thermal output of its engines has been reduced by sixty-five percent. Even when moving at full speed, the Kitsune has a lower thermal signature than most fighters. Finally, a third generation sensor jammer will make the ship harder to detect for hostile sensors that lack the necessary ECCM. One third of the hull space is dedicated to two large passive arrays, for both EM and thermal detection, allowing the Kitsune to act as a stealthy, mobile tracking station. On this occasion, its mission is to locate and monitor any Mizuchi-Ha activity in the system.
Kitsune class Stealth Scout 3,750 tons 124 Crew 777.4 BP TCS 15 TH 63 EM 0
2400 km/s Armour 1-21 Shields 0-0 HTK 22 Sensors 132/168/0/0 DCR 5-13 PPV 0
Maint Life 7.36 Years MSP 647 AFR 22% IFR 0.3% 1YR 21 5YR 314 Max Repair 168 MSP
Kaigun-Shōsa Control Rating 1 BRG
Intended Deployment Time: 3 months Morale Check Required
Koga-Murakama KM-180-TR Fusion Drive (1) Power 180 Fuel Use 52.70% Signature 63.00 Explosion 10%
Fuel Capacity 580,000 Litres Range 52.8 billion km (254 days at full power)
Type 42 Go-13E Navigation Sensor (1) GPS 3360 Range 55.1m km Resolution 120
Type 44 Go-66D EM Array (1) Sensitivity 168 Detect Sig Strength 1000: 102.5m km
Type 44 Go-56C Thermal Array (1) Sensitivity 132 Detect Sig Strength 1000: 90.8m km
Cloaking Device: Class cross-section reduced to 20.0% of normal
Electronic Warfare Jammers: Sensor 3
18th January 1986The Mizuchi-Ro Redback that was encountered in Nu Reticuli approaches the Katagami – Kariya jump point. On the two occasions when this ship was detected previously, it outran a pursuing H3K. This time, it will not escape so easily. A brand new Kawanishi H4K ‘Kumo’ (Cloud) patrol craft is stationed on the jump point and it is capable of 10,000 km/s, over 700 km/s faster than the elusive Redback. Realising it cannot escape, the Mizuchi-Ro ship attempts to ram, so the H4K holds the range open and destroys the Redback with three minutes of continuous fire.
Kawanishi H4K 'Kumo' class Long Range Patrol 500 tons 12 Crew 111 BP TCS 10 TH 100 EM 0
10001 km/s JR 3-50 Armour 1-5 Shields 0-0 HTK 4 Sensors 0/1/0/0 DCR 0-0 PPV 0.98
Maint Life 4.89 Years MSP 38 AFR 20% IFR 0.3% 1YR 3 5YR 39 Max Repair 50 MSP
Kaigun-Shōsa Control Rating 1
Intended Deployment Time: 24 months Morale Check Required
Komatsu KSJ-50-B Jump Drive Max Ship Size 500 tons Distance 50k km Squadron Size 3
Koga-Murakama KM-100-B Fusion Drive (1) Power 100 Fuel Use 138.11% Signature 100 Explosion 12%
Fuel Capacity 90,300 Litres Range 23.5 billion km (27 days at full power)
MK II Light Cannon (1) Range 20,000km TS: 10,001 km/s Power 0.75-0.75 ROF 5
Type 42 Go-34F Patrol Craft Fire Control (1) Max Range: 48,000 km TS: 8,125 km/s ECCM-3
R-0B Tokamak Fusion Reactor (1) Total Power Output 0.8 Exp 15%
Type 42 Go-14E Small Strike Sensor (1) GPS 336 Range 17.4m km Resolution 120
Type 42 Go-24E Fighter Sensor (1) GPS 3 Range 3.5m km MCR 317.9k km Resolution 1
Type 33 Go-55C Minimal Passive Sensor (1) Sensitivity 0.8 Detect Sig Strength 1000: 7.1m km
Type 43 Go-65D Minimal Passive Sensor (1) Sensitivity 1.4 Detect Sig Strength 1000: 9.4m km
29th January 1986The diplomatic ship Heiwa, stationed in the Madagascar system where she occasionally encounters ships of the Helgrim Protectorate, detects thirty-six strength-1 detonations and eighteen strength-1 energy weapon impacts close to an asteroid within the system’s main belt. A similar amount of weapon fire happens every fifteen seconds for five minutes, interspersed with the appearance of the wrecks of three Helgrim Lofn class ships. Little is known about the Lofn except that it has commercial engines, based on a previous passive contact. The wrecks are 39,546 tons. Weapon fire continues after the loss of the third ship, then ceases, so presumably some Helgrim ships survived to move outside weapon range. The identify of the assailant is unknown, so the diplomatic ship heads in-system in an attempt to make contact. When Madagascar was first discovered, it contained twenty-nine wrecks, including three Helgrim destroyers. Kimikawa Maru salvaged all the wrecks but did not encounter any non-Helgrim forces during her time in the system.
3rd February 1986The Followers of Zharov have sent a message to the troop transport Keizan Maru, requesting that it leave the Paramushir system, which is two jumps out from Fiji Naval Base on the route to Mauritius. This is the first time any such request has been made with regard to Paramushir, which is four transits from the Zharovian home system, suggesting the Followers may have established a colony. In 1973, a Zharovian ground force was detected on Paramushir II, but there was no colony. A reconnaissance mission will be launched to investigate. If the Zharovians become difficult regarding Paramushir, it will further complicate efforts to reinforce Mauritius Base.
In Madagascar, the diplomatic ship encounters six Helgrim Lofn class ships on a reciprocal course, escorted by a single military-engined Vali class of 7,130-tons. If this was the Helgrim fleet that was attacked, it is possible the Vali was the source of the strength-1 energy weapon impacts. A few hours later, another Lofn is detected, moving at approximately seventy-five percent speed – probably the ship that was under fire when the Helgrim moved out of range.
5th February 1986Heiwa moves within ten million kilometres of the asteroid where the recent combat occurred and finds a crippled Vali class ship 700,000 km from the wrecks. There are no sensor contacts on the asteroid, which has moved on in its orbit, although Heiwa’s sensors will not detect ground forces at range. Her commander, Kaigun-Taisa Kimiyama Masago, decides to move closer and eventually takes his ship into orbit, but there is no sign of whatever, or whoever, attacked the Helgrim ships.
6th February 1986Heiwa moves to the inner system to look for any more signs of life. Her active sensor detects a stable jump point just thirty million kilometres from the star, so she moves to investigate. Normally, a diplomatic ship would not engage in exploration or scouting activity, but there are no other Imperial Navy ships between Madagascar and Mauritius, four transits away. Besides, Kaigun-Taisa Kimiyama once commanded the battleship Hyūga before being transferred to the diplomatic corps, so he is eager for a little adventure.
Heiwa transits into a red dwarf system with six planets and almost fifty moons, none of which are of immediate interest. There are twenty-seven wrecks on the jump point, including a Vali and three Gefjons of the Helgrim Protectorate. A further six wrecks stretch out in a million kilometre line away from the jump point and there are three more close to the orbit of the sixth planet. The system is named Sri Lanka, following the Indian Ocean islands nomenclature for this area of known space.
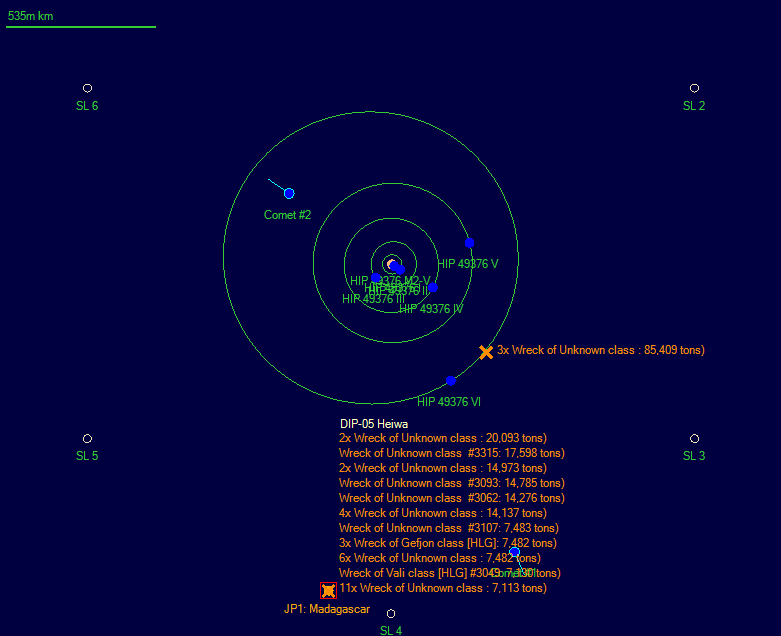
Seven hours after Heiwa arrives in Sri Lanka, a force of five Helgrim ships appears, comprising a Vali, two 14,276-ton Aegir class and two 14,137-ton Hermod class. The Aegir and Hermod are new ship types. Detecting them allows Heiwa to identify five of the wrecks on the jump point as an Aegir and four Hermods. They close on the jump point at 4728 km/s and transit into Madagascar. Heiwa follows and finds them on a course in the general direction of the Zanzibar jump point, but not on an exact course. Despite his ship being 500 km/s slower, Kaigun-Taisa Kimiyama decides to follow as far as he can. Once contact is lost, Heiwa maintains the same course.
8th February 1986Heiwa detects another stable jump point in Madagascar, directly ahead on the course she is following. She transits to discover a G5-V star with eight planets and thirty-five moons, which is designated as Fregate. The third planet is entirely covered in an ice sheet and has a nitrogen – oxygen atmosphere of 0.94 atm, although only 0.03 atm of oxygen. The surface temperature is -99C, so it is unlikely to be inhabited. A fleet of thirteen Helgrim ships is on the jump point, including several new types, plus a single unidentifiable wreck. The four largest ships are a Magni class, at 21,406 tons, followed by a Hymir of 14,973 tons and three Aegirs of 14,276 tons. The five remaining ships, all of which are approximately 7100 tons, include three Valis, a Skadi and a Buri. None of the ships have been previously detected. Heiwa head in-system to check Fregate III for signs of life.
9th February 1986After Kitsune confirmed the Sigma Tucanae – Ryugasaki jump point was clear, an H4K ‘Kumo’ took up a picket position. A Mizuchi-Ha Python class survey ships transits into Sigma Tucanae and is swiftly run down by the H4K.
Four days later, Kitsune, which is positioned twenty-five million kilometres from the Ryugasaki jump point, detects another Python seventy-five million kilometres away on a course for the jump point. The H4K intercepts and the Mizuchi-Ha lose another survey ship.
17th February 1986A large fleet of the Capella Imperium transits into Orochi’s Maw from Andoya, then splits up and moves away in six different directions. Three of the smaller forces comprise a commercial-engined Hathor class of 68,855-tons, escorted by two Horus class ships of 7,238 tons. Two more forces comprise a single Hathor. The last group comprises a Sebek of 35,351 tons, a Hepi of 179,672 tons, a Khnum of 179,909 tons and four Khonsu class at 36,518 tons. All seven ships are heading in the same direction at slightly different speed, ranging from 1,369 km/s to 1,490 km/s.
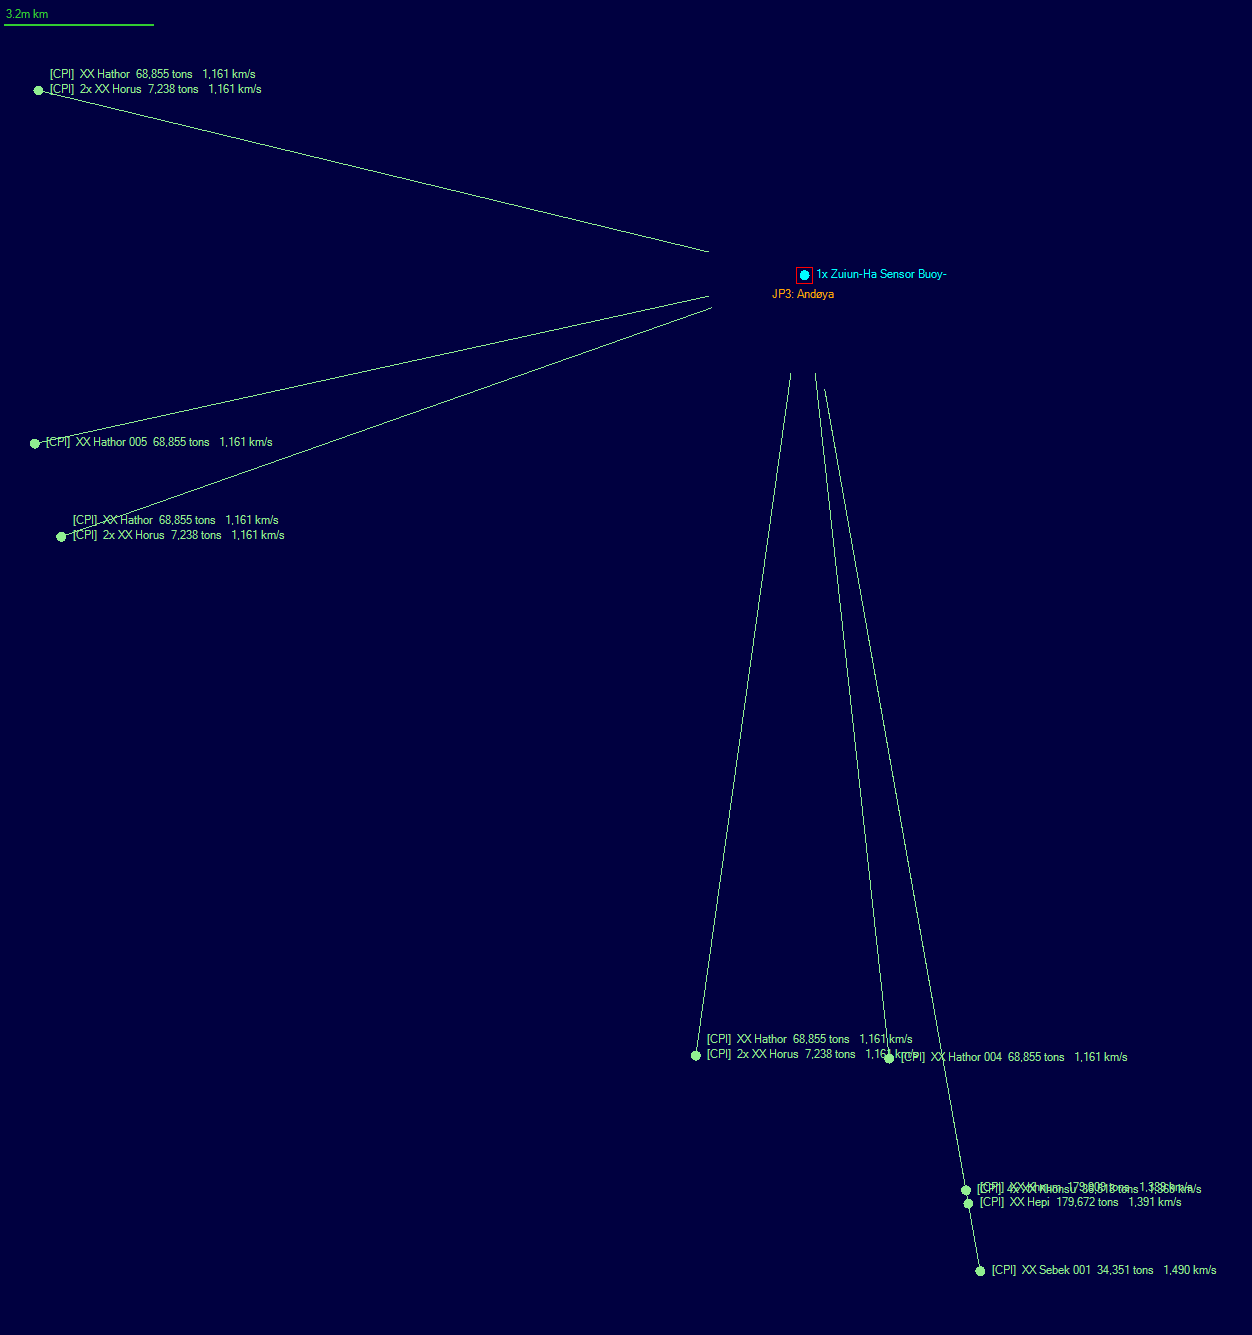
Three of the Hathor groups appear to be heading for the Cayman, Faroe and Ascension jump points respectively, which suggests the other groups maybe on course for other, as-yet-undiscovered jump points. An hour after the arrival of the first fleet, a second smaller one transits into Orochi’s Maw, comprising two Khonsu, a Khnum, a 36,518-ton Chem and a 179,672-ton Busiris. They follow the staggered group from the first fleet. The sudden Capellan activity in Orochi’s Maw is concerning, especially as it connects directly to the key Sapporo system and two of the other jump points connect indirectly to Sapporo via other systems. However, a few hours later, all the Capellan ships reverse course and return to Andoya.


