Recent Posts

Pages: [1] 2 3 ... 10
1
Humanity First / Humanity First: Final Assault on Chi Draconis
« Last post by Kurt on Today at 11:28:19 AM »
January 14, 2145: The Retribution Fleet sets out for Shield Base.  It has been reinforced to include 1xStar(C) BB, 2xStar Flight Ib BB, 3xCV, 3xPlanet Flt IIIc BC’s, 3xCVS, 1xAnnihilator Flt IVb Jump Cruiser, 1xHero Flt IVb DD, 7xHero Flt IVb DD, 8xShield Flt III DDE, 78xEagle Class Strike Fighters, 36xForward Flt II class attack fighters, 9xAegis Scout Fighters.  The Empire intends for this to be the last sortie against the Swarm in Chi Draconis.  To reinforce the fleet to this size, the Solar system has been stripped of most of the fleet’s capital ships.  In fact, only the battlecruiser Jupiter has been left behind to defend the solar system, although it is well supported by interceptors, destroyers, and destroyer escorts. 

January 31, 2145: The Retribution Fleet arrives at Shield Base and begins refueling.  It is reinforced by a jump cruiser from the Base’s fleet, two scouts, and a tug.  In addition, a group of tankers are dispatched to the Gamma Carinae system to support the fleet.  The tankers and tug will have to assemble in the Luhman system as that’s where the jump gate network ends, and there are no jump ships of the correct type to escort them further until the jump troopship assigned to Monoceri can return from transporting survey teams to the frontier.   

February 8, 2145: The Retribution Fleet has arrived at the jump point to Chi Draconis and joined the two scouts that had arrived several days earlier.  The fleet jumps through, and after confirming the far side is clear, sends a ship back to bring the scouts in.  After detaching a jump cruiser to watch the jump point, the fleet and the two scouts move in-system to the waypoint established in previous attacks as the assembly point for the carriers to launch their strikes. 

February 12, 2145: The fleet is now in position, 650 mkm’s from the only planet in the system, the known assembly point for the swarm fleet.  Admiral McCullick orders the fleet to close to point #2, approximately 250 mkm’s closer, so that the scout’s very sensitive sensors can determine if the swarm fleet is still present. 

February 13,2 145: The scouts are now within theoretical range of their active sensors, but detect nothing over the planet.  Unlike the raiders, the swarm is not known to use active emission reduction tech, so if they were present the scouts should be able to see them.  Admiral McCullick orders the fleet and the scouts to continue closing. 

By 0927 hours the fleet has closed to 250 mkm’s from the planet and continues to detect nothing.  At this point Admiral McCullick orders the carriers to launch their missile-armed fighters, along with their Aegis scout fighters, to probe closer to the planet. 

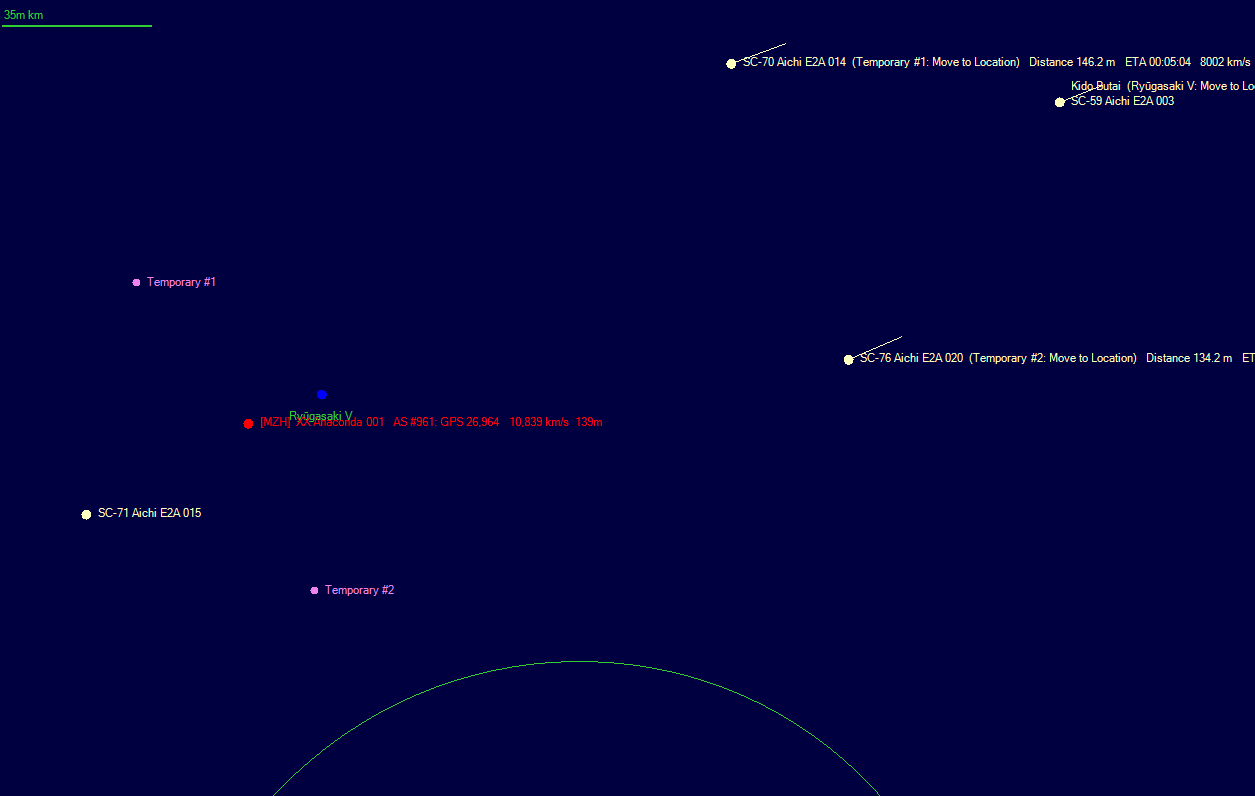
At 1215 hours, at 41 mkm’s from the planet, the fighters detect fourteen small swarm ships at the planet, of four classes all sub-1,000 tons.  The fighters continue to close after reporting the contact to the fleet. 

Unlike during the previous attacks, the small craft maintained their orbit and didn’t react to the approach of the fighters.  Eleven fighters fired their missiles, each targeting a different swarm ship with their eight missiles, but three failed to get a lock on as the three abductors were too small to target and they would have to close even more to get a lock on.  The swarm ships started running when the fighters launched, but it was too late.   The missile wave swooped in on the fleeing swarm ships and wiped all eleven from space, leaving three Abductors to continue running. 

The fighters continued to close, and when they reached one million kilometers they opened fire again, sending twenty-four missiles against the remaining three small craft, wiping them from space. 

With the known swarm ships destroyed, the fighters set out along their last course.  The swarm ships had originally begun running directly away from the fighters when they had launched their missiles, but after the first missile wave destroyed the bulk of their fleet, the remaining three small craft had turned approximately 90 degrees out-system and continued running.  Lt Commander Wireman was curious if they were running towards something. 

After continuing along this course for three hours and detecting nothing, Commander Wireman ordered his fighters to turn back and head towards the planet.  The fleet began moving towards the planet as well. 

February 14, 2145: The fleet has now assembled one million kilometers from the planet.  No ground units have been detected, so Admiral McCullick orders the fleet to orbit the planet.  The missing heavy ships is a concern, especially as there is no place else to go in the system.  There are survey ships en route to the system to complete a survey, and the fleet will wait for them in the hopes of tracking down the swarm to where ever it is hiding. 

April 3, 2145: A gravitic survey group arrives in the Chi Draconis system and immediately splits up to begin surveying for new jump points. 

April 5, 2145: The geo-survey group dispatched to assist the Retribution Fleet has arrived and probed the unknown jump point in the Gamma Carinae system, adjacent to the Chi Draconis system.  They have discovered a system with a red star primary, a Venusian planet, four gas giants with eighty-four moons, and a dwarf outer planet.  They jump back to Gamma Carinae and set out for the Chi Draconis system to survey the swarm planet.     

April 25, 2145: The survey ship completes its survey of Chi Draconis B-I, finding large deposits of eight different TN resources, some of which are present at good availability levels.  This, perhaps, explains the presence of the swarm, however, there is no sign of a mining effort.  The planet is terrestrial, but with a Venusian type atmosphere at 55 atmospheres of pressure and an average ground temp of 1188 degrees centigrade.  The gravitic survey continues. 

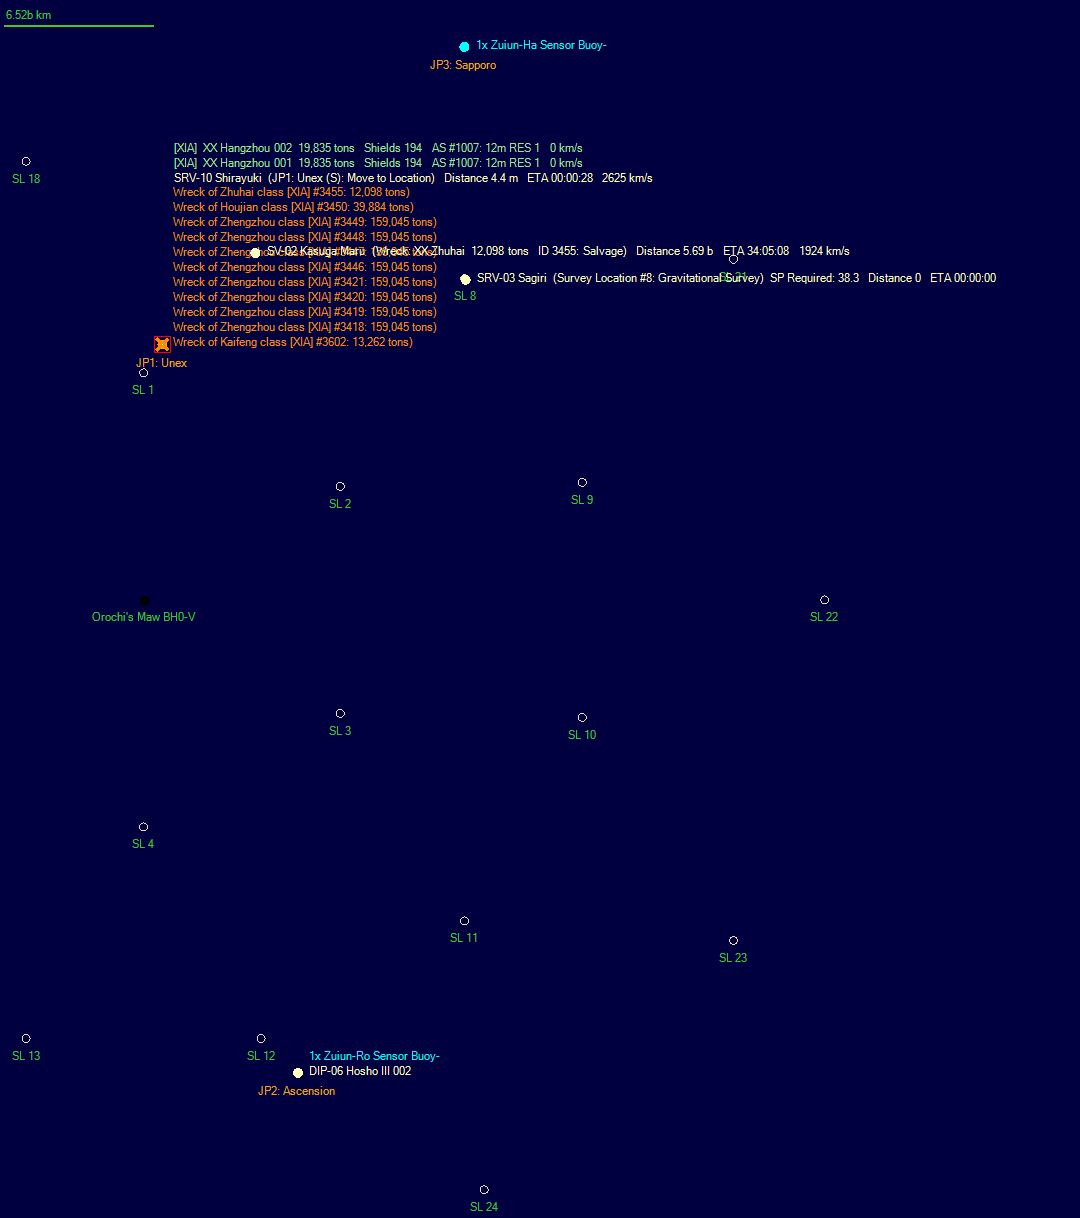
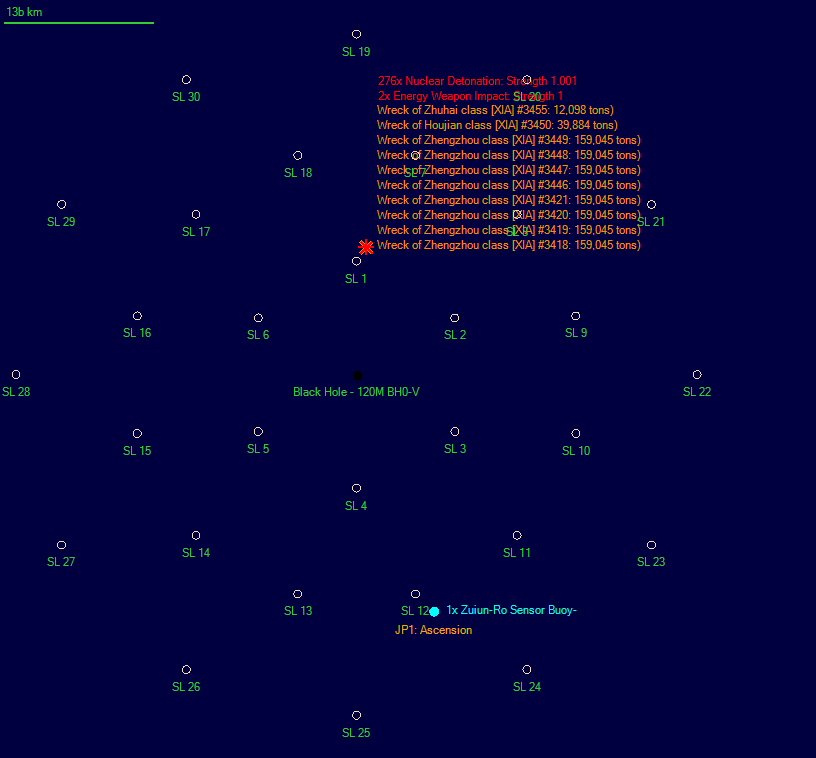
June 13, 2145: The survey of the Chi Draconis system is nearly complete.  No new swarm ships have been discovered, but one new jump point has been localized.  Admiral McCullick dispatches the jump cruiser Eradicator, escorted by a destroyer, a destroyer escort, and a scout to probe the jump point. 

June 24, 2145: The jump cruiser and her escorts jump into the new system and are immediately taken under fire by two swarm ships in close proximity to the jump point.  The Eradicator’s sensors show a 21,030-ton Abomination and a 10,699-ton Abuser sitting just 20,000 kilometers from the jump point.  Fortunately, the Terran squadron jumped into the system about 95,000 kilometers from the swarm ships, giving them a little time to get organized.  The Abomination targeted the Eradicator with eighteen energy weapons of some sort, causing minor shield damage from the one that managed to hit. 

Captain Boddy, aboard the Eradicator, ordered his squadron to target the Abomination.  While the Terran ships tried to get their weapons into action, the swarm ships headed for the jump point.  Ten seconds after the Terran ships appeared in the system, the swarm ships jumped out, appearing close to the Terran scout left behind in the Chi Draconis system. 

The scout, surprised, did the only thing it could and jumped through to the new system, as Captain Boddy ordered his squadron to pursue the swarm ships.  The scout jumped through to the new system as the Eradicator and her escorts approached the jump point.  Fifteen seconds after the swarm ships jumped to Chi Draconis, the squadron jumped after them. 

They appeared in the Chi Draconis system to see the two swarm ships 60,000 kilometers away and fleeing at 2,732 km/s, which appeared to be the Abomination’s top speed.  Captain Roddy ordered his squadron to pursue while they readied their weapons.  The Eradicator suffered to hits to her shields when she appeared.  As they raced away from the jump point, Captain Roddy changed the squadron’s targeting to the Abuser, which had a top speed higher than his ships, and could potentially escape if they destroyed the larger Abomination first. 

As they raced away from the jump point the Abuser opened fire with its lasers, seriously depleting the Eradicator’s shields.  Five seconds later the Abuser fired its lasers again, reducing the Eradicator’s shields to 21%.  The next salvo from the Abuser dropped the Eradicator’s shields and scored her armor, but at that point the Eradicator opened fire, getting hits with its 31.25cm spinal laser, two of its 15cm lasers, and four of its turret-mounted 10cm lasers.  All of the hits on the Abuser appeared to have been absorbed by its armor. 

The Eradicator took another seven hits to its armor, but now the DDE Ancile and the DD Victor Aita opened fire, launching a salvo of AMM’s at the fleeing Abuser and scoring its armor with 15 cm lasers.  At this point the Abuser accelerated away from the Abomination, opening the range on the Terran squadron. 

As the Abuser raced away, the Terrans got multiple hits with their lasers, getting a penetration, but there was no apparent damage.  The Abuser shifted its fire to the Terran DD, getting several hits on its armor.  At this point, Captain Roddy ordered the squadron to accelerate and pursue the fleeing Abuser, but to shift most targeting to the Abomination, which they would pass close to during their pursuit of the Abuser.  Only the Eradicator’s spinal laser and the DDE’s missiles would continue to target the Abuser, for now. 

The next salvo from the Terran ships pounded the Abomination at 26,000 kilometers, getting sixteen laser hits and sixteen gauss cannon hits, with one penetration.  In response, the Abuser continued to target the DD Aita, getting three hits.    The next salvo pounded the Abomination from just 8,435 kilometers range.  Once again, the Terrans got multiple hits and one penetration, but as with the first salvo, the penetration came from a gauss cannon round, and so was low power.  The Abuser continued to fire on the Terran DD, getting multiple hits on its armor. 

The Terran squadron was now past the Abomination, which turned back towards the jump point.  The next Terran salvo on the retreating Abomination was at nearly 50,000 kilometers.  They got multiple hits, and one of the Eradicator’s turrets punched right through a previous penetration and took out one of the Abomination’s engines, reducing it to half speed.  The Eradicator’s spinal laser, finally recharged, stabbed out at the Abuser, now at 71,000 kilometers, but missed.  Captain Roddy ordered one more salvo at the Abomination, and then for all ships to shift targeting to the Abuser.  The next salvo ripped the Abomination from end to end, leaving her drifting.  The Terran ships shifted targeting to the Abuser.  The Abuser had continued targeting the Aita, whose armor was down to 88%. 

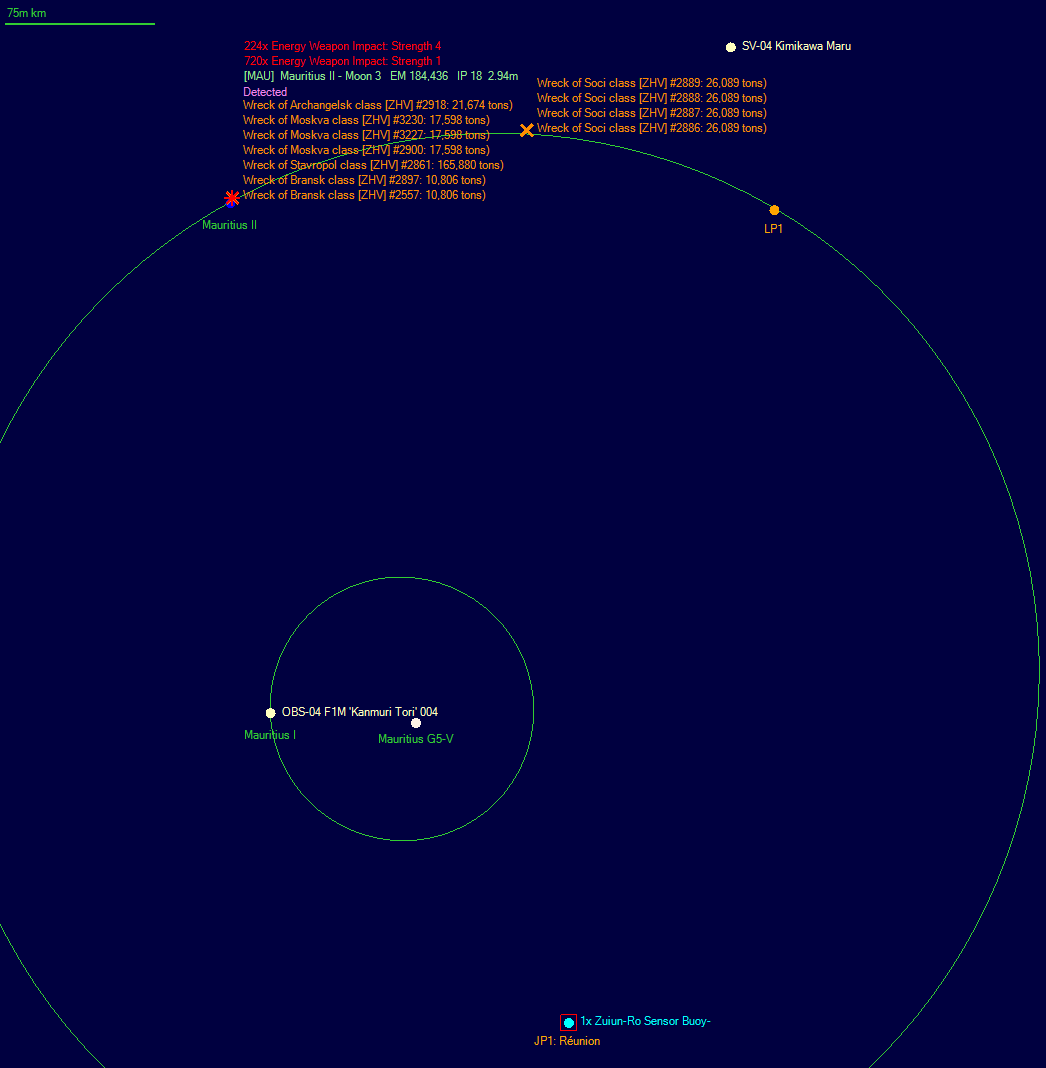
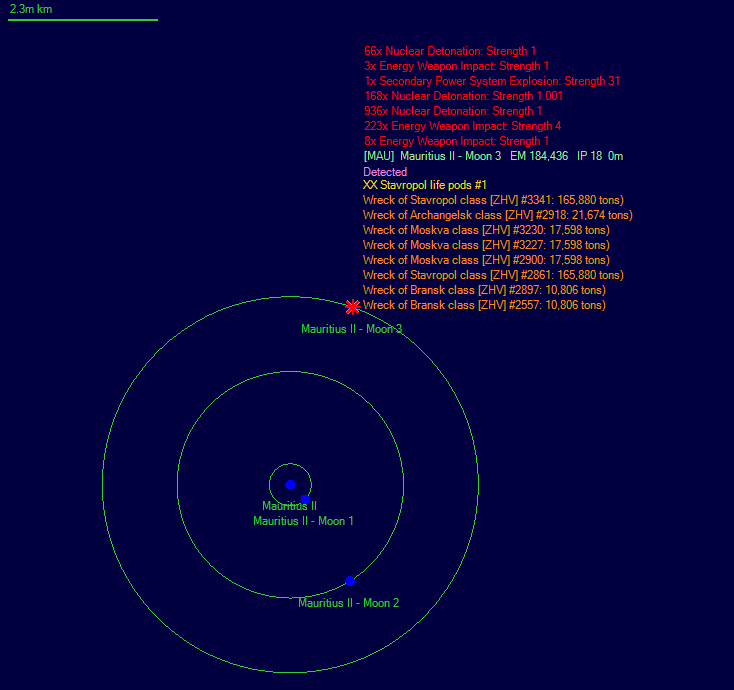
The battle stretched out as the Abuser continued running ahead of the Terran ships.  The range had stabilized at around 80,000 kilometers.  Ten seconds later, the human ships got a penetrating hit that took out an engine, dropping the Abuser’s speed to 8,057 km/s, just slightly faster than the human ships.  The next salvo of laser fire caused a massive internal explosion that destroyed the Abuser.  The Terran ships turned back towards the Abomination, and after four salvoes the Abomination blew up.  The Terran squadron sent off a contact report to the Retribution Fleet and then jumped through to join the scout in the newly discovered HIP 31292 system.  The system consisted of a lonely M3-V star orbited by two small comets. 

With the system clear, the gravitic survey group is dispatched from Chi Draconis to the new system to begin their survey and to determine if more swarm ships are present.  Admiral McCullick decided to relocate his fleet to the jump point to HIP 31292 to be closer to the surveying forces. 

August 24, 2145: The Empire’s first Dreadnought, the Andromeda, is launched and begins its training flight.  The 80,000 ton warship is the pinnacle of Imperial Naval might, and when it is done training it will assume the position of fleet flagship. 

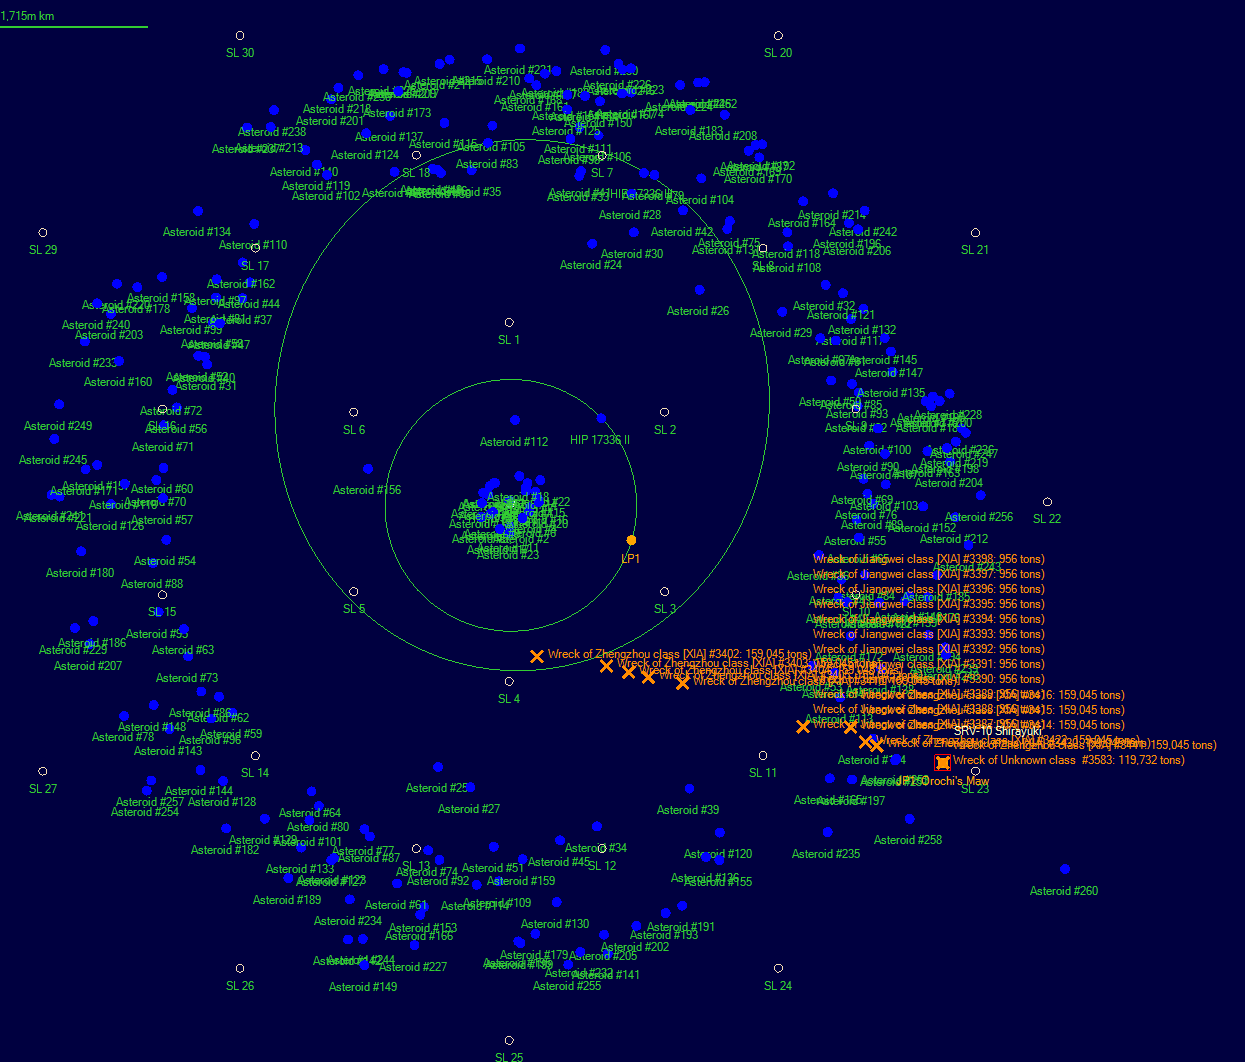
Meanwhile, the survey of the HIP 31292 system is complete, and an astounding five new jump points have been discovered, bringing the system’s total to six.  Only one other system in the empire has close to this number, the Luhman 16 system, with five jump points.  This is frustrating for Admiral McCullick, who was hoping to track down the missing swarm ships.  Mindful of the fact that the swarm were picketing the jump point to the HIP 31292 system, Admiral McCullick reorganizes his fleet, detaching two jump-capable groups.  Group one consists of the flagship, reinforced by the three ships of the Mercury battlegroup.  The second group was built around the jump cruiser Eradicator, reinforced by the Saturn battlegroup.  The Eradicator’s former escorts were returned to the fleet.  The two groups set out to probe the newly discovered jump points. 

September 18, 2145: The Antares jumps through the third new jump point in the HIP 31292 system, discovering a red star system with a planet with an oxygen-nitrogen atmosphere.  The planet is cold, with a thin atmosphere, but given the Reaper’s penchant for occupying such planets, Admiral McCullick calls forward the Retribution fleet to perform a probe in force of the system. 

September 20, 2145: The Retribution Fleet is stationed at the jump point, and the Antares, escorted by the Mercury battle group and two carriers, heads in-system. 

September 24, 2145: Having found nothing at the planet, the Antares and her escorts turn back towards the jump point. 

September 30, 2145: The jump cruiser Eradicator jumps through the last unexplored jump point in the HIP 31292 system and materializes in the Omicron Tucanae system, a previously discovered system on the frontier.  The system contains a Terra-like planet with an atmosphere just a bit too thin, and an environment a bit too cold for human habitation.  The planet was previously probed, but considering they are searching for missing swarm ships, Captain Boddy decides to head in-system and probe the planet again, after reporting his discovery to the Retribution Fleet. 

October 3, 2145: The planet is still clear, so the Eradicator and her escorts turn back towards the jump point to HIP 31292 to rejoin the fleet. 

October 13, 2145: The Retribution Fleet has reassembled in the HIP 31292 system.  Admiral McCullick decides to return to Shield Base to refuel and resupply.  He leaves behind the two survey groups and the scouts to watch for the return of the Swarm. 

November 2, 2145: The Retribution Fleet arrives over Shield Base to refuel and resupply.  Admiral McCullick, pursuant to orders from Terra, detaches a battleship, two battlecruiser groups, a jump cruiser, and a carrier and two strike carriers to reinforce Shield Base, then sets out for home.     

November 11, 2145: A troop transport group sets out from Terra, carrying the 12th Guard Division(reinforced), and a large contingent of STO batteries to establish a forward base on the lone planet in the Chi Draconis System.  The new base will be named Bastion Base, once fully established. 

November 22, 2145: The Retribution Fleet has arrived over Terra and the government announces its success in destroying or scattering the swarm. 

The Emperor gives a system-wide speech extolling the victory of the fleet and the elimination of another threat to humanity’s expansion to the stars, after which he gives out awards and commendations to officers and crews of the Retribution Fleet.   A week of celebration is announced to welcome the fleet home. The speech is well received, and the elimination of another threat is welcomed by nearly all.  The fact that the swarm flagship and several other ships are missing is not mentioned, and is kept a closely held secret.  And while still a minority, there is a growing peace movement that opposes the militarization that characterizes the Empire and its approach to other species, and its leaders are questioning the necessity of genocide against aliens that were never given a chance to talk or surrender. 
2


<United Earth Council Report>

(2367/68)


Project Excalibur is a top secret design project ordered in 2355 by the UNSC, its purpose to design a viable long range strike fighter craft capable of engaging targets up to 150mkm with enough firepower to destroy frigate sized vessels of the day when deployed in squadrons.  The fighter was slated for the planned CVX carrier design that would replace the existing Trafalgar class carrier in the 2370s, the result of Excalibur would be the F-62 Gladius Strike-Fighter, the largest ever vessel with such a designation planned for deployment in squadrons of six for both offensive and defensive roles thanks to missile and coilgun armament.

Despite the impressive capability of the Gladius the costs associated with planned deployment of both the fighter itself and the carriers to utilize them is seen as exorbitant, and it is unlikely that the Gladius if fielded will be seen in large numbers and the planned CVX which has seen designs estimated in the 75,000-125,000t range included is unlikely to see the light of day, forcing any Gladius fighters to be incorporated on existing Trafalgar class carriers.


"It is of great fortune that those who wielded such power are echos of the past, for if they still held such overwhelming might over the stars then at any moment our species could become less than an echo"

(Credit: Unknown Scientist, New Jerusalem, 2368)


The Discovery of New Jerusalem following the exploration of Ruins on Reach by ONI catapulted the organisation to the greatest level of importance since the unification of humanity, new powers were authorised and all evidence of alien life was hidden. Despite this secrecy ONI was ordered to continue researching the alien constructs, on New Jerusalem weapons of great power were discovered far outstripping any capability held by humanity, ONI believes the planet acted as some kind of testing ground for weapons. The significance of the discovery was stunted by the advanced level of technology found, simply speaking it would take decades or more before it could be reverse engineered and fully understood especially with current funding levels and the requirement for top level secrecy.


General Report - 2367/8
(January - December)


April:

April - 15th The Ammunition Transport CAA Sunderland finishes construction

April - 24th Colonists land on New Jerusalem for the first time, ONI ensures alien technology is quarantined and study begins.


May:

May - 22nd The System of Eridanus is discovered

Eridanus
Stars: Unary (M0-V)
Planets: 0 (M0-V)
Moons: N/A
Asteroids: N/A
Habitable worlds: N/A
Potential: N/A

May - 30th The CAA Jima Odyssey class colony ship is commissione don Earth


June:

June - 29th Breakthroughs in construction methods lead to a boom in the manufacturing sector (construction BP12)


July:

July - 29th The colony of Concord is founded in the Aleria system


August:

August - 23rd The system of Epsilon Indi is discovered

26 Draconis
Stars: Trinary (D5-VII), (L0-VII), (L9-VII)
Planets: N/A
Moons: N/A
Asteroids: N/A
Habitable worlds: N/A
Potential: N/A


October:

October - 28th The CMA Do you feel lucky?, Euphrates, Pony express and Heart of Midlothian class corvettes are commissioned and deployed to the outer colonies


2368


January:

January - 8th New Jerusalem is connected to the stabilised Slip-Space network


March:

March - 7th Reach hits a new milestone of 50 million people, 87 Million people now live in the Epsilon Eridani system

March - 12th The F-62 Gladius Strikefighter is unveiled to the public


April:

April - 16th The Survey ships CAA John Frederick Heard and Simon Marius are commissioned on Earth


May:

May - 10th The 5th CMA Army Corps is deployed to Aleria, Charybdis and CE-2-1239 for garrison duty

May - 17th New mining techniques increase ore production by 25% across the sector (Mining rate 14)

May - 27th - the System of Escala is discovered

Escala
Stars: Unary (A6-V)
Planets: 3 (A6-V)
Moons:1 (Escala-II)
Asteroids: N/A
Habitable worlds: 2/3 (Potentially 3)
Potential: High (Terraformable worlds, High amount of Minerals)

Minerals:

Code: [Select]
Escala I
     Duranium 7,076,322   Acc 0.4
     Corbomite 10,458,756   Acc 0.7
     Mercassium 3,059,001   Acc 0.1
     Vendarite 1,830,609   Acc 0.1
     Sorium 3,294,225   Acc 0.1
     Uridium 6,125,625   Acc 0.1
     Gallicite 6,456,681   Acc 0.5

 Escala II
     Tritanium 4,410,000   Acc 0.1
     Vendarite 129,600   Acc 0.1
     Uridium 10,112,400   Acc 0.6

 Escala III
     Duranium 48,807,200   Acc 0.1
     Neutronium 31,629,376   Acc 0.1
     Corbomite 16,224,784   Acc 0.5
     Tritanium 15,618,304   Acc 0.1
     Mercassium 54,346,384   Acc 0.1
     Vendarite 8,785,296   Acc 0.1
     Sorium 47,831,056   Acc 0.1
     Uridium 29,116,816   Acc 0.1
     Corundium 6,290,064   Acc 0.8
     Gallicite 3,055,504   Acc 0.1

 Comet #1
     Neutronium 32,387   Acc 0.9
     Sorium 100,052   Acc 0.8


June:

June - 13th/30th The systems of Groombridge 1830 and 3000 are discovered


July:

July - 2nd The system of Beta Hydri is discovered

July - 10th The newly commissioned Corvettes Euphrates, Do you feel lucky, and Pony express are deployed to 23 Librae, 26 Draconis and Charybdis


August:

August - 23rd The system of 18 Scorpii is discovered

Escala
Stars: Unary (G3-V)
Planets: 9 (G3-V)
Moons: 35 (G3-V)
Asteroids: N/A
Habitable worlds: 2 (Scorpii-IV, Scorpii-V)
Potential: High (Terraformable worlds, High amount of Minerals)

Minerals:

Code: [Select]
18 Scorpii II
     Sorium 11,778,300   Acc 0.4

 18 Scorpii III
     Neutronium 21,233,664   Acc 0.1
     Corbomite 8,294,400   Acc 0.1
     Mercassium 57,517,056   Acc 0.2
     Uridium 54,641,664   Acc 0.1
     Corundium 25,887,744   Acc 0.1
     Gallicite 37,748,736   Acc 1

 18 Scorpii IV
     Duranium 6,465,608   Acc 0.7
     Neutronium 272,484   Acc 0.7
     Tritanium 7,431,076   Acc 0.1
     Mercassium 1,345,600   Acc 0.5
     Vendarite 3,027,600   Acc 0.6
     Uridium 3,553,225   Acc 0.5
     Gallicite 972,196   Acc 0.4

 18 Scorpii V
     Duranium 12,340,512   Acc 0.8
     Neutronium 3,912,484   Acc 0.4
     Gallicite 1,779,556   Acc 1

 18 Scorpii IX
     Duranium 720,000   Acc 0.1
     Vendarite 65,610,000   Acc 0.1

 18 Scorpii VI - Moon 8
     Neutronium 841   Acc 1

 18 Scorpii VI - Moon 26
     Duranium 10,672,200   Acc 0.8
     Corbomite 7,617,600   Acc 0.4
     Sorium 5,336,100   Acc 0.1


November:

November - 2nd The system of 51 Pegasi is Discovered


End of United Earth Council Report - 2367/8

-Chairman Ellaine Durant


OOC: Been a while but am back, to give an update where I am in the campaign the year is 2372, heres a map of the galaxy and all ships so you guys can keep up on a mechanics basis, again the covenant are out there somewhere, and if you dont know the purpose of this campaign is to expand as quickly and as much as possible to simulate the Domus Diaspora in halo lore and all the difficulties that will come with that, once I reach a certain size I will also enable raiders as "pirates"/insurrectionists


Code: [Select]
23 Librae
1x CT Fifth Winter: CMA Euphrates
1x FT Banker Large F4
1x STB Musashi
1x SPT Cascadia

26 Draconis
1x SV Magellan: CAA U.E.S Carl Sagan
1x CT Fifth Winter: CMA Do You Feel Lucky?
2x SC Epoch
1x MTT Grafton
2x FT Banker Huge F4

51 Pegasi
1x STB Musashi

Algol
1x SV Magellan: U.E.S Frank Drake

Bhaakto
5x SV Magellan: CAA Anton Staus, CAA Thomas Gold, U.E.S Jane Luu, U.E.S John Frederick Heard, U.E.S Simon Marius
2x SC Epoch
1x MTT Grafton

Cassidy-Cybele
1x SV Magellan: CAA Francis Baily
2x SC Epoch
1x MTT Grafton

CE-2-1239
1x CT Fifth Winter: CMA The Heart of Midlothian
5x FT Banker Huge F4
1x CS Banker Huge C4
1x CS Banker Large C4
1x CS Odyssey
1x SPT Cascadia

Charybdis
1x CT Fifth Winter: CMA Pony Express

Chi Ceti
1x CS Odyssey
1x FT Banker Small F4

Elduros
1x CS Odyssey

Epsilon Eridani
1x FF Punic: CMA Pioneer
2x CT Fifth Winter: CMA Atlas, CMA Weeping Willows
1x SC Epoch
2x SL Banker Large L4
1x CS Banker Large C4
3x FT Banker Small F4
2x CS Banker Small C4

Eridanus
1x SV Magellan: CAA Pierre Puiseux

Escala
1x FT Banker Huge F4

Groombridge 1830
1x STB Musashi

New Jerusalem
3x TT Orion (T)
1x FT Banker Large F4
1x CS Odyssey

Sol
2x FFH Burlington (UNSC): UNSC Paris, UNSC Tharsis
1x CV Trafalgar: CMA Persian Gate
1x CV Trafalgar (UNSC): UNSC Trafalgar
2x FF Punic (UNSC): UNSC Chalons, UNSC Ready or Not
9x FF Punic: CMA Port Stanley, CMA Strident, CMA Two for Flinching, UNSC Calcutta, UNSC Daedalus, UNSC Euphrates, UNSC Hannibal, UNSC Meriwether Lewis, UNSC Persephone
1x SV Magellan: CAA Stephen Hawking
16x CT Fifth Winter (UNSC): UNSC All Under Heaven, UNSC Atlas, UNSC Chares, UNSC Chevalier, UNSC Constantinople, UNSC Dawn Under Heaven, UNSC Dresden, UNSC Epoch, UNSC Fifth Winter, UNSC Magellan, UNSC Musashi, UNSC Orion, UNSC Poseidon, UNSC Punic, UNSC Stalingrad, UNSC Trafalgar
6x CT Fifth Winter: CMA Chares, CMA Endeavor, CMA Leviathan, CMA Midsummer Night, CMA Say My Name, CMA Sparrow
36x FTR F-44 Chares
13x SC Epoch
1x MTT Grafton
8x FT Banker Huge F4
4x TT Orion (T)
14x FT Orion
1x AMT All Under Heaven
16x CS Banker Huge C4
13x FHS Constantinople
21x OMP Chevalier
3x TG Poseidon
4x FH Banker H4
7x SL Banker Large L4
3x CS Odyssey
2x STB Musashi
1x SL Banker L4
2x CS Banker Small C4
2x RB Anchorage
14x TK Meriwether Lewis
9x AMT Brasidas
6x SPT Cascadia
3
Humanity First / Humanity First: 2nd Battle of Chi Draconis (Swarm)
« Last post by Kurt on September 09, 2024, 10:31:47 AM »
January 22, 2144: The 9th DD Group has cleared the third planet of the GH 1128 system and heads back out-system.  It is time for them to return to base to resupply and overhaul their ships. 

Fleet Command has decided to establish a naval base in the 61 Hydrae system to protect the shipping transiting the system.  The only suitable body in the system is a small comet, so the base will be established there.  Fuel, maintenance supplies, orbital maintenance facilities, and an orbital recreation facility will be transferred to the system, along with ground-based defenses.  Once the installations are in place an interceptor group will transferred to the system. 

April 1, 2144: The maintenance base has been established in the 61 Hydrae system, and the defenses have been set up.  Six interceptors are dispatched from Terran orbit to establish a guard force in the system.  In addition, the Navy has set up a maintenance base close to the jump point in the solar system, consisting of four maintenance stations and a recreation base.  A destroyer group will be stationed at the base, close to the jump point, as a quick reaction force capable of rapidly responding to all nearby systems without having to first travel all the way from Terra to the jump point.  The base will be named High Guard Station. 

April 29, 2144: The Retribution Fleet has finally been rearmed and sets out for the frontier to confront the Swarm yet again.  This time the Jupiter and Venus battle groups, along with the battleship Rigel, join the fleet in case close combat becomes necessary or possible. 

April 30, 2144: The survey of the GJ 1128 system is complete.  The system has four jump points, two of which are known, and multiple potential mining sites.  While planet #3, the one with the oxy-nitrogen atmosphere, has limited available resources, planets #1 and 2 have moderately large quantities of high-availability resources, making the system an interesting prospect for future exploitation, once the Swarm is dealt with.   

May 15, 2144: The Retribution Fleet arrives over Shield Base and begins refueling, before setting out for the Swarm frontier. 

May 19, 2144: The Retribution Fleet has entered the Luhman16 system and joined the fleet scout stationed at the jump point.  After downloading updates from the scout, the fleet moves forward again. 

Second Battle of Chi Draconis
May 24, 2144: The Retribution fleet is now in the Chi Draconis system, the last known location for the Swarm.  The fleet begins moving in-system to a better location to launch its strike wings. 

May 27, 2144, 1256 hours: The Retribution Fleet is positioned in deep space 700 mkm’s from the planet that seems to be the center of attention for the Swarm.  America, China, and UK launch their fighters, which immediately sweep away from the fleet towards the last known location of the damaged ships from the last encounter with the Swarm.  The second attack on the Swarm has begun. 

At 1932 hours the strike group detects four Swarm ships, two 21,000 ton Abomination and two 10,699 ton Abuser class units, close to where the last battle took place.  The strike group turns to close on the Swarm ships.  At 2008 hours the America’s strike group launches its missiles at the four ships.  Two hundred and eight missiles were targeted on the four ships. 

The missiles sped towards the targets, which never moved or otherwise gave any sign that they knew they were under attack. 

Results:
Abomination-1: total hits 38, all absorbed by armor
Abuser-7: total hits 28, all absorbed by armor
Abuser-6: total hits 33, one penetrating hit
Abomination-2: total hits 40, three penetrated, two secondary explosions, target destroyed

The results were somewhat disappointing, but the strike group commander, Lt Commander Sturgess, decided not to follow up.  The remaining three swarm units would be left for the main fleet, if they decided to follow up the strike.  Instead, the strike group detoured around the three remaining ships and headed for the planet.  The Swarm ships attempted to pursue, but two had been slowed to 2,732 km/s and even at full speed they were too slow to catch the fighters. 

At 2202 hours, while still 95 mkm’s from the planet, the fighters detected six small Abhorrent and Aberration class swarm ships ahead of them.  The swarm ships were racing towards the group at full speed.  By 2223 the swarm ships were well within range, and six fighters from the China’s group launched their missiles at the oncoming attack ships. 

The forty-eight Sparrow II ASM’s killed all six swarm ships, however, it was a close-run thing.  The strike group continued on towards the planet. 

At 2249 hours, the strike group was finally close enough to the planet for its sensors to see what was in orbit.  The fighter’s sensors detected one hundred and twenty-six ships in orbit.  This number grew over the next several minutes as the fighters closed, until the total was:

One Acid class, 130,000 tons
Four Adversary class, 21,495 tons      
Five Abuser class, 10,699 ton      
forty-nine Abhorrent class, 844 tons   
forty-six Aberration class, 844 tons   
twenty-six Accelerator class, 761 tons   
nineteen Abductor class, 695 tons   

Total tonnage: 402,442

When the strike group reached 27 mkm’s from the planet a large group of the swarm ships broke away from the main mass over the planet and began heading towards them at 11,109 km/s.  Lt Commander Sturgess ordered his fighters to close to two million kilometers to launch their missiles. 

Lt Commander Sturgess had hoped to thin out the ranks of the smaller ships, but the lead group approaching the fighters was composed of five Abusers, four Adversary’s, and the massive Acid class mothership.  Sturgess ordered the strike group to target the Abuser class destroyer-sized units with their missiles.  Seconds later three hundred and sixty missiles sped away from the fighters. 

Damage Report:
Abuser-1: 24 hits
Abuser-2: 20 hits
Abuser-3: 18 hits
Abuser-4: 15 hits
Abuser-5: 20 hits

Astonishingly, the Abusers absorbed all of the damage without showing any outward signs of damage, meaning they had to launch more than 72 missiles per Abuser. 

At 0528 on the 28th, as the fighter group was returning to the fleet, they detected a lone Abuser class swarm ship 470 mkm’s from the planet, but just 225 mkm’s from the fleet.  The Abuser was headed towards the fleet, but that could just be a coincidence as the fleet stood between the planet and the jump point back to Imperial space.  Lt Commander Sturgess ordered his group to follow the swarm ship at a discrete distance, as they had no weapons left, and sent a contact report to the fleet. 

Back at the fleet, Admiral McCullick wasted no time and ordered his strike carriers to launch their forty-five forward class attack fighters.  The fighters raced away from the fleet, towards the swarm ship.  They had not performed well against a large mass of smaller swarm ships.  This would be a test of their capability against a larger swarm ship. 

At 0745 hours, the forty-five attack fighters of the CVS strike group open fire on the advancing Abuser class swarm ship, getting nineteen hits, one of which penetrated.  Twenty seconds later the Abuser blew up under the concentrated fire of the attack fighters, which then turned back towards their carrier. 

At 1304 hours the carriers launch their second strike.  At 2228 hours the strike group re-establishes contact with the main swarm fleet over the planet.  Notably, the fleet over the planet consists only of the smaller swarm ships, which all began running from the fighters when they reached 11 mkm’s from the planet. 

At 2315 hours, after a short pursuit, the fighters were technically in range of their missiles, but Lt Commander Sturgess delayed firing to close further, ensuring the missiles could reach the fleeing targets. 

Finally, at 2316 hours the fighters fired all six hundred and twenty-four missiles at the fleeing swarm ships, with each fighter targeting a different swarm ship.  The results were devastating.  When the explosions that wreathed the swarm ships cleared, sixty-six had disappeared, and fourteen were left drifting.  The remaining sixty-two were charging the fighters, but the human ships easily outran them when they turned back towards their carriers. 

The fighters returned to base and reloaded, and were in space again by 1035 hours on the 29th.  At 1959 the strike group’s sensors confirm that the group of mobile swarm ships is over the planet again, sixty-two strong.  The fighters closed as they had before.  Once again, the swarm ships began running when the fighters got close enough, and once again the fighters pursued.  At 2037 hours the fighters from the UK launched their missiles at the fleeing swarm ships.  The twenty-six fighters launched their missiles, each targeted on a different swarm ship, and then turned away. 

Twenty-five seconds later the missiles struck home, leaving forty-three swarm ships in space.  Next, the America’s strike group launched their missiles at the swarm group.  After this strike, only twenty swarm ships were left.  That left the China’s group to mop them up, and when the explosions cleared, there were no swarm ships left.  The bulk of the swarm’s known small ships had either been destroyed or damaged.  The fighters withdrew. 

May 30, 2144: The fighters have returned to their carriers, but the carriers have no more missiles to load in their bays.  Admiral McCullick has a decision to make.  The swarm has been deprived of most of its known small ships, leaving only the larger destroyer and battlecruiser sized ships, along with the mammoth mother ship, all of which are faster than the corresponding human ships.  In the end, it’s an easy decision to make.  The Retribution Fleet’s warships, 2 battleships, two battlecruisers, a jump cruiser, six destroyers, and six destroyer escorts, are out-massed by the remaining swarm fleet.  Admiral McCullick orders the fleet to return to Shield Base. 

June, 2144: Fleet HQ has been dissatisfied with the Fleet Scout design for some time.  This design was intended to be both an independent scout probing and guarding the frontiers, and a support unit for the fleet during fleet operations in disputed space.  However, as an unarmed ship it was seen as vital that the ship be stealthy, so it was fitted with low-emission engines that would make it hard to detect.  However, these expensive engines also meant that the scout was unable to maintain fleet standard speed, which meant that if the scout accompanied fleet units they would be reduced to the scout’s speed, which was seen as unacceptable by most fleet commanders, so the existing scouts remained on independent duty for the most part.  And after the loss of a scout in the Chi Draconis system, the fleet was unwilling to risk them in dangerous systems. 

After much wrangling between the operations department and the fleet designers, they decided to redesignate the existing scout design from “Fleet Scout” to a “Scout”, reflecting its independent operational nature, and to design a new fleet scout capable of maintaining fleet speed and supporting fleet operations.  The new Boone class Fleet Scout is essentially the same design as the Avenger Scout, but with the low-profile engines stripped out and replaced with standard destroyer engines, and the jump drive has been removed and replaced with armor and shields. 
Code: [Select]
Boone class Fleet Scout      10,000 tons       275 Crew       3,363.6 BP       TCS 200    TH 1,500    EM 330
7500 km/s      Armour 3-41       Shields 11-264       HTK 47      Sensors 756/6/0/0      DCR 9-9      PPV 0
Maint Life 2.84 Years     MSP 2,392    AFR 89%    IFR 1.2%    1YR 434    5YR 6,514    Max Repair 1,296 MSP
Lieutenant Commander    Control Rating 1   BRG   
Intended Deployment Time: 24 months    Morale Check Required   

IC Fusion Drive   (2)    Power 1500    Fuel Use 23.09%    Signature 750    Explosion 10%
Fuel Capacity 891,000 Litres    Range 69.4 billion km (107 days at full power)
Epsilon Shield Generator (1)     Recharge Time 264 seconds (0 per second)

Scout Lg Search Sensor Mk II (1)     GPS 216000     Range 405.7m km    Resolution 200
Scout Thermal Sensor Mk IIb (1)     Sensitivity 756     Detect Sig Strength 1000:  217.4m km
ELINT Module (1)     Sensitivity 6     Detect Sig Strength 1000:  19.4m km

This design is classed as a Military Vessel for maintenance purposes
This design is classed as a Intelligence Ship for auto-assignment purposes

The Eagle class strike fighters with their Sparrow II ASM’s have proven to be an effective weapon against the Swarm, however, the Empire’s difficulties in producing enough missiles to keep them supplied continues to be a weakness that the Imperial Navy has had difficulty alleviating.  R&D Assets have been tasked with improving the Empire’s munitions factory’s productivity, and construction factories have ceaselessly been building more munitions factories, but it never seems to be enough. 

In the meantime, construction has started on the Forward Flight II attack fighter design, which will replace the current Forwards in the Fleet and are, hopefully, an improvement in action against the various Xenos enemies. 

The Forward II is 84 tons larger than the original, but has better armor, better fire controls for its laser, and the 10cm laser has a better fire rate because it is a full-sized laser installation, rather than the original reduced size installed on the earlier model.  All of this means the Forward II is substantially slower than the original design, but this couldn’t be avoided.  The Forward II is still faster than most known Swarm designs. 
Code: [Select]
Forward II class Attack Craft      449 tons       7 Crew       193.2 BP       TCS 9    TH 125    EM 0
13928 km/s      Armour 3-5       Shields 0-0       HTK 4      Sensors 0/0/0/0      DCR 0-0      PPV 3
Maint Life 12.38 Years     MSP 95    AFR 5%    IFR 0.1%    1YR 1    5YR 17    Max Repair 72 MSP
Lieutenant Commander    Control Rating 1   
Intended Deployment Time: 3 days    Morale Check Required   

Fighter IC Fusion Drive   (2)    Power 125.0    Fuel Use 1250.0%    Signature 62.5    Explosion 25%
Fuel Capacity 35,000 Litres    Range 1.12 billion km (22 hours at full power)

10cm FUV Laser (1)    Range 150,000km     TS: 13,928 km/s     Power 3-3     RM 50,000 km    ROF 5       
Fighter Laser Fire Control Mk II  (1)     Max Range: 160,000 km   TS: 15,000 km/s    ECCM-2     94 88 81 75 69 62 56 50 44 38
Fighter IC Fusion Reactor (1)     Total Power Output 3    Exp 10%

This design is classed as a Fighter for production, combat and planetary interaction
This design is classed as a Fighter for auto-assignment purposes
4
Empire of the Stars / Re: Empire of the Stars - Comments Thread
« Last post by Garfunkel on September 08, 2024, 07:23:13 PM »
This is fast becoming a truly epic campaign!
5
Empire of the Stars / Re: Empire of the Stars - Comments Thread
« Last post by randakar on September 08, 2024, 12:34:18 PM »
Absolutely crazy updates. Damn.

Especially the Mauritius situation.

You want to conquer a planet that has an almost hostile empire that's technologically more advanced sitting right in your logistics chain.
That's beyond ballsy - it's incredibly risky, especially with the other threats out there.

But damn, if you manage to pull it off..
6
Unfortunately it appears my save got corrupted when I migrated my aurora folder during a factory reset, I'm going to recreate the game as best as I can, but some details might not quite line up from earlier posts. Still very much wanting to play these little tweakers though, so stay tuned!
7
Empire of the Stars / Re: Empire of the Stars - Updates Thread
« Last post by Steve Walmsley on September 06, 2024, 06:19:31 AM »
This is the 4th of 4 posts today

8th January 1985
The survey cruiser Asakaze detects emissions from what appears to be a shore battery of the Helgrim Protectorate on the second moon of Madagascar II, which is orbited by the previously detected Gefjon class ship. Shortly thereafter, the Gefjon requests that Asakaze leaves the Madagascar system. That request will be ignored for the moment.

11th January 1985
Combat is detected in the larger of the two black hole systems connected to Sapporo, at the site of the existing Xiamen wrecks. Life pods from a Xiamen Kaifeng class appear, along with a new wreck. The survey cruisers Sagiri and Shirayuki are already in the system, along with the salvage ship Kasuga Maru. The latter is moving toward the wrecks from the Sapporo jump point but due to the distances involved in the vast system will not arrive for over three months.


31st January 1985
Sensor emissions from an Incheon class ship of the Wokou Raiders are detected in Kariya, one jump outward from the Zuijin system of Beta Hydri and one inward from Katagami, where the Mizuchi-Ro have recently been detected. Shinzan Maru, a 60,000-ton small craft tender, is orbiting a comet in the system, where a deep space tracking station has been emplaced, and supporting a small group of Kawanishi H3K 'Shoki' long range patrol craft that are picketing the two outward jump points, plus a single Kawanishi H2K 'Seiku’ that is laying sensor buoys. Shinzan Maru sets a course for the nearest jump point, as Japanese scientists have determined the Wokou use a different method of entering systems and may not be able to use jump points. The H3Ks are fast enough to outrun the raider should it approach. Their light cannon would be no much for the railguns of the Incheon.


Shinzan Maru is fifty million kilometres from the Katagami jump point when it detects the thermal emissions from the Incheon at seven million kilometres on an intercept course. The raider has a speed of 5128 km/s, compared to only 2560 km/s for the tender. As the H2K is in Shinzan Maru’s hangar bay to reload sensor buoys, it immediately launches and heads for the nearby jump point at 4800 km/s. The raider pursues the small craft, so Shinzan Maru reverses course in an attempt to get out of range.

The Kawanishi H2K 'Seiku’ is less than 800,000 km from the jump point when the raider gets into range and opens fire from 154,000 km, scoring three hits and disabling one of its four fixed missile launchers. Two more volleys are sufficient to destroy the 1000-ton craft, destroying it just 650,000 km from safety. The Incheon, observed by a sensor buoy on the jump point, picks up four surviving crew members from the life pods. Less than an hour later, a new Wokou ship type, designated as Jeju class, appears at the same location as the original Incheon contact. Shinzan Maru is eighty million kilometres from the jump point and still moving away.


The Incheon reverses course and moves out of the buoy’s sensor range, while the Jeju ceases its active emissions. After a further six hours, a Jinhae class ship, known from previous encounters to be 124,000 tons and equipped with commercial engines, appears in the same location as the previous two ships, detected by its strength-5000 thermal signature. The location where the Wokou ships are appearing is likely to be their entry point into Kariya. The Jinhae sets a course for the wreck of the H2K, moving at 2000 km/s.

The nearest Imperial Navy warships are twelve billion kilometres away in the Sol system and will take sixteen days to arrive, even with the new fusion drives. Daigensui-Kaigun-Taishō Takagi authorises the dispatch of the Takao III class heavy cruisers Atago and Takao, with the fleet support ship Harutsuyu following in their wake so they will have sufficient fuel to return home.

Ninety minutes after the appearance of the Jinhae, the Incheon reappears, closing quickly on the fleeing Shinzan Maru. This time there is no escape and she is quickly destroyed with the loss of four hundred crew, plus over thirty buoys and drones in her magazine. One hundred and twenty-six crew escape to the life pods. The Incheon picks them up, then returns to the Katagami jump point and destroys the Japanese sensor buoy. The H3K ‘Shoki’ that was picketing the jump point has already transited into Katagami. Meanwhile, the Jinhae has changed course toward the wreck of Shinzan Maru, possibly indicating it is a salvage ship.

As the Jinhae passes by the tracking station on the system’s lone comet, where three H3K ‘Shoki’ remain in orbit, three additional ships are detected in formation; a second Incheon and two Bucheon class. A third Bucheon was detected in company with the Jeju class ship, which moved toward the Shinzan life pods until the Incheon picked them up. After ceasing movement, the Jeju vanished from sensors due to the lack of thermal emissions, while the Bucheon continues to radiate active emissions.


6th February 1985
The wreck of the Shinzan Maru vanishes in Kariya. Given the last known location of the Jinhae was at the wreck, Imperial Naval Intelligence classifies it as a salvage ship. A day later, the wreck of the Kawanishi H2K 'Seiku’ also disappears.

12th February 1985
A second ground forces signature of the Capella Imperium is detected in Saint Helena, on the fifth moon of Saint Helena V.

18th February 1985
The heavy cruisers Atago and Takao arrive in Kariya and move to the location at which the Wokou ships appeared in the system. The Bucheon that accompanied the Jeju is near the comet and still being detected by the tracking station. All the other Wokou ships have vanished, most likely due to remaining stationary after completing their tasks, which would place the Jinhae near the Katagami jump point. If it moves, it will likely be detected by the tracking station. The two cruisers have proceeded this far without shields or active sensors so they are unlikely to have been detected by the Wokou Raiders.

Atago remains near the suspected Wokou entry point while Takao moves toward the Katagami jump point. Meanwhile, one of the three Kawanishi H3Ks in orbit of the comet heads for the Bucheon and establishes an active lock on both the Bucheon and the Jeju that it is escorting. While the smaller Wokou Raider ships have cloaks, the H3K has a secondary resolution-1 active sensor with a range of three million kilometres, enabling it to track any of the hostile ships while remaining outside weapon range due to its superior speed. However, it is unable to attack due to its extremely light armament, which is intended for use against unarmed opponents. The two Wokou ships ignore the nearby patrol craft.

Kawanishi H3K 'Shoki' class Long Range Patrol      500 tons       12 Crew       100.7 BP       TCS 10    TH 80    EM 0
8001 km/s    JR 3-50      Armour 1-5       Shields 0-0       HTK 4      Sensors 0/1/0/0      DCR 0-0      PPV 0.98
Maint Life 5.30 Years     MSP 37    AFR 20%    IFR 0.3%    1YR 2    5YR 33    Max Repair 40 MSP
Kaigun-Shōsa    Control Rating 1   
Intended Deployment Time: 24 months    Morale Check Required   

Komatsu KSJ-50-B Jump Drive     Max Ship Size 500 tons    Distance 50k km     Squadron Size 3
Koga-Murakama KM-80-B Magneto-Plasma Drive (1)    Power 80    Fuel Use 165.73%    Signature 80    Exp 12%
Fuel Capacity 90,300 Litres    Range 19.6 billion km (28 days at full power)

MK II Light Cannon (1)    Range 20,000km     TS: 8,001 km/s     Power 0.75-0.75     ROF 5       
Type 42 Go-34F Patrol Craft Fire Control (1)     Max Range: 48,000 km   TS: 8,125 km/s    ECCM-3   
R-0B Tokamak Fusion Reactor (1)     Total Power Output 0.8    Exp 15%

Type 42 Go-14E Small Strike Sensor (1)     GPS 336     Range 17.4m km    Resolution 120
Type 42 Go-24E Fighter Sensor (1)     GPS 3     Range 3.5m km    MCR 317.9k km    Resolution 1
Type 35 Go-65C Minimal Passive Sensor (1)     Sensitivity 1.1     Detect Sig Strength 1000:  8.3m km
Type 33 Go-55C Minimal Passive Sensor (1)     Sensitivity 0.8     Detect Sig Strength 1000:  7.1m km

When Takao is eighty million kilometres from the Katagami jump point, she engages active sensors and detects the Jinhae class salvage ship. As soon as she does so, the Jinhae runs in the opposite direction and the Jeju runs for the Wokou arrival location, shadowed by the H3K ‘Shoki’. Takao is four times faster than the Jinhae and quickly closes the range, detecting an escort of one Incheon and two Bucheon as she moves within twenty-four million kilometres due to her Type 42 Go-71E Fighter Detection sensor.


Once within range, Takao opens fire on the Incheon class raider with its ten 25cm lasers and six twin 12cm turrets, quickly destroying it from outside the range at which it can reply. The Wokou ships are completely outclassed, with a lower top speed and short-ranged weapons. Both Bucheons and the Jinhae are rapidly blown to pieces. Takao initially moves to the Katagami jump point, to prevent any Mizuchi-Ro entering the system and salvaging the wrecks, then the original Incheon class raider is detected, moving from the location where Shinzan Maru was destroyed toward the Wokou arrival location, so Takao disengages sensors and shields and sets an intercept course. By the time the Incheon realises the 27,000-ton heavy cruiser is nearby, it is too late.

Meanwhile, the Jeju and its Bucheon escort continue to head directly toward the waiting Atago. When the heavy cruiser engages sensors and shields, they try to run past it and reach their exit point, with predictable results. The Wokou Raiders have paid for their attack on Shinzan Maru with the loss of seven ships, which should give them pause before trying to raid the Empire of Japan in the future. Unfortunately, their attack has disrupted the Imperial Navy’s effort to track the progress of the Mizuchi-Ro using only light forces, so the two heavy cruisers will remain in Kariya for several months until the status quo can be restored.

25th February 1985
The repair ship Fukuju arrives at Mauritius Base after passing through the Zharov system and incurring a warning to leave immediately. Its first task is to repair the armour of the battlecruiser Kirishima.

7th March 1985
The light cruiser Yura makes a sensor pass close to the Dominion home world, the third moon of Mauritius III, in an attempt to determine the size of the Bloodclaw ground forces using her missile detection sensor, which has a range of six million kilometres. Fortunately, the defending forces do not appear to have any long-range weapons and she accomplishes her mission, finding a ground forces contact of over six hundred thousand tons. In reality, that is likely to be at least two million tons when accounting for fortifications, although at least the dominant terrain on the icy moon is Tundra, which does not lend the Dominion ground forces any significant defensive advantages.


Three Bloodclaw ships of a new type, in excess of 100,000 tons and equipped with commercial engines, are ten million kilometres from the moon, so Yura changes course to intercept. As they are travelling at only 213 km/s, she launches a boarding action with her understrength Raiden Sentai. Only eighteen Kazuma Raiden remain from the original forty, but given their equipment and training they are confident of victory. That confidence is misplaced. Although they kill over a hundred and fifty crew members, the Bloodclaw are aggressive and use their natural close-quarters advantages. During twenty-five minutes of brutal combat, all eighteen Kazuma Raiden are killed. The loss of the elite boarding troops to Bloodclaw crew with light personal weapons does not bode well for a successful invasion of their home world. Yura takes swift revenge by obliterating all three ships within forty seconds. While the Nagara-series light cruisers may lack shields and powerful long-range weapons, their point-blank firepower is considerable.

12th March 1985
The survey cruiser Asakaze, surveying the inner system of Madagascar before returning to Mauritius Base for an overdue overhaul, detects five commercial-engined ships of the Helgrim Protectorate passing close to her position in orbit of Madagascar IV. Until now, only a handful of small, military-engined Protectorate ships have been detected. Madagascar, four transits from Mauritius via Réunion, Amirante and Zanzibar, is home to a total of twenty-nine wrecks, all of which are unknown types except for three Helgrim 7,482-ton Gefjon class ships. Despite her need for urgent maintenance, Asakaze conducted a sweep of the inner system to find the other party involved, or a reason for the conflict, but so far has found nothing. The first appearance of larger Protectorate ships with commercial engines suggests a more substantial Helgrim presence nearby.


Meanwhile, twenty transits away from Madagascar, a sensor buoy on the Katagami – Kariya jump point detects the approach of two Mizuchi-Ro ships; a Bolas of 20,149 tons and a Scorpion-Tail of 9.057 tons travelling at 3,215 km/s, suggesting that one of the pair is a non-combat vessel. The Mizuchi-Ro are considered a lesser threat than the Mizuchi-Ha near Fomalhaut, partly due to their slightly lower estimated level of technology, but also due to their distance from any Japanese colonies and the presence of a Zuijin fleet in Beta Hydri, which is why the Shinzan Maru and several H3K long-range patrol craft were deployed as a trip-wire force. However, the recent destruction of Shinzan Maru by the Wokou Raiders and the retaliatory attack by Atago and Takao, means that a heavy cruiser now awaits the Mizuchi beyond the Kariya jump point.

Atago is still deployed near the Wokou entry location, so Takao will have to face the Mizuchi ships alone. She takes up position 200,000 km from the jump point and waits. In Katagami, the ships move within 120,000 km before the Scorpion-Tail destroys the buoy with an acid-laser turret, which suggests the ship fulfils the same role as the Mizuchi Barracuda or Mizuchi-Ha Krait. Thirty-five seconds later, both ships transit into Kariya. Takao closes to 180,000 km and opens fire, targeting the Scorpion-Tail and scoring eleven hits, six of which are strength-4 and the others strength-1. The Scorpion-Tail immediately breaks formation and charges toward Takao at an astonishing 14,309 km/s while the Bolas moves away.

The assumption that the Mizuchi-Ro were lower tech than the Mizuchi-Ha was based on the relative speed of their attack craft, with the laser-armed Mizuchi-Ro Wolf Spider capable of 14,385 km/s, while the equivalent Mizuchi-Ha attack craft, the Sidewinder, has a top speed of 15,243 km/s. However, the Mizuchi-Ha Krait class escort has a speed less than 11,000 km/s, which is considerably slower than the Scorpion-Tail. The threat-assessment for the Mizuchi-Ro just increased significantly.

Takao runs for the centre of the system, while the H3K that was also close to the jump point sets a diverging course for the system’s sole comet. The Scorpion-Tail rapidly closes the range on Takao, with the two ships exchanging fire at 95,000 km/s. The larger Bolas reverses course and heads for the jump point to Katagami. Takao takes a pair of strength-2 hits that are easily absorbed by her shields, but she has yet to penetrate the armour of the Mizuchi-Ro ship.


The Scorpion-Tail has eight twin acid-laser turrets firing every five seconds and can inflict massive damage at close range, while Takao has ten 25cm lasers firing every twenty-seconds, with a secondary armament of six twin 12cm laser turrets. Five seconds after the initial exchange of fire, Takao takes eight strength-3 hits, dropping her shields to eighty percent. A third volley from the Scorpion-Tail drops them to fifty-seven percent. Takao’s 25cm Kentaro-Sakura KS-25A Far Ultraviolet Lasers return fire at just 31,000 km, scoring four strength-16 hits, accompanied by five more hits from her 12cm lasers. Even with so much damage, only two hits penetrate the formidable armour of the alien ship.

Twelve strength-3 impacts reduce Takao’s shields to one-third strength. Her 12cm turrets continue returning fire, scoring nine strength-4 hits, one of which inflicts internal damage and drops the alien ship’s speed to 10,731 km/s, still faster than the 8000 km/s of Takao but at least a sign it can be hurt. The range continues to fall as nine further acid-laser bolts smash into Takao’s faltering shields, now at fourteen percent, from a distance of eight thousand kilometres. Just as the heavy cruiser appears to be in serious trouble, four of ten 12cm laser hits penetrate the Mizuchi-Ro’s armour and it is suddenly dead in space. Another volley and the Scorpion-Tail vanishes from sensors, scoring a last defiant hit before it is destroyed. Takao’s shields stabilise at twelve percent.

Considering the alien ship was plainly intended as an escort design, not a primary combatant, and was only one third the size of Takao, the brief engagement was a sobering experience for the Imperial Japanese Navy. Until this point, the Mizuchi-Ro have been viewed as a lesser danger than the more immediately-threatening Mizuchi-Ha, but that perspective must now change. However, despite a new appreciation of their capabilities, there is little the Imperial Navy can do to address the threat in the short-term.

The current priorities for the Empire are building up Fomalhaut Naval Base to withstand an attack by the Mizuchi-Ha, refitting the fleet to fusion drives and other recently-developed technologies, establishing a naval base in Sapporo to support exploration of the surrounding systems and finding a way to substantially reinforce Mauritius Base until it can support an invasion of the home world of the Bloodclaw Dominion. Added to that list will be the development of ships and tactics specifically designed to fight all Mizuchi species.

If it were not for the seven Wokou wrecks in Kariya, Daigensui-Kaigun-Taisho Takagi would consider pulling back two systems to Delta Pavonis and let the Zuijin fight the Mizuchi in the intervening Beta Hydri system. Leaving the wrecks for the Mizuchi to absorb would only increase their numbers and threat-level. Unfortunately, there are only three salvage ships in service. Kimikawa Maru is in Madagascar, salvaging the Helgrim and unknown wrecks, while Kasuga Maru is in one of the black hole systems adjacent to Sapporo, salvaging Xiamen wrecks. Kamakura Maru has finished her task in Saint Helena and is heading back to Earth, but that journey will take four months, plus two more to reach Kariya.

The best option is actually two new salvage ships under construction at Earth that will be ready in July, so Takao and Atago, plus any reinforcements sent to support them, will have to hold the system for at least five months until the wrecks can be removed from Kariya. If they try and fail, their own wreckage will be added to that of the Wokou and make the situation even worse. In the meantime, Takao transits into Katagami, eliminates the fleeing Bolas, then returns to Kariya and takes up station near the jump point. Atago moves to join her, while one of the H3Ks transits into Katagami to act as a picket to replace the buoy.

25th March 1985
The survey cruiser Shirayuki detects a jump point near the Xiamen wrecks in the black hole system adjacent to Sapporo. Due to the system now regularly appearing in update reports, Imperial Naval Intelligence decides to assign both it and the other black hole system connecting to Sapporo official names, rather than referring to them by the mass of their black holes, which is in this case is one hundred and twenty and forty solar masses respectively. Given some latitude in deciding suitable nomenclature, the analyst assigned the task decides to name black hole systems after mythological creatures. The more massive system is named Orochi's Maw, based on the eight-headed serpent of Japanese mythology, while the smaller system is named Yatagarasu, after the legendary three-legged crow.


As Shirayuki approaches the jump point, she detects a pair of 19,835-ton Hangzhou class ships emerging. Despite being only ten percent larger than a Nagara class light cruiser, the two ships have shield signatures of strength-194, about a third stronger than the Imperial Navy’s 27,000-ton Takao III class heavy cruiser. The Empire of Japan appears to be falling behind other major powers in the technology race, despite the recent development of fusion drives. There is no sign of whatever force destroyed the previous Xiamen ships that transited into Orochi's Maw.

Shirayuki transits the jump point and finds herself in a large system, with a yellow G0-V star, slightly larger than Sol and orbited by two gas giants, a dwarf planet, thirty-six moons and a moderate-sized asteroid belt. A line of twenty-four wrecks, many of which are identifiable as Xiamen, stretch in a line across with the system. Whatever the power and technology of the People’s Republic of Xiama, it appears it is losing a war against an even more fearsome opponent. The only other race encountered in the area is the Capella Imperium, an Empire on which Imperial Naval Intelligence has only minimal information. ELINT data gathered from the Xiamen home world in both February and December 1984 stated the two powers were at war, although no direct combat between the two powers has been observed by Imperial Navy ships, so it is possible a third race is involved. In keeping with the nomenclature of Atlantic islands for the systems beyond Sapporo (black hole naming aside), the G0-V system is named Faroe.


3rd April 1985
Kimikawa Maru salvages the wreck of a Helgrim Gefjon class ship in Madagascar and finds a missile launcher in the wreckage. The 7,482-ton ship is classified as a destroyer.

In Katagami, the H3K monitoring the Kariya jump point, detects the approach of another Bolas, escorted by a Scorpion-Tail. When they are 560,000 km away, the H3K transits and runs for the Beta Hydri jump point. Three minutes later the two Mizuchi-Ro ships transit into Kariya and find both Atago and Takao positioned 320,000 km away. They open fire with their 25cm lasers, but the Scorpion-Tail proves a difficult target and all twenty shots miss. As the Mizuchi-Ro ships move away at 3200 km/s, they start to close the range and fire again at 255,000, inflicting four strength-3 hits.

As before, the Scorpion-Tail immediately breaks formation and charges, but this time there are two heavy cruisers and they are starting the action further away. Despite those advantages, Atago and Takao find it difficult to penetrate the Scorpion-Tail’s armour and it closes the range very quickly. It is finally destroyed at a range of eight thousand kilometres, with Takao’s shields at nine percent. Takao’s commander, Kaigun-Taisa Miyazawa Senshi, realises his ship was fortunate to prevail in the first engagement. The two cruisers run down and destroy the Bolas, then resume their picket position.

After reviewing the details of the second battle against the Mizuchi-Ro, Daigensui-Kaigun-Taisho Takagi decides to pull back the heavy cruisers, despite the presence of the Wokou wrecks. They have struggled to defeat a single escort ship of 10,000 tons, so any serious assault by the Mizuchi-Ro would result in the destruction of both ships. The alternative is to strongly reinforce the system, and the Imperial Japanese Navy does not have enough ships to do that without sacrificing other commitments. Instead, it will trade territory for time, hoping the Zuijin in Beta Hydri can cause problems for the Mizuchi-Ro, without gifting them additional wrecks. The H3Ks will remain for the moment, to monitor progress.
8
Empire of the Stars / Re: Empire of the Stars - Updates Thread
« Last post by Steve Walmsley on September 06, 2024, 06:14:53 AM »
This is the 3rd of 4 posts today

2nd March 1984
Asakaze discovers a jump point in Zanzibar, close to the F5-V primary. It is not in the area from which the two ships of the Zanzibar aliens appeared, so she continues her survey while the light cruiser Yura, recently refuelled in Amirante by Kyokuto Maru, moves to the new jump point. Although Yura does not have a jump drive, the jump point is stable, so she transits with the hope that the far side is also stable and she doesn’t require the assistance of Asakaze in returning to Zanzibar.

Yura emerges two billion kilometres from a planetless, orange K3-V star, designated as Svalbard. A warning blares on the bridge as her sensors detect two hostile contacts at point-blank range. Fortunately, they are both commercial-engined ships of the Bloodclaw Dominion: a 36-500-ton Amur Leopard class, seven of which were destroyed by Asakaze’s fighters in Zanzibar, plus a 180,000-ton Lion class, a type not previously seen. Yura launches her Raiden Sentai, albeit severely reduced in strength, against the Amur Leopard and targets the Lion. As soon as her weapons recover from jump shock, the Lion is destroyed by a single salvo. The Kazuma Raiden capture the Leopard, apparently a civilian freighter, without loss. This brief action was conducted at the furthest point from Sol that the Imperial Japanese Navy has reached: sixteen transits and almost sixty-five billion kilometres.

Amur Leopard class Freighter      36,518 tons       105 Crew       395 BP       TCS 730    TH 800    EM 0
1095 km/s      Armour 1-98       Shields 0-0       HTK 40      Sensors 0/0/0/0      DCR 1-0      PPV 0
MSP 6    Max Repair 50 MSP
Cargo 25,000    Cargo Shuttle Multiplier 3   
Kaigun-Shōsa    Control Rating 1   BRG   
Intended Deployment Time: 3 months   

T’plar P160.0 Civilian Drive (5)    Power 800    Fuel Use 3.54%    Signature 160    Explosion 4%
Fuel Capacity 150,000 Litres    Range 20.9 billion km (220 days at full power)

3rd March 1984
A Hosho III diplomatic ship that was originally deployed to Mauritius to negotiate with the Bloodclaw Dominion arrives at the Amirante – Zanzibar jump point, where the Edda class ship of the Zanzibar aliens has remained since transiting into the system. Kaigun-Taisa Kimiyama Masago is in command of the Hosho, a linguistics expert that previously commanded the battleship Hyūga in two engagements against the Zuijin before being seconded to the Diplomatic Corps.

In the adjacent Reunion system, the 1st Kurogane Samurai division is dropped on the Bloodclaw colony on the third planet and immediately engages the defenders. Once again the defenders are mostly infantry, perhaps 2500 in total, but with a gravity of 0.6G and cold but tolerable temperatures, the Kaenryu and Gekiryū combat mechs find it far easier to locate and eliminate targets than during the recent comet battle.. Both Kurogane Samurai divisions are now engaged simultaneously, as the low-level combat still continues on Tarawa II with minimal losses on both sides.

6th March 1984
The Bloodclaw defenders are annihilated in less than four days of fighting. Due to the orbital bombardment of the shore batteries and subsequent collateral damage from the ground fighting, any original Dominion population has apparently been wiped out, leaving a few installations and sufficient infrastructure to support 900,000 colonists. The installations are an eclectic mix, including one each of construction, fighter and ordnance factories, several mines and maintenance facilities, a financial centre and an ordnance transfer station. There is also a stockpile of twenty-four million litres of fuel, without a way to access it, and six thousand maintenance supplies. Kaigun-Taisa Kido Hoshi, overseeing the invasion from the battlecruiser Kirishima, suspects this was once a Zuijin outpost and the scattered installations were recovered from ruins. An orbital survey could confirm that theory, if anything of the original Zuijin ruin remains.

10th March 1984
Two of the original three Dominion colonies in Reunion have now fallen to the Empire of Japan. Kirishima approaches a comet that holds the third to engage the surface defences. Fortunately, some have already been exposed, probably due to a previous engagement, so she opens fire from beyond their maximum range. Once those are eliminated, Kirishima moves closer and encounters a second, shorter-ranged battery that opens fire at 90,000 km and inflicts several strength-4 hits on her armour. She pulls back and destroys them, before advancing once again and coming under fire at 19,000 km. Kirishima’s armour suffers another thirty-nine hits, leading to a seventy-five percent penetration in one location and moderate damage across the whole belt.

The third and final battery suffers the same fate as the first two, although Kirishima is close to weapon failure with only five percent of her maintenance supplies remaining. Kirishima heads for Reunion-A III to resupply from the recently captured maintenance stockpile. Her commander, Kaigun-Taisa Kido Hoshi is awarded the Order of the Rising Sun with Silver Rays for his actions in Reunion.

15th March 1984
The troop transport Yasukuni Maru drops the 1st Kurogane Samurai division on the Bloodclaw colony. This will be a far more difficult battle, as the ground force signature is 33,500-tons, six times larger than the forces on the other two colonies in Reunion. In fact, the attacking force is likely out-massed and the defenders are well-fortified but there are no other Imperial Army formations within fifty billion kilometres. The Kaenryu and Gekiryū combat mechs will have to rely on quality, not quantity.

16th March 1984
Within twenty-four hours of landing, the 1st Kurogane Samurai division has identified approximately a hundred Dominion tanks of various types and up to ten thousand infantry and other troops. Combat is difficult for both sides due to the minimal gravity and temperatures of minus two hundred degrees. Three days after landing, a decisive engagement takes place, when half the Bloodclaw armour is destroyed by Kaenryu combat mechs within eight hours of fighting, significantly reducing the Dominion’s ability to defeat the Imperial Army mechs.

20th March 1984
The survey cruiser Shirayuki finds another dormant jump point in Sapporo. The original survey discovered only two jump points, the entry point from Kagoshima and an outward jump point to a black hole. Since then, a jump point in Santa Isabel, two jumps from Fiji, connected to a dormant jump point in Sapporo, then a resurvey found  a second dormant jump point leading to Ascension. After the news that the Sapporo aliens were at war with the Xiamen, the resurvey continued and has now found a third previously dormant jump point.

Shirayuki probes the new jump point and discovers Bermuda, a G5-IV sub-giant star orbited by four terrestrial worlds. Bermuda III, a cold desert world with small seas and a nitrogen-oxygen atmosphere, would be an ideal habitable world, if not for 0.06 atm of carbon dioxide. The survey cruiser launches a reconnaissance drone and finds no sign of life.

8th April 1984
The survey cruiser Minekaze completes a geological survey of the four planets and fifteen moons in Ascension and heads for the Saint Helena jump point to survey the Zuijin planet in that system. As she is leaving orbit of Ascension II, she detects the transit of a Pasht class geosurvey ship of the Sapporo aliens through a previously unknown jump point, less than twenty million kilometres away.


Minekaze transits the new jump point and discovers a huge black hole with a hundred and twenty solar masses. Over thirty billion kilometres away on the far side of the system are ten Xiamen wrecks, including eight 160,000-ton commercial-engined Zhangzhou class. This system could be the link between the Sapporo aliens and the territory of the People’s Republic of Xiama. Minekaze lays her last two sensor buoys either side of the new jump point then returns to Ascension, transits into Saint Helena and heads for the Zuijin world.

10th April 1984
Full communication is established with the alien race recently encountered in Zanzibar. They are known as the Helgrim Protectorate and are humanoid in general appearance, although their true form is unknown as they wear suits of ornate metal armour, including full helms. While ancient in appearance, the armour is presumably of modern construction and ceremonial in nature. Only two small ships have been encountered so far, so the technology and military strength of the enigmatic Helgrim remains a mystery.


25th April 1984
The 1st Kurogane Samurai division completes the conquest of the Bloodclaw comet colony. The only loss was a single Gekiryū Combat Mech, although the division has consumed all its supplies and there are no replacements available. Fifty automated mines are captured.

28th April 1984
Full communication is finally established with the mysterious alien race that has been occasionally encountered in the systems around Sapporo for the last fourteen years. The aliens, which are tall, thin humanoids, with grey skin, very large black eyes and triangular-shaped bony heads, refer to themselves as Capellans and their polity as the Capella Imperium. A total of twenty-one Capellan ships have been detected over the years, all of which have military engines and mass less than ten thousand tons. As with the Helgrim Protectorate, the strength of the Capella Imperium and the extent of their territory is unknown.


4th May 1984
Ground combat between the 2nd Kurogane Samurai division and the Zuijin defenders hidden in the jungle-covered mountains of Tarawa II has been underway for over four months. Five Kaenryu combat mechs have been lost and less than ten percent of the Zuijin force has been eliminated. Approximately eleven hundred Zuijin bots and over a hundred larger mechs are estimated to remain somewhere in the dense foliage. The reconstituted 2nd Division of the Imperial Army, comprising ten thousand infantry and one hundred and twenty Ju-Ro heavy tanks, is unloaded on the planet to provide assistance. While the infantry is nowhere near as powerful as the huge Kaenryu and Gekiryū combat mechs, it significantly increases the number of units and weapons available to hunt down the Zuijin.

9th May 1984
Ten transits from Tarawa, the 3rd and 4th Divisions of the Imperial Army are dropped on Saint Helena II, another Zuijin planet. This planet also has mountains, but they are not covered in jungle. In orbit are the battleships Hyūga and Ise, left behind to protect the planet after the rest of the Kido Butai departed, the survey cruiser Minekaze, conducting a geological survey of the planet and searching for ruins, and a Pasht class geosurvey ship of the Capella Imperium. The presence of the Capellan ship could soon lead to a rival ground force competing for whatever ruins are located on Saint Helena II.

16th May 1984
The Zuijin defenders of Saint Helena II are eliminated after a week of intense combat. Imperial Army losses are relatively light, with approximately seven hundred infantry killed and six tanks destroyed. Unfortunately, due to the extreme shortage of troop transport capacity, it will be almost three months before a pair of Xenoarchaeological regiments arrive to study whatever ruins are found by the orbital survey. As the two divisions that secured the planet are fully combat effective, they will be transported to Tarawa II to join the epic struggle on that world.

28th May 1984
Minekaze finds a ruined colony on Saint Helena II. There are no mineral deposits worthy of note.

3rd June 1984
A buoy emplaced in the recently discovered black hole system adjacent to Ascension detects weapons fire near the ten Xiamen wrecks in the system. There is no sign of further wrecks or life pods.


28th June 1984
The 1st Division of the Imperial Army is unloaded on Tarawa II, joining the 2nd Division and the 2nd Kurogane Samurai. The conflict has lasted six months and a little more than half of the original Zuijin force remains. The addition of the 2nd Division in early May helped considerably, with the infantry able to operate more effectively than the huge combat mechs in the steep jungle terrain. The arrival of the 1st Division will double the infantry force. The two divisions from the recent battle in Saint Helena are en route but several months away.

12th July 1984
Three 966-ton Bloodclaw Dominion ships of a new type, designated as Bobcat class, transit into Reunion from Mauritius. All three are instantly destroyed by the Zharovian picket squadron on the jump point, which comprises three ships totalling 85,000 tons. Two Magadan class ships of 21,300 tons are detected firing 20cm lasers and a single 25cm laser. The same Zharovian squadron occasionally issues requests to leave the system when any Imperial Navy ship is nearby.

The salvage operations in Zanzibar are complete and Kimikawa Maru has returned to Mauritius Base, as have Kirishima, the troop transport Yasukuni Maru and the 1st Kurogane Samurai division. The captured fuel harvesters have recently transited from Amirante into Reunion and are making their way very slowly across the latter system. There is still no ultimate destination, as a suitable gas giant has not been found, but they will eventually arrive at Mauritius base where they will be easier to protect. One of the three light cruisers remains in Zanzibar, in contact with an Edda class ship of the Helgrim, a second is at the captured Bloodclaw colony in Reunion and the third is being overhauled at Mauritius Base. The survey cruisers Harukaze and Asakaze are conducting surveys of Reunion and Zanzibar respectively. All of this activity is a long way from the nearest naval base in the Fiji system and with the ban on transiting the Zharov system, there is no further help for Mauritius Base or its assigned forces for the foreseeable future.

16th July 1984
Emissions from two more of the new Bobcat class are detected a hundred and forty million kilometres from Mauritius Base, moving at almost 13,000 km/s. The old Kongo II class battlecruiser Kirishima and the Nagara III-Ni light cruiser Yura are at the base, but even the latter has less than half the speed of the Bloodclaw ships. Given their size and speed, they could be some form of missile platform, or maybe even a large attack craft similar to those of the Mizuchi. Fortunately, they appear to be on a course for the Zharov jump point, rather than moving to attack the Japanese base. Upon hearing the news regarding the activity of the Bloodclaw, Daigensui-Kaigun-Taishō Takagi considers that a new run through Zharov might be required to reinforce the most distant outpost of the Empire.


The Bobcats reappear a few hours later on approach to the Reunion jump point, after presumably changing course somewhere beyond the detection range of the tracking station at Mauritius Base, but now detected by a sensor buoy on the jump point. There are three Bobcats in total, which ignore the buoy and transit into Reunion where they are obliterated by the Zharovian ships. Kimikawa Maru transits into Reunion and salvages the wreckage, finding several fixed missile launchers and a missile fire control.

25th July 1984
Asakaze probes a newly discovered jump point in Zanzibar, located in the general direction from which the only two known ships of the Helgrim Protectorate approached the Zanzibar – Amirante jump point. She discovers a white dwarf system with an unmarkable dwarf planet, orbited by a tiny moon. The system is named Havelock, following the theme of Indian Ocean islands for systems beyond the Zharovian home world, the first of which is Mauritius, home system of the Bloodclaw Dominion.

27th July 1984
A Viper class geological survey ship of the Mizuchi-Ha enters Sigma Tucanae from Ryūgasaki, detected by a sensor buoy emplaced on the jump point. The Kawanishi H3K 'Shoki' that was previously picketing the jump point was withdrawn to Fomalhaut due to the arrival of a large force of Mizuchi-Ha attack craft on the Ryūgasaki side. A second H3K is dispatched from Fomalhaut Naval Base, with orders to locate the Viper during its survey mission and eliminate it.

Ninety minutes later that order is rescinded when a force of seven Mizuchi warships, totalling over 150,000 tons and including the 68,000 ton Anaconda class, follows the Viper into Sigma Tucanae, placing them a single transit from Fomalhaut. They destroy the sensor buoy before heading in-system. Based on the buoy readings just before its destruction, the two 22,660-ton Mamba class ships in the Mizuchi-Ha force are each armed with fifteen 35cm acid-lasers and a single 52cm acid-laser, giving them formidable firepower. The Anaconda also has a 52cm acid-laser, plus almost fifty twin turrets, while the four 11,293-ton Kraits each have ten twin turrets.

The forces on station at the Fomalhaut Naval Base include the light cruiser Tenryu, sixty A3M2 ‘Hayabusa’ fighters, forty A2M3 ‘Shinden’ fighters, three experimental Nakajima J1N 'Toryu’ (Dragonslayer) interceptors, which are the only craft of their type in existence, and three Kawanishi H3K 'Shoki' patrol craft. Three further H3Ks are deployed at nearby jump points. Two shore batteries are present on the surface, comprising a dozen 30cm lasers and an equal number of 20cm lasers.

Nakajima J1N 'Toryu' class Interceptor      2,000 tons       27 Crew       615.4 BP       TCS 40    TH 499    EM 0
12480 km/s      Armour 1-14       Shields 0-0       HTK 14      Sensors 0/0/0/0      DCR 0-0      PPV 15
Maint Life 1.98 Years     MSP 598    AFR 128%    IFR 1.8%    1YR 202    5YR 3,037    Max Repair 249.6 MSP
Kaigun-Chūsa    Control Rating 1   BRG   
Intended Deployment Time: 2.1 days    Morale Check Required   

Koga-Murakama KM-500-DB Magneto-Plasma Drive (1)    Power 499.2    Fuel Use 252%   Signature 499    Exp 19%
Fuel Capacity 53,700 Litres    Range 1.92 billion km (42 hours at full power)

Kentaro-Sakura KS-45A Spinal Laser (1)    Range 320,000km     TS: 12,480 km/s     Power 53-5     ROF 55       
Type 34 Go-34E Laser Fire Control (1)     Max Range: 320,000 km   TS: 12,500 km/s    ECCM-2   
R-5B Stellarator Fusion Reactor (1)     Total Power Output 5.1    Exp 10%
Type 33 Go-74B Fighter Detection (1)     GPS 16     Range 4.3m km    Resolution 10


With the deadly, high-tech Mizuchi-Ha encroaching on the territory of the Empire of Japan, the Fomalhaut naval base requires urgent reinforcement. The light cruiser Kuma, recently upgraded to the new Nagara IV class with fusion drives, longer-ranged railguns and improved sensors, is dispatched from the nearby Hadano system, on the border of Xiamen space, leaving behind the old light cruiser Kasagi to provide a tripwire defence should the Xiamen suddenly turn hostile. The battleships Nagato and Mutsu, not yet scheduled for an upgrade to the latest technology, are dispatched from Sol. Together, these ships comprise the maximum size of force that the base can support until its maintenance capacity is improved.

Nagara IV class Light Cruiser      18,000 tons       618 Crew       4,669.8 BP       TCS 360    TH 2,880    EM 0
8000 km/s      Armour 6-61       Shields 0-0       HTK 122      Sensors 16/28/0/0      DCR 10-5      PPV 108
Maint Life 1.91 Years     MSP 2,121    AFR 259%    IFR 3.6%    1YR 754    5YR 11,303    Max Repair 720 MSP
Troop Capacity 500 tons     Boarding Capable   
Kaigun-Taisa    Control Rating 3   BRG   AUX   CIC   
Intended Deployment Time: 15 months    Morale Check Required   

Koga-Murakama KM-1440-B Fusion Drive (2)    Power 2880    Fuel Use 32.20%    Signature 1440    Explosion 12%
Fuel Capacity 695,400 Litres    Range 21.6 billion km (31 days at full power)

Kentaro-Sakura KS-20B Far Ultraviolet Laser (12)    Range 384,000km     TS: 8,000 km/s     Power 10-5     ROF 10       
Takashi Kinetics TK-10C Railgun (12x4)    Range 50,000km     TS: 8,000 km/s     Power 3-3     ROF 5       
Type 41 Go-31F Laser Fire Control (2)     Max Range: 384,000 km   TS: 8,125 km/s    ECCM-3   
R-50 Tokamak Fusion Reactor (2)     Total Power Output 100.3    Exp 5%

Type 42 Go-21E Missile Detection (1)     GPS 14     Range 7.9m km    MCR 710.9k km    Resolution 1
Type 42 Go-11E Search Sensor (1)     GPS 15120     Range 116.9m km    Resolution 120
Type 42 Go-61D Passive Sensor (1)     Sensitivity 28     Detect Sig Strength 1000:  41.8m km
Type 33 Go-51C Passive Sensor (1)     Sensitivity 16     Detect Sig Strength 1000:  31.6m km

Electronic Warfare Jammers:   Sensor 2    Fire Control 3    Missile 4   

Ground Forces
1x Naval Landing Force

15th August 1984
The Zuijin forces on Tarawa II are finally defeated after nine months of combat across the planet’s jungle-covered mountains. Three full divisions, including the combat mechs of the 2nd Kurogane Samurai, were required to hunt down the Zuijin bots and mechs in an extremely difficult environment. With the planet now clear of hostile forces, two Xenoarchaeological regiments are landed to begin a survey of the ruined colony. While the combat was underway, a gravitational survey of the system was completed without revealing any outward jump points.

18th August 1984
The tracking station at Mauritius Base detects a new class of Bloodclaw ship, designated as Javan Leopard class, moving away from the Dominion home world. As the ship has commercial engines and a speed of 1400 km/s, the light cruiser Yura moves to intercept. She uses a single railgun to attack the ship until it slows by fifty percent, then sends her Raiden Sentai to board it. Despite being understrength, the Sentai quickly captures the ship, a small civilian freighter, without any losses.

19th August 1984
Sapporo has an F7-V primary, with higher mass than Sol, which makes a full re-survey a substantial task. Nevertheless, given that three dormant jump point have been found since the original survey, completing the resurvey is still a priority task, despite the belief of many Imperial Navy officers that the entry point of the Capella Imperium into Sapporo has already been located and the focus should be on surveying the surrounding systems. Those doubters are proven incorrect when Shirayuki, one of three 10,000-ton Asagiri II class survey cruisers in Sapporo, discovers a fourth dormant jump point. Why this particular system seems to attract so many dormant jump point is a mystery, but it only reinforces the need to complete the resurvey. Shirayuki moves to the new jump point while her sister ships Sagiri and Murakumo continue the task in Sapporo.

25th August 1984
Shirayuki transits the new jump point and finds herself in the same black hole system that was discovered four months earlier from Ascension, which itself is adjacent to Sapporo.  This new connection supports the idea that the colossal black hole system, which has an outer survey ring sixty billion kilometres in diameter, may be the direction from which the Sapporo aliens first appeared. The new jump point is only eighteen billion kilometres from the Xiamen wrecks, compared to thirty-two billion kilometres from the Ascension jump point. Given the recent combat activity at the wreck location, it is likely a jump point to Xiamen space, so Shirayuki begins a survey of the area near the wrecks, trying to locate the jump point. Due to the number of jumps points, presence of the Capella Imperium and the proximity of the Aether Rift in the Vanikoro system three transits away, Sapporo I will be developed into a new naval base.


23rd September 1984
The survey of the ruined colony on Tarawa II is complete. Fifty-one sites of interest have been identified.

10rd October 1984
The survey of the ruined colony on Saint Helena II is complete. Sixty-two sites of interest have been identified.

18th November 1984
Asakaze discovers two new jump points close to the star in the Zanzibar system, three jumps out from Mauritius. The first leads to Nicobar, a red dwarf system with three terrestrial planets, the second of which is Mars-sized and has liquid water and a thin nitrogen – oxygen atmosphere, although no mineral deposits. The other jump point connects to Madagascar, a far more substantial system, with an orange K2-V primary, six planets, forty-eight moons and almost two hundred asteroids. A moon of the third planet has similar characteristics to Nicobar II, albeit without a geological survey at this point.

There are twenty-nine wrecks in Madagascar, ranging from 7000 tons to 180,000 tons, all of which are unknown types. While most are scattered between the orbits of the first and second planets, a hot barren rock and a Venusian world respectively, there are nine wrecks further out, in the same general area beyond the sixth planet, a gas giant with sixteen moons. It is possible the wrecks are from ships of the Helgrim Protectorate, as only two of their ships have been encountered, or it could be an entirely new race.


Asakaze is out of both buoys and drone and lacks a scout, so she moves in-system to a point where she can launch her B1N ‘Ryusei’ strike craft, so it can scout the inner system using its small strike sensor. The B1N detects a new 7,482-ton ship type of the Helgrim Protectorate, designated as Gefjon class, in orbit of a moon of Madagascar III, but no other sign of life in the inner system. Asakaze moves in behind the strike craft to have a closer look.

3rd December 1984
A ground force of the Capella Imperium is detected on Saint Helena IV, a frozen world slightly larger than Earth, with a helium-hydrogen atmosphere, ice sheets covering half the surface and a surface temperature of -96C. A geological survey finds large deposits of several minerals but only at minimal accessibility. What the Capellans could find interesting about this desolate wasteland is unknown. Imperial Army recovery operations are still in progress at the Zuijin ruins on Saint Helena II.

5th December 1984
The delivery of maintenance facilities and two Yokosuka class orbital maintenance stations to Fomalhaut Naval Base has increased its maintenance capacity to almost half a million tons. This allows the deployment of two Takao III class heavy cruisers, Ashigara and Myōkō, to bolster the forces stationed at Fomalhaut to counter the growing threat from the Mizuchi-Ha. Seventy-one Nakajima B1N ‘Ryusei’ strike craft, delivered by the carriers Taihō and Junyō, are added to the Fomalhaut Kōkūtai. The B1N was superseded in carrier kōkūtai from 1979 onwards by the Nakajima B2N2 'Tenzan’, but can still provide the base with a useful strike capability. The carriers also delivered sufficient Rakurai II anti-ship missiles for a full reload before heading back to Earth. Further forces will be allocated to Fomalhaut as they become available.

Fomalhaut Squadron
Nagato II class Battleship: Mutsu, Nagato
Takao III class Heavy Cruiser: Ashigara, Myōkō
Nagara IV class Light Cruiser: Kashima, Kuma

Fomalhaut Kōkūtai
3x Nakajima J1N 'Toryu' Interceptor
3x Kawanishi H3K 'Shoki' Long Range Patrol
71x Nakajima B1N 'Ryūsei' Carrier Strike
60x Mitsubishi A3M2 'Hayabusa' Fighter
40x Mitsubishi A2M3 'Shinden' Fighter
2x Aichi E2A class Scout:

Takao III class Heavy Cruiser      27,000 tons       865 Crew       6,640.7 BP       TCS 540    TH 4,320    EM 4,260
8000 km/s    JR 3-50      Armour 5-80      Shields 142-532       HTK 169     Sensors 16/28/0/0     DCR 14-5     PPV 145.28
Maint Life 1.91 Years     MSP 3,652    AFR 417%    IFR 5.8%    1YR 1,293    5YR 19,391    Max Repair 720 MSP
Kaigun-Taisa    Control Rating 4   BRG   AUX   ENG   CIC   
Intended Deployment Time: 10 months    Morale Check Required   

Komatsu KMJ-270-B Jump Drive     Max Ship Size 27000 tons    Distance 50k km     Squadron Size 3
Koga-Murakama KM-1440-B Fusion Drive (3)    Power 4320    Fuel Use 32.20%    Signature 1440    Explosion 12%
Fuel Capacity 1,016,000 Litres    Range 21 billion km (30 days at full power)
Shīrudo-71A Shield Generator (2)     Recharge Time 532 seconds (0.3 per second)

Kentaro-Sakura KS-25A Far Ultraviolet Laser (10)    Range 384,000km     TS: 8,000 km/s     Power 16-4     ROF 20       
Twin Kentaro-Sakura KS-12C Laser Turret (6x2)    Range 240,000km     TS: 25000 km/s     Power 8-8    ROF 5       
Type 41 Go-31F Laser Fire Control (2)     Max Range: 384,000 km   TS: 8,125 km/s    ECCM-3   
Type 41 Go-31F Turret Fire Control (2)     Max Range: 96,000 km   TS: 25,000 km/s    ECCM-3   
R-50 Tokamak Fusion Reactor (2)     Total Power Output 100.3    Exp 5%

Type 42 Go-21E Missile Detection (1)     GPS 14     Range 7.9m km    MCR 710.9k km    Resolution 1
Type 42 Go-71E Fighter Detection (1)     GPS 280     Range 24.1m km    Resolution 10
Type 42 Go-11E Search Sensor (1)     GPS 15120     Range 116.9m km    Resolution 120
Type 33 Go-51C Passive Sensor (1)     Sensitivity 16     Detect Sig Strength 1000:  31.6m km
Type 42 Go-61D Passive Sensor (1)     Sensitivity 28     Detect Sig Strength 1000:  41.8m km

Electronic Warfare Jammers:   Sensor 2    Fire Control 3    Missile 4   

16th December 1984
Intelligence gathered via ELINT data from the home world of the Xiamen, confirms that the People’s Republic of Xiama is still at war with the Capella Imperium, formerly known as the Sapporo aliens. This conflict was first reported in February and the presence of Xiamen wrecks in the larger of the two black hole systems connected to Sapporo suggests the war is ongoing in that system, but, apart from energy impacts and explosions, no actual combat has been observed by the Imperial Japanese Navy. Based on the evidence gathered so far, the People’s Republic presents a formidable opponent with a substantial population, high levels of technology and a presence in numerous systems. Relations between the Empire of Japan and the People’s Republic are cordial, with a trade treaty in place. With so many threats to the Empire, this is an acceptable state of affairs, at least for the moment. The Capella Imperium remains a mystery, with only small, military-engined ships encountered so far, in the systems around Sapporo, plus the ground force signature on Saint Helena IV.

26th December 1984
ELINT data from the Bloodclaw home world reveals extremely disconcerting information, in the form of a Bloodclaw heavy cruiser design. Until now, given that the Dominion is plainly losing its war against the Followers of Zharov, and taking losses from the small Japanese force at Mauritius Base, plus its relatively smaller home world population and the low technology of captured ships, Imperial Naval Intelligence had assumed the Bloodclaw Dominion had a lower level of technology than the Empire of Japan.

The ‘heavy cruiser’ design crushes that assumption. The Simone Schiaffino V class is fifty percent larger than the eight Imperial Navy heavy cruisers and has an Inertial Fusion drive, which is a generation ahead of the Imperial Navy’s Magnetic Fusion drive, which has only recently been developed. The Imperial Navy is in the early stages of a refit program, with only four of thirteen carriers having received the new drives and none of the eight battleships, although the majority of light and heavy cruisers have been refitted. Furthermore, the Bloodclaw class mounts the same deadly particle lances as the Zuijin and has the necessary speed to get within range. Only in fire controls and electronic warfare does the Imperial Navy have an advantage, and that is mainly due to the large research colony on Osaka-B I, home to an ancient construct that adds eighty percent to sensor research.

Simone Schiaffino V class Heavy Cruiser     42,594 tons     1,497 Crew     16,485.8 BP     TCS 852    TH 6,900    EM 0
8099 km/s      Armour 7-108       Shields 0-0       HTK 307      Sensors 11/11/0/0      DCR 10-2      PPV 348
Maint Life 0.36 Years     MSP 2,419    AFR 1451%    IFR 20.2%    1YR 6,649    5YR 99,737    Max Repair 862.5 MSP
Magazine 0 / 104   
Line Captain    Control Rating 3   BRG   AUX   CIC   
Intended Deployment Time: 12 months    Morale Check Required   

Inertial Fusion Drive  EP1725 (4)    Power 6900    Fuel Use 11.42%    Signature 1725    Explosion 10%
Fuel Capacity 1,150,000 Litres    Range 42.5 billion km (60 days at full power)

Particle Lance-18 (29)    Range 240,000km     TS: 8,099 km/s     Power 55-5    ROF 55       
Beam Fire Control R320-TS8500 (3)     Max Range: 320,000 km   TS: 8,500 km/s    ECCM-3   
Inertial Confinement Fusion Reactor R6 (29)     Total Power Output 169.9    Exp 5%

Size 26 Decoy Launcher (4)     Decoy Size: 26    Hangar Reload 255 minutes    MF Reload 42 hours
Justicar Ship Decoy (4)    Signature: 5200 tons    ECM-3    Size: 26

Active Search Sensor AS103-R120 (1)     GPS 15120     Range 103.6m km    Resolution 120
Thermal Sensor TH1-11 (1)     Sensitivity 11     Detect Sig Strength 1000:  26.2m km
EM Sensor EM1-11 (1)     Sensitivity 11     Detect Sig Strength 1000:  26.2m km
Electronic Warfare Jammers:   Sensor 3    Fire Control 3    Missile 3   

This new information has both positive and negative implications. The obvious negative is that if the Dominion manages to build one or more of these ships, they will pose a significant threat to Mauritius Base. The three light cruisers based at the colony are powered by magneto-plasma drives, while the old battlecruiser Kirishima still has ion engines. The rest of their technology is in line with their engines, apart from sensors and fire controls, so they are unlikely to prevail in such a conflict.

The positive implication is due to the fact the Dominion has apparently suffered heavily against the Followers of Zharov and appears to be mainly confirmed to their home world, building only occasional commercial-engined ships that are destroyed if they try to leave the system. The Zharovians have made several attempts to attack the Dominion home world, but have been defeated by the orbital defences. If the Dominion really is weak and its home world has suffered damage, it might be possible to launch an attack to capture it and gain access to the latest Bloodclaw technology. While the Imperial Navy has the advantage of an existing base in the system, it is still relatively small and over fifty billion kilometres from Earth. Two thirds of that distance is via the territory of the Followers of Zharov.

A repair vessel is already en route to Mauritius, to enable a more sustainable presence in the system, plus a tug is towing a second Yokosuka class maintenance base, although the decision about when to make the run through the Zharov system, with the attendant risks of war with the Zharovians, is yet to be made. In the meantime, Daigensui-Kaigun-Taishō Takagi sets a new objective for the Imperial Navy; build up the forces in Mauritius, to the point where an assault on the Bloodclaw home world is possible, without causing a war with the Followers of Zharov, or weakening the Empire’s ability to deal with the Mizuchi-Ha.

As a first step, the light cruiser Naka moves within sensor range of the Bloodclaw home world to check its current status. She detects twelve ships of three different types, ranging from 20,787 tons to 26,151 tons, which are possibly orbital bases. At least one type is armed with light missiles, given the barrage suffered by Zharovian ships attacking the planet. There is also a large shipyard complex, which the Zharovians have plainly failed to destroy. Capturing that intact would be extremely useful, especially so far from Earth.


9
Empire of the Stars / Re: Empire of the Stars - Updates Thread
« Last post by Steve Walmsley on September 06, 2024, 05:58:36 AM »
This is the 2nd of 4 posts today.

21st July 1983
A sensor buoy stationed on the Ryūgasaki jump point in Sigma Tucanae, a single jump from Fomalhaut, detects a Python class survey ship of the Mizuchi-Ha transiting into the system. Also stationed on the jump point is a single Kawanishi H3K 'Shoki' (Demon Slayer) class Long Range Patrol craft. The function of the Shoki is long-range, long-term deployment as a picket or raider, targeting unarmed hostile ships. Only twelve have been constructed, of which six are based at Fomalhaut Naval Base, including the picket in Sigma Tucanae and a second picket on the Fomalhaut- Kashima jump point, watching for anything that might emerge from the rift in Kashima and attempt to enter Fomalhaut.

Kawanishi H3K 'Shoki' class Long Range Patrol      500 tons       12 Crew       100.7 BP       TCS 10    TH 80    EM 0
8001 km/s    JR 3-50      Armour 1-5       Shields 0-0       HTK 4      Sensors 0/1/0/0      DCR 0-0      PPV 0.98
Maint Life 5.30 Years     MSP 37    AFR 20%    IFR 0.3%    1YR 2    5YR 33    Max Repair 40 MSP
Kaigun-Shōsa    Control Rating 1   
Intended Deployment Time: 24 months    Morale Check Required   

Komatsu KSJ-50-B Jump Drive     Max Ship Size 500 tons    Distance 50k km     Squadron Size 3
Koga-Murakama KM-80-B Magneto-Plasma Drive (1)    Power 80    Fuel Use 165%    Signature 80    Explosion 12%
Fuel Capacity 90,300 Litres    Range 19.6 billion km (28 days at full power)

MK II Light Cannon (1)    Range 20,000km     TS: 8,001 km/s     Power 0.75-0.75     ROF 5       
Type 42 Go-34F Patrol Craft Fire Control (1)     Max Range: 48,000 km   TS: 8,125 km/s    ECCM-3   
R-0B Tokamak Fusion Reactor (1)     Total Power Output 0.8    Exp 15%

Type 42 Go-14E Small Strike Sensor (1)     GPS 336     Range 17.4m km    Resolution 120
Type 42 Go-24E Fighter Sensor (1)     GPS 3     Range 3.5m km    MCR 317.9k km    Resolution 1
Type 35 Go-65C Minimal Passive Sensor (1)     Sensitivity 1.1     Detect Sig Strength 1000:  8.3m km
Type 33 Go-55C Minimal Passive Sensor (1)     Sensitivity 0.8     Detect Sig Strength 1000:  7.1m km

The Python is capable of 9000 km/s, faster than the H3K by 1000 km/s. Even so the H3K pursues, attempting to damage the Mizuchi ship while still in range. As soon as the 4000-ton Python is struck, it turns on its pursuer and makes continuous attempts to ram the much smaller vessel. The H3k maintains fire for over three minutes, first slowing the Python and eventually destroying it, then returns to its picket position. The Imperial Navy is waiting on new engine technology to be available before confronting the advanced ships of the Mizuchi-Ha, so the destruction of the Python buys a little more time before the Mizuchi can survey Sigma Tucanae and advance into the key Fomalhaut system.

24th July 1983
In Ryūgasaki, a fleet of eighty-eight Mizuchi-Ha attack craft arrives on the Sigma Tucanae jump point and destroys a Zuiun-Ro sensor buoy. The H3K stationed on the Sigma Tucanae side is ordered to retreat to a new picket position on the Fomalhaut – Sigma Tucanae jump point, leaving only a sensor buoy to track any further transits by the attack craft.

5th August 1983
The survey of Reunion has revealed one jump point so far, leading to the planetless Amirante system, which was probed by Asakaze in early July. ELINT data from the Zharovian home world reveals that Amirante has two outward jump points, so Asakaze temporarily abandons her survey in Reunion to investigate them.

16th September 1983
The survey cruiser Minekaze finds a previously undetected jump point during the resurvey of Sapporo, probably confirming the theory that the Sapporo aliens, with whom communication has yet to be established, arrived in the system via a dormant jump point. Minekaze conducts a probe and discovers a red dwarf system with four unremarkable planets. There is no sign of any alien presence. The system is named Ascension, based on the newly designated nomenclature of Atlantic islands for all discoveries beyond the new Sapporo jump point.

8th October 1983
While recent attention has been focused on the Mizuchi-Ha, the second species of Mizuchi to be discovered, the Mizuchi-Ro, have been present in the Koga Chain for over four years. The Mizuchi-Ro were originally discovered in the Moriguchi system, but were ignored as they were seven transits from Earth, which was the nearest Japanese population to their location, plus they would first encounter the large Zuijin fleet in Beta Hydri, three jumps from Moriguchi, on their route to Sol.

To monitor their expansion, several H3K 'Shoki' long range patrol craft are dispatched past Beta Hydri, supported by Shinzan Maru, a specialised tender ship designed to support a small force of small craft. The tender provides maintenance support, refuelling and resupply, plus spare buoys and drones for those small craft equipped with launch rails. One H3K is stationed at the Beta Hydri – Kariya jump point and a second at the Kariya – Katagami jump point. After a third H3K performs a sweep of the inner system in Katagami, directly adjacent to Moriguchi, Shinzan Maru enters that system.

Shinzan Maru class Small Craft Tender      60,000 tons      534 Crew      1,999.7 BP       TCS 1,200    TH 3,072    EM 0
2560 km/s    JR 3-50(C)      Armour 1-136       Shields 0-0       HTK 118      Sensors 8/14/0/0      DCR 1-0      PPV 0
MSP 10,020    Max Repair 120 MSP
Hangar Deck Capacity 2,000 tons     Magazine 500 / 0    Cargo Shuttle Multiplier 3   
Kaigun-Chūsa    Control Rating 1   BRG   
Intended Deployment Time: 3 months    Flight Crew Berths 40   
Maintenance Modules: 4 module(s) capable of supporting ships of 10,000 tons

Komatsu KCJ-600-B Jump Drive     Max Ship Size 60000 tons    Distance 50k km     Squadron Size 3
Koga-Murakama KC-384-B Magneto-plasma Drive (8)    Power 3072    Fuel Use 2.48%    Signature 384    Expl 4%
Fuel Capacity 2,926,000 Litres    Range 354.1 billion km (1601 days at full power)
Refuelling Capability: 60,000 litres per hour     Complete Refuel 48 hours

Zuiun-Ha Sensor Buoy (32)    Speed: 0 km/s    End: 0m     Range: 0m km    WH: 0    Size: 12
Shūsui Reconnaissance Drone (8)    Speed: 5,200 km/s    End: 10d     Range: 4,499.2m km    WH: 0    Size: 12
Ordnance Transfer Rate: 40 MSP per hour     Complete Transfer 12.5 hours

Type 42 Go-13E Navigation Sensor (1)     GPS 3360     Range 55.1m km    Resolution 120
Type 33 Go-53C Passive Sensor (1)     Sensitivity 8     Detect Sig Strength 1000:  22.4m km
Type 42 Go-63D Passive Sensor (1)     Sensitivity 14     Detect Sig Strength 1000:  29.6m km

The captain of Shinzan Maru, Kaigun-Chusa Shirahata Toshiharu, orders the H3K in Katagami is to probe the other two jump points in the system before transiting into Moriguchi. The H3K transits into Nu Reticuli, a planetless brown dwarf system, and discovers a 2,591-ton Mizuchi-Ro ship of a new type, designated as Redback class. As it is suffering from jump shock, the H3K is unable to fire immediately, but pursues the Redback anyway. After running for a short time, the Redback doubles back and transits into Katagami, where it moves away at 9264 km/s, faster than the pursuing H3K, in the general direction of the Kariya jump point. The H3K maintains the pursuit until the Redback moves out of sensor range, then sets course for Kariya. Shinzan Maru, currently heading toward the Katagami inner system, reverses courses and heads back to the Kariya jump point.


16th October 1983
Shinzan Maru return safely to Kariya and takes up position in orbit of a comet, which is the only body in the entire system. The H3K sees no further sign of the Mizuchi-Ro ship before also arriving in Kariya and taking up station at the Kariya – Nabari jump point, in case the Mizuchi have already moved through Kariya and are present in other areas of the Koga Chain. Once a suitable ship or patrol craft is available, sensor buoys will be laid throughout the area to determine the extent of the Mizuchi-Ro penetration into known space.


23rd October 1983
The People’s Republic of Xiama occasionally passes on geological survey data to demonstrate their desire for peaceful relations, although this is not too common as Imperial Naval Intelligence believes their survey ships have moved out beyond known space. On this occasion however, an item of survey data regarding minimal deposits on a tiny moon, has far wider implications. The moon is in Tarawa, a Zuijin system adjacent to Makin - which is on the border between the Xiamen and Velsharoon - and three jumps from both the Truk and Hadano naval bases.

Imperial Naval Intelligence requests an update on the system, which is provided by an E2A scout operating from Truk. The Imperial Navy’s previous visit to Tarawa was in 1970 by the light cruiser Kasagi, commanded by Kaigun-Chusa Kido Hoshi, which ran into a Zuijin squadron on the Makin jump point and managed to escape after a brief engagement. Kido, now a Kaigun-Taisa, is currently commanding the battlecruiser Kirishima at the base in the Bloodclaw home system of Mauritius.

The E2A finds the orbit of Tarawa II littered with Zuijin wrecks, including Devastator and Terror class base, three destroyers, a Ravager escort cruiser and ten Ghost fast attack craft. Also present are two Xiamen wrecks and a single Velsharoon wreck. The scout heads in-system to check for any surviving Zuijin ships. The salvage vessel Kamakura Maru is already in Hadano, due to the recent tension between the Xiamen and Velsharoon, and is immediately dispatched to Tarawa. Two survey ships, one recently overhauled in Fomalhaut and a second currently operating in Xiamen space, are ordered to abandon their current assignments and head to Tarawa, although they will take several months to arrive.


The E2A proceeds in-system and finds no sign of any Zuijin ships. A single 10,000-ton Nanjing class ship of the People’s Republic of Xiama is in orbit of Tarawa II, while a small Zuijin ground force remains on the surface, with a signature of only 3,100 tons. The presence of the ground force strongly suggests that neither the Xiamen nor the Velsharoon have surveyed any ruins that might lie on the surface, providing a opportunity for the Imperial Navy to gain an advantage over its alien rivals.

15th November 1983
The People’s Republic of Xiama provides survey data for Tarawa II, including the existence of a ruined colony on the surface, plus a hundred and eighty million tons of accessibility 0.8 Duranium. Although Tarawa II has a gravity of 2.4G, making it unsuitable for human colonisation, the ground forces of the Imperial Army are able to operate in almost any environment. Three Sagami class troop transports, escorted by the light cruiser Jintsu, are already en route to Truk, where they will refuel before proceeding to Tarawa.

The Nanjing class ship that was in orbit of Tarawa II departed just before the survey information was received, so Imperial Naval Intelligence designates the ship as a geological survey vessel. It has a speed of over 10,000 km/s, once again demonstrating the considerable advantage of the Xiamen in the field of propulsion research.

Tarawa II Survey Report
Duranium:   185,281,250   0.80
Tritanium:   56,250,000   0.10
Boronide:   156,250,000   0.10
Mercassium:   10,562,500   0.80
Sorium:   132,250,000   0.10
Uridium:   2,250,000   0.10
Corundium:   43,890,625   0.10

16th November 1983
An E1A3 scout from Minekaze probes a jump point in Ascension, adjacent to Sapporo, and discovers Saint Helena, a system with a yellow-white F8-V primary, eight planets, almost sixty moons and a moderate-sized asteroid belt. The second planet is a mountainous super-terrestrial world with a dense nitrogen-oxygen atmosphere. There are two identical groups of unknown wrecks within the inner system, outside the orbits of the second and fourth planets respectively. Each group comprises two wrecks over 150,000 tons, plus several smaller wrecks between 7,000 and 31,000 tons. There is also a single identifiable wreck: a 7,211 ton Thoth class of the Sapporo aliens.


Minekaze transits into Saint Helena and launches a Shūsui Reconnaissance Drone at the second planet, which reveals a large Zuijin fleet in orbit, massing over a quarter of a million tons. If this system does lie on the direct route between the Empire of Japan and the territory of the Sapporo aliens, it would explain why there has been only minimal contact so far. However, it also presents an opportunity. If this Zuijin fleet could be eliminated and the planet secured, it would serve as an excellent forward base for the Imperial Navy. The timing is far from ideal, as fusion drives have recently been developed, the Kido Butai is about to commence a round of refits, most of the large troop transports are either returning from Mauritius, or heading to Tarawa, plus there are numerous other threats and commitments. Even so, Daigensui-Kaigun-Taishō Takagi orders planning for an operation to secure Saint Helena as soon as the necessary resources are available.


23rd November 1983
The wreck of a Zuijin destroyer vanishes in Tarawa. The E2A in orbit of Tarawa II moves to investigate and find three Xiamen ships at the site: a commercial-engined Nanchang class, which is likely a salvage vessel, and two military-engined Kaifeng class ships of 13,000 tons. Kamakura Maru is still two weeks away from Tarawa and the only other two Imperial Navy salvage ships have been stuck in Mauritius since the ban on transiting the Zharov system, so with wrecks in both Tarawa and Saint Helena available for salvage, Daigensui-Kaigun-Taishō Takagi authorises Kasuga Maru and two accompanying freighters to make a run through Zharov. She is threatened with being fired upon, but no actual hostile act takes place.

1st December 1983
Asakaze discovers a small Bloodclaw colony on a comet in the Socotra system, two jumps outward from Reunion and three from the Dominion home system in Mauritius. Meanwhile, at the Imperial Navy base at Mauritius I, the three Nagara class light cruisers and the battlecruiser Kirishima have taken turns to conduct overhauls. Now these are complete, they will begin a series of assaults on the Bloodclaw colonies in Reunion and eventually at the newly discovered comet colony in Socotra.

17th December 1983
The Nagara III-Ni class light cruisers Nagara, Naka and Yura move within 360,000 km of the Bloodclaw Dominion’s comet-based colony in Reunion, which used surface-to-orbit weapons to destroy the Imperial Navy survey cruiser Fubuki six months earlier. Remaining outside of STO weapon range, the light cruisers use their fast-firing Kentaro-Sakura KS-20B Far Ultraviolet Lasers to eliminate the ground-based weapons, then move into orbit to await Kirishima and the troop transport Yasukuni Maru.

30th December 1983
Yasukuni Maru combat drops the 1st Kurogane (Black Iron) Samurai division on to the Bloodclaw colony. This is the combat debut of an entirely new Imperial Army ground force, comprising two regiments of Kaenryu (Blazing Dragon) Combat Mechs and two regiments of Gekiryū (Furious Dragon) Combat Mechs. The Kaenryu is fifteen metres tall and armed with a super-heavy cannon, plus two heavy autocannon. The Gekiryū is smaller, at eleven metres, and armed with three heavy anti-infantry weapons. Seventy-two Kaenryu or one hundred and twenty Gekiryū comprise one regiment, so the entire Kurogane Samurai division includes three hundred and eighty-eight mechs, plus sixty 180mm artillery pieces at the divisional level.

The Bloodclaw ground force has a signature of 5200 tons, so even accounting for the effects of fortification on detection, they are severely out-massed. Within the first few hours of combat, it becomes obvious the defenders are mainly an infantry force, supported by a few tanks and with limited anti-armour capability. The powerful Kaenryu combat mechs are overkill against such light targets, so the Gekiryū are employed in hunting down the elusive infantry. The minimal gravity and extreme cold are more of a problem than the defensive fire, affecting targeting sensors and generally reducing the combat effectiveness of both sides.

13th January 1984
Ground combat has been underway on the Reunion comet colony for two weeks, with most of the Bloodclaw force destroyed. Perhaps a quarter still survives and is evading the Imperial Army mechs. The Kaenryu and Gekiryū have proven extremely effective from a survival point of view, with no mechs lost in combat. What is lacking is an ability to rapidly eliminate a large number of weak targets that is commensurate with their cost, although the conditions on the comet are not ideal. Gekiryū and Kaenryu regiments cost as much as five and six infantry regiments respectively. On the plus side, the Kurogane Samurai division is a survivable and effective formation, when time is not a factor, that can travel on a single troop transport, making them ideal for employment in situations where limited lift capability is a factor, such as at Mauritius Base. The combat experience in Reunion suggests that a complementary formation is required. More capable and survivable than normal infantry, but with a greater output of anti-personnel fire than the equivalent mass of combat mechs.

While combat continues, the battlecruiser Kirishima moves to the known Dominion colony on Reunion-A III. While the battlecruiser is larger than the light cruisers, it has not been refitted for some time and is still equipped with ion engines and fire controls with a maximum range of 256,000 tons. It will use its advantage of greater armour mass to draw fire, so the light cruisers can target any defences from long-range.

Kirishima comes under fire at 128,000 km, suffering nine strength-4 hits. She immediately reverses course and returns fire, halting at 185,000 km where she appears to be out of range, but can still engage with both her primary armament of 25cm lasers and her secondary 12cm turrets. Once those STOs that can be detected have been eliminated, she moves closer to the planet and takes a barrage of fire at 15,000 kms, which inflicts forty-eight strength-1 hits. Kirishima opens the range and begins firing once again, swiftly eliminating the new threat. Her armour is damaged, but not critical, with only a single penetration deeper than forty percent of her armour belt.

20th January 1984
The comet colony falls to the Kurogane Samurai division, without the loss of any combat mechs, although the regiments have exhausted their supplies.

25th January 1984
As one invasion ends, another begins. The 2nd Kurogane Samurai division, the only other combat mech formation in the Imperial Army, is unloaded on Tarawa II to confront the Zuijin defenders. Although the Xiamen may have eliminated the Zuijin fleet in Tarawa, the real prize is on the surface. The opposing force appears to be relatively small, with a signature of 3,100 tons. However, the dominant terrain is jungle-covered mountains, making this a difficult environment in which to fight and one in which an well-fortified opponent is well-concealed, both from detection and targeting scanners. The real size of the Zuijin ground force is likely to be many times larger.

The environment proves as difficult as feared. Within the first twenty-four hours, the invading force fails to destroy a single Zuijin bot or mech, while losing a Kaenryu combat mech to hostile fire. There are four infantry divisions that could support the assault on Tarawa, but two are already en route to the Saint Helena system to support a planned attack by the Kido Butai. The other two are available, but restricted by a lack of transport capacity.

The Imperial Japanese Navy has six large troop transports capable of transporting a division: three drop-capable Yasukuni class and three older Sagami Maru class. One Yasukuni is in Reunion, after transporting the 1st Kurogane Samurai Division to the Bloodclaw comet colony, and the other two are transporting the two divisions en route to Saint Helena. The three Sagami Maru class ships are already in Tarawa: one transported the 2nd Kurogane Samurai Division and the other two still holding three engineer regiments, three xenoarchaeology regiments and two shore batteries for deployment on Tarawa II after it is secured.

There is also the Shinshu Maru class of nine small troop transports, which have capacity for a single regiment, but are still equipped with gas core drives and capable of only 1500 km/s. They are used for lower priority tasks, such as delivering shore batteries or geosurvey regiments. Five are in Earth orbit, with the other four already assigned to various tasks. These five ships are ordered to load the 2nd Infantry Division, plus additional logistics units, and proceed to Tarawa, but will not arrive for four months. Two of the three Sagami Maru ships in Tarawa are ordered to drop off their transported formations to a temporary base on Tarawa III and return to Earth. One will remain in case a decision is made to withdraw the 2nd Kurogane Samurai Division.

Meanwhile, salvage operations have been underway in the Tarawa system, with Kamakura Maru competing with a much smaller Xiamen vessel. Three larger wrecks and several Ghost class FACs have been salvaged by the Xiamen ship, while Kamakura Maru has salvaged the rest, including two Xiamen ships and a single Covenant wreck, albeit of older technology.

26th January 1984
Asakaze investigates a jump point in Amirante, one transit outward from Reunion. As the Bloodclaw Dominion is hostile and Asakaze does not have an Aichi scout in her hangar, a A2M3 ‘Shinden’ fighter conducts the transit, while Asakaze holds the jump point open. The fighter emerges in a system with a planetless F5-V star, designated as Zanzibar, and discovers a large fleet of over thirty Bloodclaw ships stationed on the jump point, ranging in size from 34,000 tons to 180,000 tons, plus a single ship of 9,100 tons, designated as Indochinese Leopard class. There is no immediate hostile fire,, so assuming that the 9000-ton ship is the only likely warship, the fighter locks on target and waits for jump shock to wear off.

Moments later the entire Dominion fleet transits into Amirante. Asakaze launches her other fighter and her single Nakajima B1N 'Ryūsei' with orders to attack the Leopard, while requesting help from the adjacent Reunion system. All three Nagara light cruisers break orbit of the recently captured comet colony and set a course for the Amirante jump point. The Bloodclaw ships cannot re-transit due to jump shock, so they run, with the Indochinese Leopard leading the way at 5583 km/s. It is the only ship with military engines and presumably a missile ship that is out of ordnance, or perhaps a scout design.

The second A2M3 gives chase, while the first cannot yet return due to jump shock. The B1N launches a pair of first generation Rakurai anti-ship missiles, one of which inflicts a strength-12 hit on the Leopard, penetrating its armour and reducing its speed by a third. The ease with which the ship was damaged, suggests it is more likely a scout than a missile combatant. The pursuing A2M3 ‘Shinden’ continues to fire on the Leopard. The other A2M3 finally recovers from jump shock and transits into Amirante, choosing a 36,518-ton Bornean Bay class as its target, due to the fact it is the fastest of the commercial-engined ships, although it cannot yet fire due to new jump shock effects.

Both the Indochinese Leopard and the Bornean Bay reverse course, attempting to return to the Zanzibar system. Neither makes it. The Indochinese Leopard suffers a large secondary explosion and disintegrates, while the Bornean Bay surrenders after coming under attack. After the loss of the Leopard, every Dominion ship changes course and heads back toward Zanzibar

Bornean Bay class Freighter      36,518 tons       105 Crew       435 BP       TCS 730    TH 1,000    EM 0
1369 km/s      Armour 1-98       Shields 0-0       HTK 40      Sensors 0/0/0/0      DCR 1-0      PPV 0
MSP 7    Max Repair 50 MSP
Cargo 25,000    Cargo Shuttle Multiplier 3   
Kaigun-Shōsa    Control Rating 1   BRG   
Intended Deployment Time: 3 months   

Dafor P200.00 Civilian Drive (5)    Power 1000    Fuel Use 3.04%    Signature 200    Explosion 4%
Fuel Capacity 150,000 Litres    Range 24.4 billion km (205 days at full power)

The two fighters do their best to slow the progress of the Bloodclaw ships, but they have limited firepower and every remaining ship manages to transit. One A2M3 transits into Zanzibar, while the other remains in Amirante. They will remain in their respective systems to avoid further issues with jump shock while they try to damage as many ships as they can while their weapons hold out. The three light cruisers from Reunion are nine days away.

The fighter in Zanzibar destroys a 36,000 ton Cheetah class ship before it runs out of maintenance supplies and is forced to return to Amirante and land on Asakaze. The other fighter transits into Zanzibar and continues the attack, achieving the destruction of a 66,000 ton Cougar before suffering a weapon failure and also returning to Asakaze. For some reason, possibly the destruction of their comrades in Amirante, the Bloodclaw ships do not attempt another transit and instead runs into the depths of the Zanzibar system.

After repairing their weapons in Asakaze’s small hangar bay and replenishing their maintenance supplies, the two fighters conduct another attack, destroying two ships before resupplying once. This cycle continues, moving further from the jump point, until all but fourteen Cougar class ships of 66,000 tons remains. The Cougars are fleeing at only 363 km/s, except for one crippled vessel near the jump point, which suggest they may be some type of resource-gathering ship, Asakaze monitors their position, but they are otherwise left alone until the light cruisers arrive, as they have boarding capability.

4th February 1984
The light cruisers Nagara, Naka and Yura arrive in Zanzibar. Two have Raiden Sentai detachments, comprising forty Kazuma Raiden boarding troops, equipped with powered armour and the Nambu Type 36 Machine Gun. Nagara has a detachment of unarmoured marines, with older weapons, which she dispatches to board the damaged Cougar near the jump point, while the other two ships head after the thirteen Cougars still fleeing the area.

Resistance to the marines is unexpectedly heavy. The detachment was understrength anyway, with only thirty-four personnel. Within three minutes of boarding the Bloodclaw vessel, fifteen are dead and so are sixty-one of the crew. The other two light cruisers reverse course and head back to assist. By the time the Kazuma Raiden join the marines, there are only eleven remaining.

The arrival of the two Raiden Sentai detachment completely transforms the boarding operation. Within two minutes of arriving, they have killed two hundred crew and captured the ship without suffering a single loss. The Cougar turns out to be a small civilian fuel harvester. As the forces at Mauritius Base are effectively cut-off from the rest of the Empire of Japan, due to deteriorating relations with the Followers of Zharov, the securing of a local fuel production capability will be extremely welcome, although as yet no suitable gas giant in the area has been discovered. The Raiden Sentai return to Naka and Yura and prepare for a series of further boarding actions to secure the undamaged Cougars. As Nagara no longer possesses an effective boarding detachment, she returns to Reunion to provide support for the planned assault on the Bloodclaw colony on Reunion-A III. Asakaze also heads for Reunion to continue her gravitational and geological surveys.

5th February 1984
Boarding operations have been underway for several hours, with two more harvesters captured for the loss of six Kazuma Raiden, when events in the Zanzibar system take an unexpected turn. Sensor emissions are detected from an alien ship of a previously unknown race, located approximately equidistant from the jump point and the boarding operations. The ship, designated as Sigurd class, is travelling at 6000 km/s on a direct course for the Amirante jump point. Nagara, already in the Amirante system, reverses course and heads back to the Zanzibar jump point. Asakaze is heading for the same jump point from the Zanzibar side and is just over a hundred million kilometres from the alien ship. She launches one of her fighters on an intercept course.


Despite initial occasional contact, the alien ship vanishes for several hours and the fighter is unable to locate it, so it moves to the jump point and waits. Eventually, ten hours after initial contact, the Sigurd class ship moves within the fighter’s limited sensor range as it closes on the jump point. In that time, Naka and Yura have captured a further four Bloodclaw fuel harvesters. Asakaze and Nagara are still heading to the jump point from either side, but neither is in sensor range yet. After remaining on the jump point for approximately ninety minutes, the Sigurd transits into Amirante, where it is detected by a buoy left by Asakaze.


Six hours after transiting, the Sigurd class ship departs the jump point on an apparent course for the Reunion jump point. By this point, Nagara is within active sensor range, so she begins shadowing the alien ship. Meanwhile, in Zanzibar, Naka and Yura complete the capture of the remaining ships, although the Raiden Sentai suffer forty percent casualties in total during the many boarding actions. Both light cruisers head for the Amirante jump point, while the survey cruiser Asakaze begin a survey of Zanzibar to locate the entry jump point of the Sigurd. The Reunion survey will be resumed afterwards. The captured fuel harvesters are all out of fuel, so will have to remain in Zanzibar until the replenishment ship Kyokuto Maru arrives from Mauritius Base.

A few hours later, the Sigurd reaches the position of the captured Bornean Bay class freighter, then reverses course and heads back to the Zanzibar jump point. It appears that rather than moving to the Reunion jump point, the alien ship was investigating the freighter, which happened to be on a course to Reunion. This suggests the alien ship is a scout and Amirante might be the furthest point to which the new alien race has explored. If they do find Reunion, that will put them in contact with both the Bloodclaw Dominion and the Followers of Zharov, both of which have colonies in the system, although the ownership of the Dominion colonies may change in the near future.

10th February 1984
The Sigurd returns to Zanzibar and moves to the captured harvesters, presumably continuing its investigation of recent sensor contacts. Nagara continues to shadow the alien ships, but is down to fifty percent fuel so will not be able to maintain the pursuit indefinitely. While the aliens have shown willingness to attempt communication with the Japanese light cruiser, progress has been extremely limited.

20th February 1984
Due to concerns over fuel, Nagara lost contact with the Sigurd several days ago and took up station on the Zanzibar – Amirante jump point. A second ship of the Zanzibar aliens, designated as Edda class, is detected in Zanzibar on a heading for the Amirante jump point. The Edda, 6,100 tons and moving at 5,527 km/s, appeared from the same direction as the initial contact with the Sigurd. Asakaze is attempting to locate their entry jump point. The Edda transits into Amirante and holds position on the jump point.

21st February 1984
The Kido Butai arrives in the Saint Helena system and sets course for the Zuijin fleet in orbit of the second planet. Due to refits and other commitments, no heavy cruisers are available and the Akagi class carriers Kaga and Zuikaku have replaced the Taihō and Junyō, reducing the number of strike craft by a third but adding an extra forty-eight Mitsubishi A3M 'Hayabusa' class fighters. The fleet has refuelled twice en route to reach Saint Helena. All fourteen ships proceed to within a hundred million kilometres of the planet, then the Carrier Striking Force holds position while the Main Force proceeds onwards, escorted by the carrier strikegroups.

Main Force
Yamato-Ha class Battleship: Katsuragi, Musashi, Shinano, Yamato
Nagato II class Battleship: Hyūga, Ise, Mutsu, Nagato

Carrier Striking Force
Taihō II-Ro class Carrier: Chūyō, Hiyō, Shinyō, Unryū
Akagi III class Carrier: Kaga, Zuikaku
144x Nakajima B2N 'Tenzan' class Carrier Strike
264x Mitsubishi A3M 'Hayabusa' class Fighter
8x Aichi E2A class Scout

On approach, the Main Force deals with several waves of sixteen laser torpedoes and a single wave of thirty. Once within five million kilometres, the B2N ‘Tenzan’ strike craft launch two hundred and eighty-eight Rakurai anti-ship missiles, targeting a Devastator class base and a Ravager escort cruiser, which are the only Zuijin ships armed with light missiles. Both targets are blown to pieces. The B2Ns head back to their carriers, while the Main Force closes on the Zuijin fleet.


Although the Zuijin defenders are theoretically powerful, with over 200,000 tons of warships, their missile ships cannot effectively penetrate the Kido Butai’s point defence, their light missile ships have been eliminated and their energy-weapon combatants are slower and have shorter range weapons. The Zuijin attempt to attack the Japanese battleships, but unlike the early days of Japanese expansion, they are now completely outclassed. The battle is a massacre. Once every last Zuijin warship has been hunted down and destroyed, the Main Force wipes out the surface-to-orbit weapons on Saint Helena II, leaving the planet open to ground assault.

26th February 1984
ELINT data from the Xiamen home world reveals that the People’s Republic is at war within the Sapporo aliens. This is very surprising as the two races are at least six transits apart, based on known detections, and the available routes pass through either the Velsharoon home world or via both Fiji and Truk. Either the systems beyond Saint Helena and Ascension connect to Xiamen space, or there is some other unknown route. The resurvey of the Sapporo system was abandoned after the Ascension jump point was located, but that survey will be completed to ensure there are no more back doors into the Empire of Japan.
10
Empire of the Stars / Re: Empire of the Stars - Updates Thread
« Last post by Steve Walmsley on September 06, 2024, 05:48:34 AM »
Note: This is the 1st of 4 posts today

3rd December 1981
The Aichi E1A3 scout running to the jump point in Ryūgasaki runs out of fuel. Yamakaze’s captain, Kaigun-Chusa Onohara Sadako, was executive officer of the carrier Hiryu during the Kido Butai’s battle against the Mizuchi in Sigma Draconis and refuses to leave the scout behind. He takes Yamakaze in-system until the scout can enter the survey cruiser’s hangar using only manoeuvring thrusters. As there is no sign of Mizuchi-Ha ships and Yamakaze is near a survey location, he decides to survey it en route back to the jump point. As Yamakaze moves within range, she detects a Mizuchi-Ha ship at the same location, designated as Python class. Apparently, the Mizuchi need to conduct gravitational surveys to locate jump points, which is a useful item of intelligence.

Kaigun-Chusa Onohara orders Yamakaze’s pair of Mitsubishi A2M3 'Shinden' fighters to launch and attempt to engage the Python. Simultaneously, the survey cruiser launches a Rakurai anti-ship missile from its internal launcher. Two energy impacts are registered close to the Mizuchi ship and the missile vanishes. The fighters follow up and begin strafing the Python without any defensive fire, so the missile was probably destroyed by some form of close-in weapon system. The Python attempts to run, but has a maximum speed of 4500 km/s and is soon destroyed by the fighters. Yamakaze immediately recovers her fighters and sets a course for the outer system.

12th January 1982
A Zharovian commercial-engined Moskva class of 17,600 ton is destroyed by light missiles, two million kilometres from the home world of the Mauritius aliens. A few hours later, the Followers of Zharov detect an Imperial Navy salvage ship crossing their home system en route to Mauritius, and issue a demand for it to leave immediately.

5th February 1982
Intelligence gained from the ELINT craft monitoring the home world of the People’s Republic of Xiama reveals the Xiamen have a negative, but not hostile, relationship with the Covenant of Velsharoon. Based on this new information, Imperial Naval Intelligence believes that the Covenant diplomatic ship was destroyed by the Xiamen, as previously thought, but the two races have managed to improve relations sufficiently from that low point to avoid an all-out war. It was likely a fortunate happenstance that neither side had any additional ships in close contact at the moment of the diplomatic ship’s destruction, giving them time to negotiate a truce.

7th February 1982
After refuelling at the Fomalhaut Naval Base, the Kido Butai arrives in Ryūgasaki. The survey cruiser Yamakaze is still in the outer system, conducting a gravitational survey. Kaigun-Shōshō Kurosawa Rai orders a trio of Aichi E2A scouts to probe the planets, moons and comets of the inner system in search of the Mizuchi-Ha. Meanwhile, the Support Force has been diverted from Hadano and is holding position in Sigma Tucanae at the  Ryūgasaki jump point.

Kido Butai – Kaigun-Shōshō Kurosawa Rai

Main Force - Kaigun-Taisa Sakubara Kogo
Yamato-Ro class Battleship: Musashi*, Yamato**
Nagato II class Battleship: Hyūga, Ise, Mutsu, Nagato
Takao II class Heavy Cruiser: Chōkai, Maya

Carrier Striking Force - Kaigun-Taisa Daishi Toru
Taihō II class Carrier: Junyō*, Taihō
Taihō II-Ro class Carrier: Chūyō, Hiyō, Shinyō, Unryū
Akagi III class Carrier: Soryu
216x Nakajima B2N 'Tenzan' class Carrier Strike
216 Mitsubishi A3M 'Hayabusa' class Fighter
3x Nakajima J1N 'Toryu' class Interceptor
40x Mitsubishi A2M3 'Shinden' class Fighter:
9x Aichi E2A class Scout

Support Force – Kaigun Taisa Suzuki Saya
Kongo II class Battlecruiser: Hiei*
Hayasui class Fleet Support Vessel: Harutsuyu, Hayashio, Hayasui


12th February 1982
As an E2A scout approaches Ryūgasaki V, it detects eight Mizuchi-Ha ships in orbit. Four are 11,293-tons and designated as Krait class. Three more designated as Mamba class and a single ship designated as Anaconda class are only detected by their powerful active sensor emissions. Two groups of seven ships, each consisting of three Sidewinders and three Rattlesnakes, all of 787 tons, plus a 667-ton Widowmaker, have closed on the scout from behind at 15,243 km/s, which is only fractionally slower than the Mitsubishi A3M ‘Hayabusa’. The Sidewinders open fire at 178,000 km, damaging the scout.

As the Mizuchi-Ha attack craft have a much greater weapon range than Japanese fighters, trying to pursue them with A3Ms would be very ill-advised. Due to the minimal speed advantage, they would be under constant fire for over three minutes before they could return fire. The Nakajima B2N2 'Tenzan’ carrier strike craft are slower and would quickly be run down and destroyed. If the alien attack craft cannot be lured into range, faster fighter and strike craft designs will be required.


The E2A is destroyed by a second volley without being able to determine anything further about the larger Mizuchi ships in orbit of Ryūgasaki V. The nightmare scenario for Kaigun-Shōshō Kurosawa is for the alien warships to be faster than his own battleships and possess longer-ranged weapons. Given the obvious high technology of the Mizuchi attack craft, that is a very real possibility. The other two E2As in the inner system are given the task of determining the size and speed of the Mamba and Anaconda classes, as they probe the other bodies in Ryūgasaki.

Two hours after the destruction of the first scout, an E2A detects two more Krait class ships and two 20,950-ton ships of a new type, designated as Diamondback class, in orbit of a comet over a billion kilometres from the primary. The scout stays well clear of the comet and heads in-system toward its next target.


Kaigun-Shōshō Kurosawa orders the Kido Butai in-system on a course for the Kraits and Diamondbacks. To avoid interception in deep space, Kurosawa instructs all ships to deactivate shields and active sensors. Three E2A scouts with active sensors are deployed in an ninety-degree arc, forty-five million kilometres ahead of the fleet.


14th February 1982
An E2A scout approaching Ryūgasaki III detects the same 3,549-ton Viper class ship that was originally detected by Yamakaze’s E1A3 in November 1981. The Viper is tentatively classed as a geological survey vessel. After moving past the alien ships, the E2A heads for Ryūgasaki I. En route, it detects active emissions from two new Widowmaker class attack craft on an intercept course at 15,243 km/s. The scout deactivates its sensor and runs.

The other remaining E2A has scouted Ryūgasaki II and is approaching Ryūgasaki V from the direction of the primary, attempting to learn more about the Mambas and Anaconda when it detects a further two Widowmakers, so it adopts the same strategy. Both scouts manage to evade their pursuers, then circle back to approach  Ryūgasaki V from two different directions, trying to get within range before using their active sensors.

15th February 1982
One E2A engages its active sensor and attracts the attention of the same Widowmakers, but manages to get close enough to Ryūgasaki V to achieve an active contact on the Mambas, which are 22,260 tons. They remain in orbit so there is no way to determine their speed. There is no sign of the Anaconda.


The first scout turns to run, while the second continues toward the planet from a different direction with sensors offline, finally engaging them at twenty million kilometres and finding the Mambas and the Widowmakers in orbit. With no sign the Mambas are going to leave their position, both scouts retreat and begin working their way back to the Kido Butai. A few hours later, the wreck of the E2A destroyed the previous day vanishes, which suggests that the Anaconda was the ship carrying out the salvage.

16th February 1982
The ELINT vessel operating in the Covenant home system gains complete intelligence on a Velsharoon missile destroyer class, including the capability of its missiles. While smaller than Imperial Navy ships, the El Dorado III appears to be extremely capable. The engine design is a generation ahead of Japanese technology, while the jammers are comparable to the most up-to-date Japanese designs . It is equipped with both shields and decoys and armed with twelve missile launches for Vindicator Anti-Ship Missiles. The Vindicator is faster than the latest Imperial Navy missile, the Rakurai-Ho, and has a much longer range.

El Dorado III class Missile Destroyer      11,601 tons       218 Crew       2,189.2 BP       TCS 232    TH 1,760    EM 1,590
7585 km/s      Armour 4-45       Shields 53-331       HTK 63      Sensors 11/0/0/0      DCR 3-2      PPV 32.4
Maint Life 0.44 Years     MSP 353    AFR 359%    IFR 5.0%    1YR 810    5YR 12,150    Max Repair 440 MSP
Magazine 746 / 84   
Sheikh    Control Rating 1   BRG   
Intended Deployment Time: 12 months    Morale Check Required   

Magnetic Fusion Drive  EP880 (2)    Power 1760    Fuel Use 19.07%    Signature 880    Explosion 10%
Fuel Capacity 450,000 Litres    Range 36.6 billion km (55 days at full power)
Theta S53 / R331 Shields (1)     Recharge Time 331 seconds (0.2 per second)

Size 21 Decoy Launcher (4)     Decoy Size: 21    Hangar Reload 229 minutes    MF Reload 38 hours
Size 9 Missile Launcher (30.0% Reduction) (12)     Missile Size: 9    Rate of Fire 720
Missile Fire Control FC116-R112 (2)     Range 116.9m km    Resolution 112   ECCM-3
Devastator Ship Decoy (4)    Signature: 4200 tons    ECM-3    Size: 21
Vindicator Anti-Ship Missile (82)    Speed: 42,400 km/s    Range: 94.1m km    WH: 9.001    Size: 9    TH: 186/111/55

Active Search Sensor AS101-R112 (1)     GPS 14112     Range 101.2m km    Resolution 112
Thermal Sensor TH1-11 (1)     Sensitivity 11     Detect Sig Strength 1000:  26.2m km
Electronic Warfare Jammers:   Fire Control 3    Missile 3   

18th February 1982
In Ryūgasaki, the E2A preceding the Kido Butai detects the two Krait and two Diamondback class ships, running away from the comet where they were detected a few days previously at a speed of 2,982 km/s. This is so much slower than any other Mizuchi-Ha ship that Kaigun-Shōshō Kurosawa believes the Diamondbacks may be some form of Mizuchi commercial vessel. Based on the size of the Krait and its appearance in both fleets detected so far, he suspects it is an escort vessel, similar to the Barracuda class of the original Mizuchi, which had only short-range weapons.


The Kido Butai splits into two, with the Main Force closing on the fleeing Mizuchi ships and the Carrier Striking Force falling half a million kilometres astern. At 320,000 km, the Main Force opens fire on the two Kraits. The inaccuracy of that initial fire reveals the Mizuchi-Ha have fourth generation fire control jammers. One Krait suffers two strength-2 hits and immediately breaks formation to charge toward the Kido Butai at 10,875 km/s. The speed of its approach confirms Kaigun-Shōshō Kurosawa’s concerns about the danger posed by this new species of Mizuchi.

Kurosawa orders a course reversal to reduce the rate of closure, while all ships focus on the single Krait class. With the entire Main Force firing, it is blown to pieces by two salvos, with the second at a range of 140,000 km. At no point did the Krait open fire, which reinforces Kurosawa’s belief it is an escort vessel. The fleet reverses course once again and closes on the three remaining Mizuchi ships. The second Krait also reacts by breaking formation and survives long enough to open fire at 114,000 km, scoring four strength-1 hits on Yamato. It is destroyed by simultaneous fire from the same battleship. With both escorts eliminated, the two Diamondbacks are easily run down and destroyed, without any sign of defensive fire.

Given the fourth-generation jammers and high speed of the Kraits, Kaigun-Shōshō Kurosawa believes the chance of a being attacked by Mizuchi-Ha warships that can outrun and outrange his own battleships is significant. However, the Kido Butai has both fighters and carrier strike craft which could engage such enemies if they move within range. Also, with the fuel shortages plaguing the Empire of Japan, Kurosawa does not wish to expend precious resources without confronting the threat. Therefore, he decides to take the Kido Butai to Ryūgasaki V and attempt to engage the Mizuchi force near that planet. As before, the fleet will proceed with inactive sensors and shields, relying on the E2As to provide sensor readings.

19th February 1982
With the Kido Butai still over half a billion kilometres away, an E2A sneaks within twenty-five million kilometres of Ryūgasaki V and activates its sensors. The Anaconda has returned and the Mizuchi fleet has grown to four Kraits of 11,293 tons, five Mambas of 22,660 tons, plus the single Anaconda of 67,782 tons, almost as large as the Yamato class. Given the similarity of the Mizuchi-Ha Kraits to the Mizuchi Barracuda, Kaigun-Shōshō Kurosawa believes the Mambas may fulfil the same role as the Mizuchi Mako, which was armed with nineteen long-range acid-lasers.

All the Mizuchi warships suddenly break orbit, moving away at 10,839 km/s, while active emissions begin from two Widowmakers. The E2A disengages its sensors and runs, before circling around to approach the planet from the opposite direction. Twelve hours after the previous activation, the scout conducts another brief sensor sweep and finds that all the Mizuchi ships are back in orbit. Apparently they moved away from a potential threat, but returned once the threat vanished. The E2A slips away again and takes up a position sixty million kilometres away.

Taking a calculated risk, Kaigun-Shōshō Kurosawa orders the three E2As preceding the Kido Butai to disengage their sensors. Two are dispatched ahead to positions surrounding the planet, while the third drops back into the main formation. Meanwhile, the entire Kido Butai proceeds blindly toward Ryūgasaki V. With the fleet less than two hundred million kilometres away, sensor emissions from the Anaconda are detected moving toward the lurking scout.


The scout attempts to move out of the way, but is slower than the approaching ships. Shortly thereafter, the emissions of the Widowmakers return. They are considerably closer and on an intercept course. This time, the scout cannot escape. A large fleet of attack craft, comprising twenty Rattlesnakes, eleven Sidewinders, four Widowmakers and fourteen of a new type, designated as Asp class, are detected via their thermal emissions, less than four million kilometres away. They close in an destroy the fragile E2A with a single volley.

The Kido Butai arrives at Ryūgasaki V, where Yamato briefly activates her active sensor. There is no sign of any Mizuchi ships. Kaigun-Shōshō Kurosawa takes the fleet to the wreck of the scout to rescue the sole surviving crew member, then the Kido Butai sets course for the jump point. Just like in Sigma Draconis, the Mizuchi will not be lured or forced into an engagement. On this occasion, Kaigun-Shōshō Kurosawa does not want to replicate the tactics of Kaigun-Taisa Nakamura eleven years earlier, when he split the Kido Butai and attacked the Mizuchi from two directions. The Mizuchi-Ha are considerably more advanced, their attack craft are almost as fast as the Japanese fighters and the Kido Butai is missing two Yamato class battleships and six cruisers.

The Imperial Japanese Navy needs to develop new ships and tactics to counter the Mizuchi-Ha. In the meantime, the Fomalhaut Naval Base will be reinforced to deal with any Mizuchi-Ha that move from Ryūgasaki through Sigma Tucanae into Fomalhaut.

15th March 1982
A population of the Mauritius aliens is detected on a comet in the Reunion system. There are now two known colonies of the Mauritius aliens in the system, plus two Zharovian colonies.

16th March 1982
The first Fukuju class Repair Ship is completed in Earth orbit. The Fukuju will allow the repair of ships up to 54,000 tons at forward bases and will become part of the Support Force of the Kido Butai.

Fukuju class Repair Ship      175,524 tons       3,196 Crew       9,311.5 BP       TCS 3,510    TH 7,680    EM 0
2187 km/s      Armour 1-279       Shields 0-0       HTK 294      Sensors 8/11/0/0      DCR 1-0      PPV 0
MSP 33    Max Repair 120 MSP
Kaigun-Shōsa    Control Rating 1   BRG   
Intended Deployment Time: 3 months   
Repair Capacity: 54000 tons

Koga-Murakama KC-384-B Magneto-plasma Drive (20)    Power 7680    Fuel Use 2.48%    Signature 384    Exp 4%
Fuel Capacity 1,500,000 Litres    Range 62 billion km (328 days at full power)

Type 35 Go-13D Navigation Sensor (1)     GPS 2520     Range 42.3m km    Resolution 120
Type 35 Go-63C Passive Sensor (1)     Sensitivity 11     Detect Sig Strength 1000:  26.2m km
Type 33 Go-53C Passive Sensor (1)     Sensitivity 8     Detect Sig Strength 1000:  22.4m km

26th April 1982
The survey cruiser Oboro transits a newly discovered jump point in Guadalcanal, the home system of the People’s Republic of Xiama, and discovers Rua Sura, a system comprising a red dwarf star, two unremarkable planets and a scattering of asteroids.

27th April 1982
A significant exchange of fire is detected close to the home world of the Mauritius aliens, with almost a thousand energy weapon impacts detected within a few seconds. A number of Zharovian ships were detected entering Mauritius from both Zharov and Reunion within the past few days, but there is no sign of either a wreck or life pods, which is unexpected after such a fierce engagement. The observing ship is Kimikawa Maru, a Japanese salvage ship accompanied by two freighters, which has been testing the limits of the planet’s detection capabilities. It is currently waiting out of sensor range until the planet orbits far enough away to allow salvage of four Zharovian wrecks left behind from a previous engagement.


Within a few seconds of the first exchange of fire, a further seven hundred energy weapon impacts are detected, along with thirteen hundred strength-1 detonations. There are still no life pods. Finally, after yet another thousand detonations and several hundred impacts, the 165,880 ton wreck of a Zharovian Stavropol class ship appears, along with accompanying life pods. Given its size, the amount of punishment it was able to take and previous observation of its commercial engines, it is possible the Stavropol is a large, armoured troop transport. If so, it may have successfully landed ground forces on the Mauritian home world.


Explosions and energy weapon impacts continue, but moving away from the planet. After a minute of sustained fire, four more Stavropol wrecks have appeared, each one further from the planet than the previous wrecks. If they were troop transports, they are likely to have already delivered their cargo. As the planet orbits away from the scene of the battle, Kimikawa Maru dispatches one of her freighters to pick up the Zharovian life pods.

As a result of questioning the Zharovian survivors, intelligence is gained on the Chefornak III class troop transport. Once again, an alien race has superior engine technology to the Empire of Japan. In addition, if the larger Stavropol is indeed a troop transport, this could even be an obsolete design.

Chefornak III class Troop Transport      128,797 tons       680 Crew       5,501.3 BP       TCS 2,576    TH 5,400    EM 0
2096 km/s      Armour 8-227       Shields 0-0       HTK 303      Sensors 11/11/0/0      DCR 1-0      PPV 0
MSP 26    Max Repair 200 MSP
Troop Capacity 60,000 tons     Drop Capable    Cargo Shuttle Multiplier 4   
Lieutenant Commander    Control Rating 1   BRG   
Intended Deployment Time: 3 months   

Commercial Magnetic Fusion Drive  EP360.0 (15)    Power 5400    Fuel Use 0.80%    Signature 360    Explosion 3%
Fuel Capacity 1,250,000 Litres    Range 217 billion km (1198 days at full power)

CIWS-200 (2x10)    Range 1000 km     TS: 20,000 km/s     ROF 5       
Thermal Sensor TH1-11 (1)     Sensitivity 11     Detect Sig Strength 1000:  26.2m km
EM Sensor EM1-11 (1)     Sensitivity 11     Detect Sig Strength 1000:  26.2m km

13th May 1982
Full communications are established with the Mauritius aliens, due to the work of a diplomatic ship orbiting an one of their colonies in the Reunion system. The aliens are humanoid in shape, resembling lean, but muscular felines with dark skin and orange fur and refer to themselves as the Bloodclaw, with the name of their polity being the Bloodclaw Dominion. Their demeanour is arrogant and aggressive, despite suffering attacks on their home world by the Followers of Zharov. Before communications were established, the diplomatic ship received several unintelligible communications, which were interpreted as demands to leave the Reunion system. Two similar communications were received by Kimikawa Maru in Mauritius.


26th May 1982
The survey cruiser Miyuki transits a jump point in New Georgia, four transits out from Hadano on the far side of known Xiamen space, and discovers the Rabaul system. The yellow G8-V primary is orbited by seven planets, two of which have breathable atmospheres and liquid water. Miyuki investigates. While she finds no sign of life and no significant mineral deposits, she does discover an ancient construct on Rabaul II.  A pair of troop transports with Xenoarchaeological regiments depart Earth orbit on a seven month journey to the system.

20th June 1982
Once again, Kimikawa Maru attempts to salvage Zharovian wrecks in Mauritius. She receives a communication from the Bloodclaw Dominion to leave the system or be fired upon. As there has been no recent sign of Bloodclaw ships, outside the orbit of their home world, she is given permission to continue with the salvage. The potential technology gains from the Zharovian wrecks is greater than the threat from an alien race well outside Japanese territory. The diplomatic ship in the adjacent Reunion system moves to a safe distance from the Bloodclaw colony, while three Nagara III-Ni class light cruisers are dispatched from Sol to Fiji, on the first leg of a journey through Zharovian space to support the salvage operation.

26th July 1982
Intelligence gained from ELINT observation of the Zharovian home world provides gravitational survey data on Ekarma, a system six jumps outward from Fiji with six jump points. The survey cruiser Asakaze was already at work in the system, so she immediately begins probing the new jump points.

9th September 1982
ELINT data gained from the home world of the Bloodclaw Dominion reveals the existence of a system named Lancia, which has an ideal habitable world and several wrecks. It’s location is unknown. The data also provides information on the home world itself, which had a population of 2.13 million and 4700 installations, smaller than the home worlds of the other known major alien powers.

10th September 1982
A survey of the ancient construct in the Naha system, two jumps out from Fomalhaut, reveals it will boost research into sensor systems by up to ninety percent. There is already an ancient construct on Osaka-B I with an eighty percent boost and twenty research facilities in operations. Given the distance of Naha, it is not worth the logistical challenges to relocate from Osaka, but a small colony will be established to activate the construct, which will add a small boost to sensor research across the Empire.

22nd September 1982
The light cruisers Nagara, Naka and Yura arrive in the Mauritius system, after refuelling three times en route; once at Fiji and twice at pre-positioned replenishment ships. The Bloodclaw Dominion ceased demands to withdraw several weeks ago, despite Kimikawa Maru salvaging nine Zharovian wrecks within sensor range of their home world, which suggests they already regard the Empire of Japan as a hostile power. The three light cruisers close in on two Bloodclaw ships, designated as Serval and European Lynx classes, recently detected near the Reunion jump point. Both ships have been moving at only 1 km/s for some time, suggesting they are badly damaged. All three cruisers launch their boarding troops, comprising two Raiden Sentai and a Naval Landing Force, against the Lynx, but they find the armour to be undamaged. After blasting through it with breaching charges, boarding combat begins. If the Bloodclaw Dominion didn’t previously view itself as being at war with the Empire of Japan, it does now.

The ship is secured four minutes after the armour is breached, with the loss of three marines and one of the Kazuma Raiden. There is no apparent damage except for the breached armour, but the ship is entirely out of fuel. Fortunately, Kyokuto Maru, a Japanese replenishment ship already in Mauritius, supporting the salvage operation at extreme range from Earth. The Eurasian Lynx is a 16,244 ton missile ship with magneto-plasma drives that has expended all its ordnance, presumably against the Followers of Zharov. Once refuelled, it will travel to Earth for dismantling.

Eurasian Lynx class Missile Destroyer      16,244 tons       301 Crew       2,444.8 BP       TCS 325    TH 1,696    EM 0
5220 km/s      Armour 5-57       Shields 0-0       HTK 89      Sensors 8/0/0/0      DCR 5-3      PPV 69.3
Maint Life 0.47 Years     MSP 470    AFR 422%    IFR 5.9%    1YR 1,004    5YR 15,061    Max Repair 424 MSP
Magazine 1,362 / 52   
Kaigun-Chūsa    Control Rating 1   BRG   
Intended Deployment Time: 12 months    Morale Check Required   

Magneto-plasma Drive  EP848 (2)    Power 1696    Fuel Use 21.72%    Signature 848    Explosion 10%
Fuel Capacity 600,000 Litres    Range 30.6 billion km (67 days at full power)

Size 26 Decoy Launcher (2)     Decoy Size: 26    Hangar Reload 255 minutes    MF Reload 42 hours
Size 7 Missile Launcher (30.0% Reduction) (33)     Missile Size: 7    Rate of Fire 795
Missile Fire Control FC89-R120 (1)     Range 89.1m km    Resolution 120   ECCM-2

Active Search Sensor AS77-R120 (1)     GPS 11520     Range 77.1m km    Resolution 120
Thermal Sensor TH1-8 (1)     Sensitivity 8     Detect Sig Strength 1000:  22.4m km
Electronic Warfare Jammers:   Sensor 2    Fire Control 2    Missile 2   

The three light cruisers recover their boarding troops and launch a new assault on the Serval. This time, they find easy access through the armour as the ship is badly damaged. Four marines and three Kazuma Raiden are lost in action before the ship is secured. The Serval is also a missile ship, but with a fire control and active sensor designed to detect and engage fighters. As with the Lynx, all its fuel and ordnance has been expended, along with its maintenance supplies. The damage is extensive, with both engines disabled and two thirds of the missile launchers inoperative. The Bloodclaw Dominion may appear to be losing its war against the Followers of Zharov, but it is not going down without a fight.

Serval class Missile Destroyer      16,244 tons       301 Crew       2,444.8 BP       TCS 325    TH 1,696    EM 0
5220 km/s      Armour 5-57       Shields 0-0       HTK 89      Sensors 8/0/0/0      DCR 5-3      PPV 69.3
Maint Life 0.47 Years     MSP 470    AFR 422%    IFR 5.9%    1YR 1,004    5YR 15,061    Max Repair 424 MSP
Magazine 1,362 / 52   
Kaigun-Chūsa    Control Rating 1   BRG   
Intended Deployment Time: 12 months    Morale Check Required   

Magneto-plasma Drive  EP848 (2)    Power 1696    Fuel Use 21.72%    Signature 848    Explosion 10%
Fuel Capacity 600,000 Litres    Range 30.6 billion km (67 days at full power)

Size 26 Decoy Launcher (2)     Decoy Size: 26    Hangar Reload 255 minutes    MF Reload 42 hours
Size 7 Missile Launcher (30.0% Reduction) (33)     Missile Size: 7    Rate of Fire 795
Missile Fire Control FC30-R5 (1)     Range 30.9m km    Resolution 5   ECCM-2

Active Search Sensor AS26-R5 (1)     GPS 480     Range 26.7m km    Resolution 5
Thermal Sensor TH1-8 (1)     Sensitivity 8     Detect Sig Strength 1000:  22.4m km
Electronic Warfare Jammers:   Sensor 2    Fire Control 2    Missile 2   

While Kyokuto Maru can provide fuel and maintenance, the Serval cannot repair its own engines, so a tug will be required to conduct a hundred billion kilometre round trip to bring the Serval back to Earth. Given the recent developments in Mauritius, Daigensui-Kaigun-Taishō Takagi decides that if a tug is going to be heading there anyway, it may as well bring a maintenance base to establish a permanent outpost, either in the system or nearby. He also orders the Akagi class carrier Zuiho and the repair ship Fukuju to be forward deployed to Fiji.


1st January 1983
A large battle near the home world of the Bloodclaw Dominion has resulted in the destruction of seven Zharovian ships; two 155,866-ton, commercial-engined Dzerzinsk class, two 17,382 Saransk class and three 13,523-ton Bratsk class. The salvage ship Kimikawa Maru has no accompanying freighters as both are en route to Fiji to deliver minerals and ship components from previous salvage operations. New freighters are en route to Mauritius, along with the salvage ship Kasuga Maru. Additional freighters and a colony ship are transporting infrastructure and colonists to establish a small colony on Mauritius I, while the Occupation Force of the Kido Butai is moving through Zharovian territory with ground forces, surface to orbit weapon batteries and several engineer regiments. The Imperial Japanese Navy will soon be able to establish a permanent presence in the Mauritius system.

8th January 1983
Another battle takes place at the Bloodclaw Dominion home world, with the Zharovians losing two more Dzerzinsk class and a pair of 21,674 ton Archangelsk class ships. If the Dzerzinsk are troop transports, like the Stavropol class ships destroyed in April 1982, the Followers of Zharov are making a serious effort to land ground forces. The defences appear to be primarily light missile armed bases, backed by short-range energy weapons. While the Zharovians are taking heavy losses, the Dominion may eventually run out of ordnance.

The Japanese diplomatic ship in Mauritius rescues the survivors of the battle, once the planet has moved away. Interrogations reveal that the two jump points discovered in the Zharov system by a partial survey are the only two that exist, removing any need to risk a diplomatic incident by completing the survey.

4th March 1983
Two new commercial-engined ships of the Bloodclaw Dominion, a 19,000-ton Jungle Cat and a 32,000-ton Sri Lankan Leopard, are launched from its home world and head straight for the Reunion system. As soon as they enter, they are both destroyed by a group of Zharovian warships waiting on the far side of the jump point.

25th March 1983
There has been no sign of any ships from the Sapporo aliens for some time. The black hole system beyond Sapporo has been surveyed and four outward jump points explored. There has been no sign of colonies, ships or even stable jump points. Therefore, a resurvey of Sapporo is authorised to check for the presence of a previously dormant jump point.

8th May 1983
The survey cruiser Fubuki has been destroyed by the Bloodclaw Dominion in the Reunion system. Fubuki, along with the larger survey cruiser Asakaze, was conducting a survey of the system and encountered a Bloodclaw colony on a comet. Surface-to-orbit weapons based at the colony opened fire and destroyed the Imperial Navy ship. Until this point, the limit of the Bloodclaw’s aggression was harsh language. Now their actual hostility is confirmed, the Dominion colonies in Reunion will be attacked, once the Imperial Navy base in their home system is established. Twenty-four hours later, Asakaze narrowly avoids a similar fate when she detects another Dominion population as she approaches a different comet.

4th June 1983
The tug Rokkai Maru arrives at Mauritius I to deliver a Yokosuka class maintenance base, completing a fifty-four billion kilometre journey from Earth, most of which was through Zharovian territory, including their home system. Other vessels that made the long journey, refuelling at Fiji and again at a covert refuelling point in the Kharimkotan system, include a dozen freighters, a colony ship, three large troop transports, two replenishment ships, the fleet support vessel Hayasui, two salvage ships and the old battlecruiser Kirishima. Three Nagara class light cruisers and a diplomatic ship were already in place. The Followers of Zharov issued several warnings as the various ships transited their home system en route to Mauritius, instructing them to leave immediately.

Mauritius I now supports a population of 500,000 and has a maintenance capacity of 90,000 tons – sufficient for Kirishima and the light cruisers. The freighters also brought minerals so that four engineer regiments can construct additional infrastructure. Four surface-to-orbit batteries were delivered, comprising a total of twenty-four 30cm lasers and twenty-four quick-firing 20cm lasers. The Imperial Navy now has a solid presence in the Dominion home system and a base from which it can launch raids against Bloodclaw shipping and Dominion colonies in the adjacent Reunion system. The Bloodclaw home world is the third moon of Mauritius II and is sufficiently close to Mauritius I for an F1M 'Kanmuri Tori' ELINT craft to monitor it while remaining in orbit of the new base.

26th June 1983
Two troop transports and ten freighters cross the Zharov system on their way back to Earth from Mauritius. They receive a warning to leave immediately, or be fired upon. This threat of hostile action is new and indicates that relations with the Followers have reached a new low, no doubt due to repeated Japanese violations of their territory. While the Imperial Japanese Navy will deal with the Followers at the appropriate time, that time is not now, so Daigensui-Kaigun-Taishō Takagi places a temporary ban on entry to the Zharov system. For the moment, the Imperial Navy forces in the Mauritius system are on their own.

A Zharovian salvage ship is competing with Kimikawa Maru in Mauritius to salvage the wrecks in that system and is requesting that the Japanese salvage ship leave the system. This was upgraded from a suggestion to a request at the same time as the threat in the Zharov system. This will be ignored unless the warning becomes more strident, but is another indication that the situation in Zharovian space is deteriorating.
Pages: [1] 2 3 ... 10
SMF spam blocked by CleanTalk